CT Wu

Software Architect · Backend · Data Engineering

Discover the fatal flaws that make Copilot’s agent mode unusable for serious tasks

GitHub Copilot was one of the earliest providers when the concept of vibe coding emerged. However, this glory was short-lived, as commercial software like Cursor and open-source software like Cline quickly overshadowed GitHub Copilot.

The fundamental reason is that Copilot’s AI functionality remained at the most basic level, namely auto-completion. However, Cursor and Cline had already entered the realm of Agentic AI, demonstrating how effortless it could be to delegate tasks to an agent for execution.

GitHub Copilot thus nearly disappeared from the battlefield. Until the latter half of 2025, Copilot finally introduced Agent mode, but by then it was already too late.

However, keeping the spirit of trying everything, I recently spent some time testing it out. After a week of use, my impression is that it’s really not good.

Major Problems

I will list two serious issues that I believe are most critical.

As for whether the effect is good or bad, or whether AI is intelligent, I believe that is no longer the point.

The worst issue, in my opinion, is that Copilot Agent is “almost” unable to obtain the results of executed commands.

I say “almost” rather than “completely” because for commands with extremely fast response times, such as ls, it works. However, for commands that take longer to execute, it is completely impossible to obtain the results, as it simply won’t wait for them.

In fact, this is not an isolated case; people are discussing this serious flaw in Copilot on various forums.

Just to list a few, but there are actually many more.

This means that you cannot rely on Copilot to perform many important tasks. These include, but are not limited to, the following common examples.

  1. Installing dependencies, such as pip install or npm install. These installations can take a significant amount of time, and sometimes we ask the Agent to analyze the output to help resolve dependency conflicts.
  2. Unit testing. This should also be easy to understand. Unit testing takes time unless you run them one by one. If Copilot can’t help us run unit tests, how can it help us fix bugs?
  3. Remote operations. This is a bit abstract but also common, such as asking the Agent to connect to a remote machine via SSH or to a container via Docker to execute commands and troubleshoot issues based on the results.

There are many other scenarios where the Agent’s inability to wait imposes limitations.

This is a fatal flaw.

We expect the Agent to be capable of anything, so we guide it through tools like MCP and other methods. But if Copilot can’t even handle the basic task of waiting for results, that’s truly tragic.

Task functionality missing

A task refers to breaking down a complex instruction into smaller, executable tasks and executing them in sequence like a to-do list, then summarizing the results.

Whether this functionality is explicit or not, it should be an essential feature. As I mentioned earlier, numerous papers have demonstrated that when LLMs are presented with overly large tasks, they can collapse, and even with countless tokens, progress cannot be advanced.

Therefore, whether it’s Cursor, Claude Code, or the open-source Cline, they have all incorporated this functionality, though the names may vary, the capabilities are similar.

Copilot, however, is still struggling to catch up as it slowly enters the world of agentic AI.

This directly results in Copilot performing poorly when faced with complex tasks, necessitating the use of various prompt engineering techniques to adjust the workflow. This undoubtedly increases the learning curve for users.

Some Mitigations

Is there a way to resolve Copilot’s mentioned challenges?

Yes, but the effectiveness is limited.

I made an attempt by using the LiteLLM Gateway to treat Copilot as a model provider and allow open-source frameworks like Cline or Kilo Code to directly leverage it.

Is it better? It is indeed more helpful.

These open-source frameworks can solve the two biggest problems mentioned above, but the downside is that they are prone to crashing. When dealing with specific tasks, they often fail to perform smoothly, especially when calling tools or using MCP.

After all, Copilot was not originally designed to be a model provider, and this means that even if the API format can be converted to OpenAI Compatible Format, its behavior still struggles in various scenarios.

Wrap Up

I have conducted in-depth research on various products, as I am an architect focused on AI implementation in enterprises. Therefore, I will conduct in-depth testing using the daily tasks of software engineers, and the insights gained should be quite accurate.

I spent a significant amount of time testing Copilot, and I can only say that Copilot is usable but not outstanding.

If your company provides Copilot as a resource, you can consider it a powerful programmer. When it comes to auto-completion, Copilot does have some capabilities. It can also provide real-time suggestions, and in small-scale scenarios, Copilot’s capabilities are definitely reliable.

However, if you want to fully integrate Copilot into the AI development workflow, Copilot is far from capable of handling that.

I will also provide my personal ranking. The following is based solely on commercial products; open-source software is not included due to different evaluation criteria. The ranking is based on my actual testing experience and is for reference only.

Kiro > Claude Code > Cursor = Rovo Dev >>> Codex >>> Gemini Cli > Github Copilot

From this ranking, it is clear that the top-ranked ones are all Claude’s models. As for the ones behind them, the results are really disappointing, especially the ones at the bottom, which are in a completely different league from the ones at the top.

Gemini CLI does not have the two serious flaws of Copilot, but Gemini CLI also has its own issues, which we may discuss another time.

Originally published on Medium

A powerful new AI agent for spec-driven development, all within your terminal

Recently, there have been several popular programming agents, namely Kiro, Claude Code, and mini SWE Agent.

Each of these agents has its own unique features and areas of expertise. I will briefly introduce these projects and then explain the side project I am currently working on.

However, to summarize, the side project I am currently working on was inspired by these three agents and developed further, combining the unique features of each agent while also possessing strong project development capabilities.

Kiro

Kiro is currently undergoing public review, and I had the opportunity to participate in this test. I have to say, the quality of the code written by Kiro far exceeded my expectations. This is a product that truly gives me confidence in using vibe coding in a production environment.

Kiro’s greatest advantage lies in its spec-driven development. It is the first product to divide the development process into four stages. When a request is broken down into requirements, design, planning, and implementation, we can collaborate with the agent to define the optimal “shape” for each detail.

As we engage in in-depth discussions with the agent at each stage, our role shifts from developer to project owner, resembling that of an architect. Review becomes a significant component of the development process, far more important than coding itself.

This design pattern fully aligns with the concept of context engineering. Each phase of the agent’s tasks is grounded in sufficient context, which on one hand limits the agent’s freedom to improvise, and on the other hand makes it easier for reviewers to understand the agent’s approach.

Just as in code reviews, we must first understand the coder’s design intent to conduct a review. Through the specification, we can precisely grasp the agent’s intent.

Claude Code

The standout feature of Claude Code is its complete reliance on CLI-based interaction, eliminating the need for human-agent collaboration to be integrated through a bulky IDE.

Additionally, Claude Code utilizes models based on Claude 4 or higher, allowing us to have greater confidence in the quality of the output. It is precisely because the model’s capabilities are sufficiently robust that we can confidently collaborate with the agent on development even in a CLI-only environment.

Of course, Claude Code is evolving rapidly, and its ecosystem is growing increasingly expansive. As a result, an ever-growing array of new features continues to develop and expand around this CLI-centric concept.

Mini SWE Agent

This project is less well-known, as it is not a commercial product and does not have any superpowers. However, it has a really special feature, as stated in its GitHub title.

The 100-line AI agent that solves GitHub issues and more

It can accomplish many complex tasks with minimal code, and its core functionality is based on SHELL. Essentially, shell is capable of handling any task, which is why the mini SWE agent relies solely on shell to perform its functions.

This design allows the mini SWE Agent’s core code to remain extremely concise yet highly effective.

SpecForge Agent

https://github.com/wirelessr/SpecForge-Agent

This is my recent side project, called SpecForge Agent.

This project combines the features of the three agents mentioned above to create an execution and thinking framework for open source solutions.

  • Spec-driven development: This project strictly follows the four-phase development process of requirements, design, planning, and implementation, which is the process learned from Kiro. During the requirements phase, the EARS standard is strictly applied, while the design phase clearly outlines the architecture and data flow.
  • CLI only: Like Claude Code, this project relies solely on CLI operations for the development process, eliminating all UI interactions. It truly achieves a CLI-only design, advancing all development processes through the CLI.
  • SHELL only: Since there is nothing a shell cannot do, in this project, I also tried to make the core guiding principle of the agent “shell-first.” If there is a need to use MCP, I did it this way: I turned the MCP client into a command-line tool so that the project knows how to execute it.

Through these three principles, the capabilities of the SpecForge Agent are far more powerful than I had imagined.

In addition, this project has the following features.

  • SpecForge Agent actively remembers what it thinks it needs to learn, and humans can also establish guidelines for it, as in the MCP example above. If we write the usage of the MCP command line into its memory, it will correctly call the corresponding tool.
  • Since spec-driven development uses a large number of tokens, it is easy for context overload to occur after multiple rounds of work. This phenomenon is also observed in Kiro, but manually compressing the context in Kiro is very cumbersome, so this project adopts automatic compression. When the context exceeds the threshold, SpecForge Agent will automatically initiate the compression process.
  • Most importantly, this project uses an OpenAI-compatible model, so it is compatible with OpenRouter or other free solutions.

During Kiro’s public review period, I will continue to optimize this project. While its current architecture is modular, there are still many redundant segments in between.

Furthermore, there is room for improvement in terms of functionality. I have implemented a quality testing framework to measure the quality of each output. After several rounds of optimization, we can see a significant improvement in performance.

However, there is still room for improvement, so I will continue to optimize the implementation phase.

If you have any ideas, please feel free to raise them in an issue. Of course, contributions are also welcome.

In the project documentation, I have clearly documented the entire project architecture and testing methods. I hope the quality of this project can reach a level where it can optimize itself.

Reference documents.

  • Project architecture and usage instructions

A message from our Founder

Hey, Sunil here. I wanted to take a moment to thank you for reading until the end and for being a part of this community.

Did you know that our team run these publications as a volunteer effort to over 3.5m monthly readers? We don’t receive any funding, we do this to support the community. ❤️

If you want to show some love, please take a moment to follow me on LinkedIn, TikTok, Instagram. You can also subscribe to our weekly newsletter.

And before you go, don’t forget to clap and follow the writer️!

Originally published on Medium

Discover why n8n’s visual workflow design beats Ansible for personal automation

Recently, n8n has been highly popular on the web, one of the reasons is riding on the AI trend, and the other is because n8n has an excellent GUI.

I used to use Ansible as my main workflow management tool, but I took the opportunity to try n8n for a couple of recent requirements, and I decided to give up ansible on the spot and use n8n only for personal use in the future. Why? Let’s check it out.

Before we get into the main topic, let’s talk about why we need a workflow management tool such as ansible or n8n.

When we have a task that we do over and over and over again, we can use a workflow management tool to automate this repeated operation.

There are many possible scenarios for duplication. For example, when we are doing an approval, and we receive a request for an approval, we will look up the data somewhere and then verify the eligibility of a certain place and then approve or disapprove it.

On the other hand, when we are managing many homogeneous systems, such as multiple k8s clusters, what we may do is to switch the kube context and then connect to it to find out the specific pod and then play the command to see the result. If there are 10 clusters, then do it 10 times.

Either way, it’s a duplication that can be automated with a workflow management tool.

What’s good about n8n?

Let’s use the above example to do a demo.

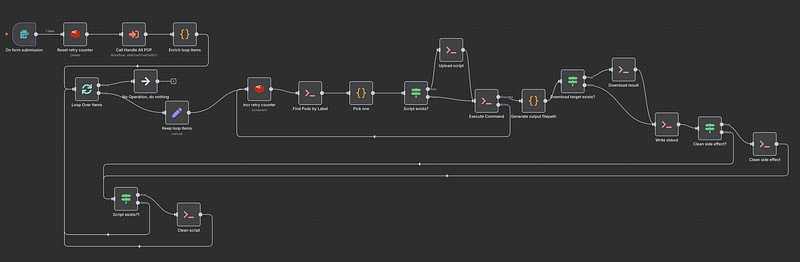
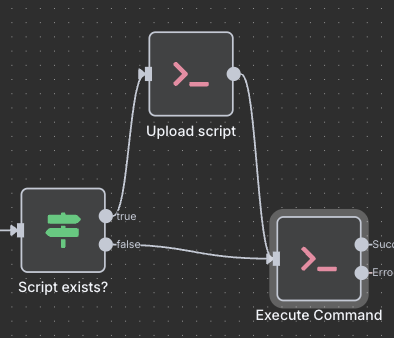
I need to upload a script to all k8s clusters that collects the state of a pod in each cluster. The collected state is stored in a csv file on the pod, so I have to download the results back. Each cluster has to do this cycle once, so here is my workflow.

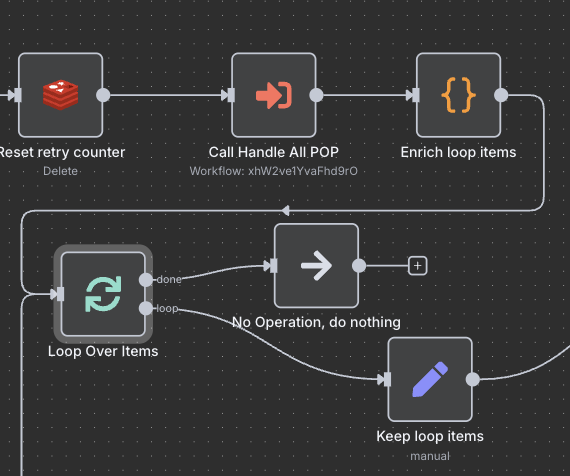
For those who are familiar with n8n, you can see that I don’t use any special node at all, it’s almost all Execute Command and Code nodes, and then interspersed with some control nodes, such as Loop and If.

This way the whole thing can be automated, I just need to use a n8n built-in form, yes, even the form can be automatically generated by n8n to input parameters and drive the whole process.

The parameters are just the label of the pod, and some file parameters, such as where to upload the script, where to upload the script to, where to download the file, and where to download the file to. If we feel the built-in form is not pretty, we can write our own webpage to do some file dialog, so we don’t need to write the path by hand.

You might say that ansible can do it, and that skilled people write ansible very quickly. In fact, I did start out using ansible. Don’t look at this workflow as simple, but ansible is a playbook of almost a thousand lines, mainly for the following reasons.

Whether you are uploading or downloading, remote or local, you need to determine if the file exists. Determining the existence of a file is not difficult, but passing the status in ansible is quite cumbersome. The state is passed through register, and we have to be careful to avoid repeating keywords, which can lead to hidden problems.

In addition to state passing, another big problem in ansible is the handling of loops. How to make a task fail with a retry, but continue to run after the retry fails, only to record the state so that it can generate a report on the execution. This is also a headache. It can be done, but it’s a bit of a pain in the ass.

Let’s take a look at the two scenarios mentioned above and see what they look like in n8n.

The last two nodes are Execute Command nodes, which are BASH nodes. What they’re trying to do is something like this.

1
2
3
4
5
6
kubectl exec   
--kubeconfig {{ $('Pick one').item.json.kubeconf }}
{{ $('Pick one').item.json.name }}
-n {{ $('Pick one').item.json.namespace }}
-c {{ $('Pick one').item.json.container }}
-- {{ $('Keep loop items').item.json.command }}

These variables framed in curly brackets are actually the outputs of the previous nodes, and I can specify which node I want to fetch which output from, or even just drag and drop it on the UI.

Another case is loop processing.

After the previous node generates the list of kube context, simply call a Loop node and iterate. Although n8n has its pitfalls in loop handling, for example, you need to have a node to enrich the loop items, otherwise the node after the Loop will not see the fixed constants.

But this is much easier to deal with than ansible.

Why did I abandon ansible?

Troubleshooting was the final straw for me.

When I write a huge ansible playbook and run it with high expectations, it fails. The reason for the failure is when the pod I’ve locked with a label in the previous step just dies, then all the subsequent steps will fail. It doesn’t matter, just let it pick the next pod and start again.

In fact, that’s what I was thinking. But I suddenly realized that I couldn’t change ansible much, because it’s too big and it was written without design, so it’s badly modularized. I didn’t know where to start with a round robin requirement. At that moment, I decided to switch to n8n.

I’m actually a newbie to n8n, I’ve never used it before, so I followed the instructions on the official website and installed it and started writing.

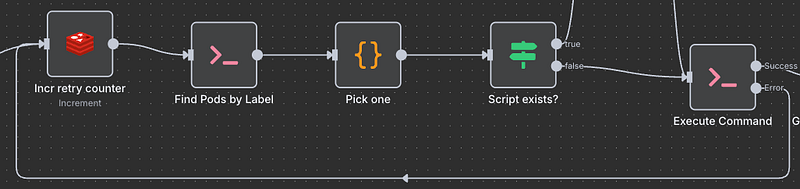
First, I reproduced the full playbook, which took me less than half a day to complete by dragging and dropping it through the UI. Then we came to implement the annoying round robin mechanism. That’s the fallback line you see in the workflow.

I simply used redis to make a counter to keep adding up, but during the Pick one phase I would mod the number of running pods, which simply created a round robin mechanism. It really only took me a few minutes to add this mechanism, which I believe is the biggest advantage of n8n.

How to test such a fast modification can really work, after all, there are not always pods going down, right? In n8n, there is a mechanism called mock output, which requires only one UI click to open and conduct localized tests on the workflow.

Indeed, there is a similar mechanism in ansible, but the workflow has to be well modularized, otherwise it’s hard to do something similar.

Wrap Up

Ansible is a great workflow tool, and I’ve always thought so.

But the premise is that each workflow must know the whole picture, and be well designed and modularized in order to respond to the subsequent needs.

In n8n, we don’t need that kind of design. A fancy UI solves a lot of problems. Take the partial test as an example, n8n is so easy to do partial test, each node can be executed individually, and even the output can be simulated directly.

If the workflow implementation process found that some processes are not taken into account, it is also an easy way to process change in the whole overview.

It can be said, a well-designed UI solves a lot of difficulties and complexity in ansible development, which is also the reason I abandoned ansible. Sometimes we have a quick idea that needs to be validated, and it’s extremely easy to implement a POC and iterate on the requirements on n8n.

However, on ansible, just the preliminary design phase alone will take a lot of time and effort.

Therefore, in the future, I can say as long as it’s a personal requirement, I will always prioritize n8n over ansible, which is what I’ve been using most often in the past.

Thank you for being a part of the community

Before you go:

Originally published on Medium

From a better terminal to AI scripting, here are my top 3 onboarding finds.

It’s been a month since I changed my job, and I’ve started to try out some new ways of working in this new journey, and I’ve also found some new joys in the process of exploring.

I’d like to take this second review to record the three tools that have helped me the most in this onboarding process. All of them are related to AI but not entirely because of AI.

The following order is in accordance with my personal level of amazement.

Warp

I’ve been a user of iTerm2 for a long time, but in fact I don’t use iTerm2 for anything special, just routine tasks like issuing commands and reading the results. A friend recommended Warp to me, so I thought I’d install it when I got a new laptop for my new job.

As a result, Warp really amazed me, the user experience of Warp is really great, the experience here is not even referring to Warp AI, but just a terminal. I’ll list a few features that I feel are excellent.

Column Selection Mode

The command ctrl+v should be familiar to vim users, and Toggle Column Selection Mode (shift+opt+left mouse click) is also available in VS Code. Warp also has this feature, which can be used either as ctrl+v or shift+opt+left mouse click, both of which are supported.

This is useful when copying and pasting a list of commands and modifying specific places.

Warp Drive

When it comes to copy and paste, we have to talk about the Warp Drive, which is a storage space integrated into the Warp interface that allows you to define a lot of frequently used commands.

I’m not sure what you’ve done in the past with terminal, but I’ve written down frequently used commands in a notepad and then copied and pasted them when I needed to use.

In Warp, it has this built in, so we don’t need to copy it elsewhere, and we don’t even need to paste the workflow (frequently used commands) written in the Warp Drive. We can define alias for each command, so we can call it directly by alias.

You may ask, isn’t it possible to write this in ~/.bashrc? The problem is that the terminal connects to all kinds of environments: docker, kubernetes, ssh, etc. This definition of alias on Warp works in all environments. There is no need to define the same ~/.bashrc everywhere.

Even if more than one computer is involved, the Warp Drive is shared and synchronized across all computers.

Warpify

I just mentioned that Warp Workflow can apply the same alias to each connection, how can it do that?

This is called Warpify, which is a kind of sub shell designed by Warp, that is to say, it holds a connected shell under the original shell, so it can share alias.

Copy Output

The last one is actually the function I use most often, copying commands and results.

This seems to be a very common thing, but it is not common at all. If the output of a command is very large, let’s say a thousand lines, how would you copy the result?

On iterm2 I do this by emptying the buffer, then re-running the command and selecting it in full (ctrl+a). That way I can copy all the results with the commands.

But in Warp, each line of instruction and output is in a separate cell, so with a single mouse click, we can copy the instruction and output this time, which is truly convenient.

In fact, there are a lot of interesting things about Warp, but the four mentioned above are the ones I use every day and feel the most deeply, maybe I’m already used to the other optimizations. None of these optimizations involve AI, in other words, they are free features. Anyway, welcome to try them out.

Docker MCP Toolkit

In the era of AI, a complete set of MCP tools should be indispensable for AI to have a strong impact.

However, setting up a bunch of MCP tools is really tiring. It’s not enough to just have an MCP server, but there are also a variety of MCP clients.

I’ve been using Cursor, Roo Code, Google Gemini Cli, and more recently Rovo Cli and Kiro, and I’ve found that each client needs to write its own json file, and some of them even have subtle differences, which is a real pain in the ass.

Recently, I found that Docker Desktop has released an MCP Toolkit after version 4.42, which includes all the commonly used MCPs, and just by clicking on the UI, we can finish installing all the common MCPs. The client side is even easier to configure, just one line, docker mcp gateway run.

All the settings are integrated together, which makes installing MCP no longer a nightmare.

Vibe Scripting

Personally, I don’t really trust Vibe Coding, after all, in a large project, the context window of AI is limited, and it’s extremely difficult to make accurate changes.

However, Vibe Scripting is definitely my favorite. Because it doesn’t need much context, the AI needs to fulfill a very simple requirement, we just need to tell it properly.

And the finished product that the AI creates is much better than we can imagine, and even faster than going online to find the solution. Even if we do find the solution on the Internet, how to use it and what are the limitations, it may not satisfy our needs. But what AI makes according to our scene and needs will be an out-of-the-box tool with no learning curve at all.

Take my recent work as an example, I need to copy several folders from a k8s specific pod and put them into my local container.

This script has a couple of special features.

  1. namespace and pod can be fuzzy searched.
  2. the script will always report progress.
  3. even if the source directory keeps changing, it can still be done. This is the hardest thing to overcome. Normally, when the source directory file is changed, we will find out that tar sends out a termination signal, and then kubectl will be interrupted. But Gemini and I came up with an approach that allows it to generate a snapshot first, and then do a copy of the snapshot, and then we’re good to go.

I used to search for tools on the Internet for a long time, but now I prefer to do whatever I need by myself (by AI), which is much more efficient.

Wrap Up

With a new computer and a new environment, there are some new things to try.

Every time I find something new, I feel so surprised, and I believe that’s the interesting thing about this era, it’s changing fast enough. Especially with the wave of AI, the tools are changing day by day, so there will be a lot of treasures buried in them.

The most useful discovery for me this time is Warp, maybe there will be some new tools coming out in a while. Let’s keep in touch.

Originally published on Medium

Context Engineering: The Next Software Paradigm Shift

Stop chasing AI tools. Master context engineering to boost your multitasking and productivity

Recently, the agent ecosystem has seen a huge explosion, with various Agentic AIs springing up. Products led by tech giants such as Claude Code were released, followed not long after by Google’s Gemini Cli and Atlassian’s Rovo Dev Agent. In addition, new Agentic AIs have been created, such as Augment.

These tools are constantly evolving, and for many engineers it should be hard to learn and know which one is the best. Actually, present time is the process of software engineering paradigm gradually switching from prompt engineering to context engineering. Therefore, it is reasonable that there are a lot of tools to implement this new paradigm, and this has led to the birth of many new tools.

In fact, I was looking for the best one, but after reading a lot of papers and disassembling the underlying logic of these tools, I realized that there was no need to keep chasing the green bird. For engineers, what we need to do is simple: instead of chasing tools, we need to understand the concepts of this new paradigm. Then no matter how the tools evolve, we can have a universal methodology.

A Whole New World

Learning with these Agentic AI’s has helped me to overcome some of my past weaknesses, such as my difficulty in doing a lot of context switches.

My limit is to work on two things at the same time, for example, working on project A while doing troubleshooting on project B. When someone interrupts me, for example, to discuss with me the design of project C, it is out of my contextual window. At the end of the discussion I have a period of stagnation where I don’t know what to do now, and I need to re-focus on getting back to the context of what I just worked on, which usually takes a lot of time.

Recently, however, I’ve begun to use the concept of context engineering to keep track of my work, and I’ve suddenly realized that I can multitask, and it’s no exaggeration to say that I can now work on three or four things at the same time without too much of a problem.

Let’s have a quick review of context engineering, and then I’ll explain how I use it.

Context Engineering

In the past, prompt engineering was static, we took an instruction and asked the agent to complete it. We would design very strict conditions for this instruction, be it designing roles, structured output, thinking process (CoT) or even providing some examples (few-shot prompting), and these strict constraints were meant to make the agent’s unpredictable behavior controllable.

However, this approach has its limitations, for example, the agent can only accomplish certain tasks and is restricted to certain conditions. When the task goal changes, or even the conditions change, will lead to the task result is not as expected.

Therefore, context engineering emerges, which can be regarded as a kind of dynamic guidance to the agent, we tell the agent what contexts, tools and resources are available, so that the agent can complete the task by itself through the tools.

MCP is released to accelerate the process of iterating the capabilities of the agent. Under context engineering, the agent usually has the following two capabilities, memory function and task orchestration.

The memory function is used to manage context iterations, where the agent needs to memorize various states to keep the results consistent as the task progresses. This is especially important in tasks with multiple conversations.

As for task orchestration, it is a necessary tool because no matter how powerful the agent is, when the task complexity is too high, the agent’s behavior will collapse, which has been proved in many papers. Task orchestration is also closely related to memory, because agents usually save tasks in the form of to do lists, which requires memory annotations.

Through the quick explanation, we should have a basic understanding of context engineering, and the key points are as follows.

  1. dynamic context
  2. memory
  3. task orchestration

How do I use this concept?

When we do multitasking, we’re actually doing something similar to agent, where we need to have an overview of all the tasks we’re going to perform on the one hand, and on the other hand we need to be able to remember the status of each task.

So now I’m going to build my memory bank. Here’s the format of my memory bank.

1
2
3
4
5
6
7
8
9
10
11
12
13
14
15
16
17
18
19
20
21
22
23
24
25
26
27
28
29
30
31
32
33
34
35
36
# {title}  

Concurrent projects A, B & C

> mindmap

## Status

- [ ] task 1
- brief description
- [x] task 2
- [ ] task 3
- brief description
- [ ] task 4

## Weekly Archived

### W1 (XX/XX - XX/XX)

> some descriptions about finished tasks

### W2 (XX/XX - XX/XX)

> another descriptions

## Detailed References
- [design doc A](https://xxx)
- [implementation doc B](https://xxx)

## Project A

lots of details

## Project B

lots of details

First, I will use a mindmap to list a few of my current medium and long-term goals. In the next section, I’ll record which step I’ve reached, and I’ll back-mark it on the mind map.

Since I have a habit of making a weekly report, every Friday I will write a description of the tasks that have been checked off in Status in the corresponding weekly record. After writing the weekly report, I delete the tasks that have been checked in Status. This behavior is a reference to many Agentic AI practices, such as Claude Code’s ability to compress the context via /compact.

The following section shows all the records and results for each medium and long-term goal.

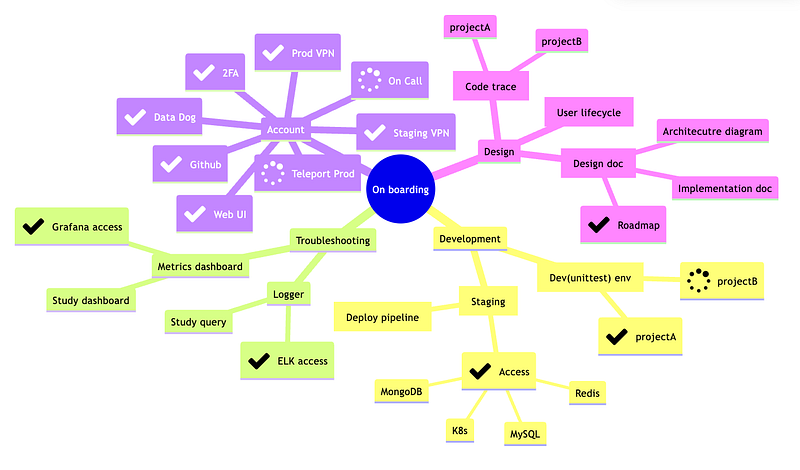
What does the mindmap look like? Let’s see it with a ready-made example.

This is a diagram of the on boarding program I’ve been running at my recent job change, I’ve replaced all the keywords so it’s just a schematic.

From the mindmap, you can see that I’m working on many tasks at the same time, and with a clear context, a regularly updated state and some key details, I can switch between tasks as seamlessly as possible.

And that’s what Agentic AI is doing right now.

Wrap Up

From the behavioral patterns of AI, human beings can also benefit in unexpected ways.

So instead of comparing tools and trying to find the best one, I’m trying to understand the behavioral patterns of each tool and trying to learn to emulate them. It’s interesting that whereas we used to let AI mimic human thinking, now we’re trying to mimic AI.

But I believe that this is the best practice to get out of the tool selection vortex.

Originally published on Medium
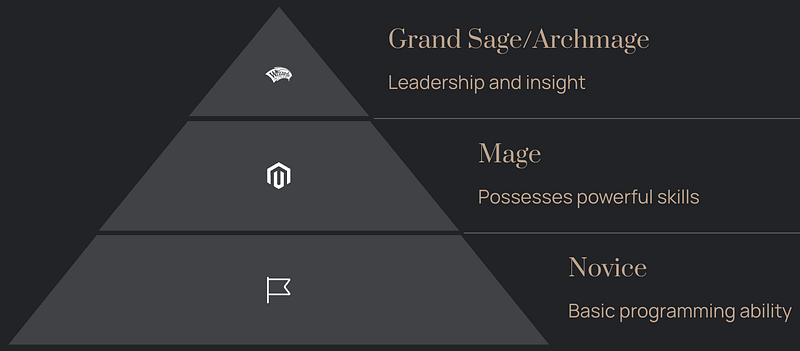
This is the career talk I often give to teammates — how we grow, prepare, and level up like in an MMORPG.

In my previous article, Why So Few Qualified Architects, I talked about how success often hinges more on luck than on hard work. But I also argued that effort still matters — because when luck does arrive, we need to be ready to catch it.

This new post is something I often share with my team at the end of a project cycle. It’s about how we, as software engineers, can grow and prepare ourselves for those rare moments — those windows when the opportunity to get promoted actually opens.

I recently created a slide deck around this topic, which is available here:

Software Engineer Career Presentation

Now let’s talk through it with a bit more fun — imagine your career as a classic MMORPG.

Novice

When we first enter the industry — fresh from school, or after a career change — we become junior engineers. In RPG terms, we’re just starting out as adventurers in the beginner village. There’s not a lot we can do at this point, but everything we do brings back noticeable experience. It’s the fastest growth phase in our career.

Our daily routine? Fighting slimes, collecting herbs, and doing quests. In real life, this might mean writing basic features, fixing bugs, or learning how version control works.

Some engineers choose to stay at this stage — and that’s totally valid. The tasks are familiar, the pay is decent, and the return on investment is high. Once we reach a certain level, slaying slimes doesn’t take much mental energy at all.

But if we want to go beyond this comfort zone and reach the next stage, we’ll need to think about class-changing.

Just like in a proper RPG, we don’t get to become a Mage by slaying slimes forever. At some point, we have to:

  1. Equip better gear — like a Mithril Staff
  2. Learn real spells — maybe Fireball or Chain Lightning
  3. Improve our playstyle — hit, run, combine abilities

And in engineering, we do something similar.

We begin to explore new domains, learn new paradigms, and get comfortable with complexity. We realize that doing what we’re already good at — over and over — won’t carry us further. That’s when we make the decision to grow.

That’s when we start preparing to class-change into a Mage.

Mage

At this stage, we start making deliberate investments into our toolkit and thinking. We might buy books (gear), attend workshops, or practice our skills after hours. It’s where we shift from being reactive to becoming intentional learners.

We study software engineering fundamentals, database design (SQL/NoSQL), refactoring, design patterns, and other best practices. In reality, a lot of this stuff doesn’t show up in our backlog. Especially not in smaller teams, where we’re always shipping and rarely have the luxury to explore architecture or scalability problems.

So we end up doing the real leveling after hours — reading random tech blogs we bookmarked months ago, joining meetups even when we’re exhausted, poking around open-source codebases just to see how others think.

Once in a while, something we saw out there clicks. We bring it back to work, try it in our codebase, maybe even propose a small shift in how our team does things. If we saw an interesting caching pattern in a talk, we experiment with it in our own stack. These small experiments help us build impact and credibility.

When those moments accumulate, the chance for a promotion often appears. That’s when we “class-change” into a Mage — an engineer who not only builds but also drives improvements.

At the same time, many people pause here too — and that’s okay. Often this is the stage when life outside work demands more attention: marriage, kids, health, responsibility. If we’re no longer able to keep investing in growth at the same pace, that’s simply a trade-off.

But if we decide to push forward, we’ll need to aim at the two endgame classes: Archmage or Grand Sage.

Grand Sage / Archmage

Mages can handle mid-bosses solo — giant spiders, cave trolls, chaotic outages. We learn to kite, stun, AOE, and recover on the fly. With the right spells and tools, we hold our ground.

But eventually, we set our eyes on a world boss. An Ancient Dragon.

These aren’t fights we solo. Now we’re in raid mode.

We start thinking like a strategist:

  • Who’s tanking the critical path?
  • Who’s buffing the deployment pipeline?
  • Who has aggro on leadership expectations?

We prepare mana potions (resources), stack buffs (team rituals), and fine-tune our battle plan (roadmaps, RFCs, OKRs). We aren’t just casting spells — we’re orchestrating the whole raid party.

This is the shift into senior IC roles:

  • Staff Engineer
  • Principal Engineer
  • System Architect

Our job isn’t just to solve problems. It’s to see problems before they exist, to align teams, and to guide the group through the dungeon, even if we’re not the party leader.

But just like endgame raids, this tier is hard.
 Progress is slow.
 Feedback is vague.
 And the gear we need often doesn’t drop on the first clear.

So we keep reading papers. We explore other guilds. We grow our technical judgment. And when the next window for promotion appears — we’re already buffed, geared, and ready to go.

Wrap Up

This is what I often remind myself — and my team:

Just shipping features has no value.
 No value means no XP.
 No XP means no level-ups, no class changes, and no promotions.

It’s just like in an RPG:
 We don’t beat an ancient dragon by slaying slimes for a decade.

That’s how we grow. Not by repeating the same dungeon, but by stepping into areas we don’t fully understand. Sometimes that means fighting monsters we’ve never seen — and yes, sometimes we wipe. But we respawn smarter. Sometimes it means leading the raid.

But most of all, it means preparing for that one window — when luck shows up.

And when it does, we better be ready to roll.

Originally published on Medium

How to Learn AI from Scratch

A practical guide for software engineers to start using and building with AI

In today’s era of generative AI, there are countless ways to get started with AI. However, for engineers without a background in AI or machine learning, the overwhelming number of buzzwords can make it hard to know where to begin.

That said, there’s no denying the productivity gap between those who know how to use AI and those who don’t.

This article aims to give software engineers a fast-track introduction — a practical guide to navigating and thriving in this new landscape.

The mind map below outlines the flow of the article. We’ll start with how to use AI effectively, then move into how to build things with it, touching on key concepts along the way. Let’s dive in.

How to Use

When people talk about using AI, it’s impossible not to bring up how it all started — ChatGPT was the moment generative AI really hit the mainstream. After that, every major company started launching their own chat models.

I’ve listed four models I personally use almost every day. You might wonder why I switch between them. Simple reason: free plans come with limits, so rotating helps me stay productive without paying.

  • ChatGPT — This is the one I use the most. Whether I’m writing, editing, brainstorming, or just trying to get a fresh idea out, ChatGPT usually gets the first draft going.
  • Claude — When it comes to quick scripts or anything related to the command line, Claude feels the easiest to work with. For instance, if I need a curl command to upload a JSON file with auth, I’ll ask Claude.
  • Gemini — I use this mainly for more in-depth research. It gives off a more grounded vibe, which helps when I need something solid to work with.
  • Grok — Once I hit Gemini’s limit for the day, Grok usually takes over.

These tools make it really easy to fold AI into everyday tasks. For most situations, this setup covers everything I need. But when I’m working on something more specific — like building a presentation — I’ll bring in different tools.

One I rely on a lot is Gamma.app. It’s changed how I make slides.

I already had a pretty good rhythm from doing talks regularly, so I can usually outline things quickly. But Gamma takes it even further. I just give it a prompt, let it build a rough version, and then tweak the parts I want to improve. Something that used to take half a day now takes me about an hour.

Another one I keep coming back to is Perplexity.

Since generative AI is basically predicting what words come next, it’s not always accurate. That’s where Perplexity helps — it’s the tool I use to cross-check facts or dig up references. Sure, other AI tools have similar features, but I’ve set Perplexity as my browser’s default search engine, so it’s the quickest for me.

I use a few other tools depending on the project. For example, if you work with Confluence Cloud, Rovo Chat is a solid option that fits nicely into that workflow.

Vibe Coding

For software engineers, vibe coding has become a key part of using AI effectively to boost productivity. But getting good at it takes a lot of hands-on practice — and even just picking the right IDE and agent can take serious trial and error.

Beyond that, no matter which agent you go with, you’ll still need to plug it into the right ecosystem to unlock its full potential. Some rely on MCP-style control flows, others on rule templates. Here are a few specific needs I personally care a lot about:

  • Task master: If your instructions to the AI aren’t clear enough, it’s easy for the model to get stuck — wasting tokens without producing anything useful. This was highlighted in Apple’s paper, which shows that as task complexity increases, model performance can collapse entirely. That’s why task decomposition is essential. Task master is a solid open-source option for that.
  • Memory bank: Since LLMs have limited context windows, they tend to forget past mistakes or important task details. A persistent memory mechanism helps address that gap.

There are plenty of other tools that can be added, depending on your development habits and how far you’ve gone with vibe coding. It’s really about building the setup that fits your workflow.

Underneath all of this is prompt engineering — everything starts with how you communicate your intent to the model. Getting that part right matters a lot. Fortunately, Google has published a pretty thorough whitepaper that’s worth reading if you’re looking to understand the fundamentals.

If you want to go deeper, there’s a growing body of research too.

For example, this paper summarizes 26 different techniques for improving prompts — worth checking out if you’re serious about refining your workflow.

Vibe coding is half tools, half mindset — and prompt engineering is the bridge between the two.

How to Develop

Once you’ve got the hang of using AI, the natural next step — especially for engineers — is to start experimenting with what AI can actually do for you. Personally, I’ve built a handful of small tools that I now use regularly at work, like a code review agent and a text-to-command-line agent.

These tools each focus on solving very specific problems with AI. So how do you even start building something like that?

Model selection

The first step is understanding what resources are available. By “resources,” I mean which AI services expose endpoints that you can actually call.

If you’re willing to pay, then the big-name providers are all viable. But if you’re trying to keep costs low, what are your options? Turns out — plenty. Here are a few I actively use:

  • OpenRouter: This platform gives you access to a wide range of models, including quite a few with free quotas. In fact, even models like Google’s Gemma 3:27B have a free tier here.
  • Ollama: If you’re worried about running through OpenRouter’s quotas, you can always fall back to local setups. Ollama is plug-and-play and runs locally. The only trade-off? Heavy models are tough to handle on a local machine — but smaller models are often too limited.
  • gemini-balance: This one’s kind of clever. Gemini offers a free tier that’s actually free — it doesn’t sneak in charges once you pass a usage limit. The catch is, the quota’s small. But if you can cycle through enough free-tier tokens, you can effectively run things at zero cost. That’s exactly what gemini-balance helps with.

Here’s how I’ve set things up:

  • For important tasks, I rely on gemini-balance. The Gemini 2.0 models are just that good — I trust them with higher-stakes stuff.
  • For lighter tasks, I go with OpenRouter, especially when I want to use Gemma 3:27B. It’s a strong model, but OpenRouter doesn’t support function calling for Gemma, so I keep it for simpler jobs.
  • For embedding, I use Ollama locally. Embedding isn’t very compute-intensive, but I run it at scale, so I’d rather not worry about hitting quotas.

As you can probably tell, picking a model isn’t just about performance — it’s also about constraints, access, and cost. Each model comes with its own trade-offs, so understanding those is key to building something reliable.

AI Application

Once you’re familiar with the tools, the next step is figuring out what kind of applications you want to build.

This is where imagination comes in — but regardless of what you’re building, you’ll eventually run into the concept of RAG.

RAG (Retrieval-Augmented Generation) is one of the most effective ways to unlock real-world utility from LLMs.

Why?

Because language models can’t access huge documents directly — their input limits are real. But many tasks (like customer support) require deep background context. That’s exactly what RAG helps with.

I won’t go deep into RAG architecture here. If you’re curious, I wrote a more detailed piece: Evolution of RAG: Baseline RAG, GraphRAG, and KAG.

No matter what kind of app you’re building, sooner or later, you’ll hit the need for fine-tuning. Most base models are trained for general tasks, but real applications require customization — your data, your workflows. That’s where fine-tuning comes in. Of course, fine-tuning isn’t trivial — it assumes some background in ML. I’ll cover that in another post.

And then there’s evaluation and observability — two things you must consider when your AI app is live. You need to know if the model is doing its job, and why it failed when it didn’t. Tools like LangSmith and LangFuse can help with this, but you’ll need to spend time experimenting with what works best for your stack.

Conclusion

So yeah — diving into AI development is a big journey.

From picking tools, to writing prompts, to deploying apps, there’s a huge surface area of decisions.

But don’t let that intimidate you. AI is still new, and most of us are learning as we go.

My advice: start with problems from your day-to-day life. That’s the best way to learn. You’ll naturally uncover more tools, more patterns, and more techniques as you build.

Eventually, you’ll develop your own set of “survival skills” for the AI era.

This article includes a pretty massive mind map — it touches on nearly every major area in the Gen AI space.

You don’t need to master everything — not even close. Just start with what you care about, build one small thing, and the rest will follow.

In this new AI era, curiosity and momentum matter way more than credentials.

Thank you for being a part of the community

Before you go:

Originally published on Medium
From dense theory to runnable code — my AI-powered workflow for decoding research and GitHub repos.

Recently, I was reading a paper, Reinforced Self-play Reasoning with Zero Data, which describes how to train a large language model through reinforcement learning without using human data.

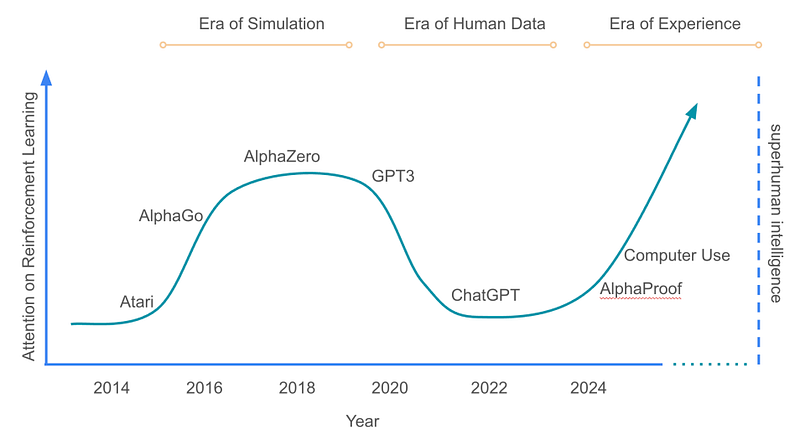
This concept is described in Welcome to the Era of Experience, which states that for an AI agent to be able to exceed human intelligence, it is not enough to rely on human data to learn. The agent must be able to evolve on its own based on the results of its interaction with the environment.

In the past, we have seen that a large part of the improvement in modeling capability comes from human data or human prejudgment.

Human data is better understood as the conversations or formulas that we have prepared in advance to guide the agent to make accurate conclusions. On the other hand, human prejudgment is to tell the agent whether the result is good or bad after the agent has done certain behaviors.

Either way, the AI will only end up doing convergent evolution like humans and will not be able to exceed human capabilities. Therefore, it is necessary for AI agents to have self-learning and self-evolutionary mechanisms in order to break through the ceiling of human beings.

In Absolute Zero, self-learning by interacting with the environment through python code is proposed. The whole process is quite similar to the one I used in my side project of my previous article, where there is a planner, an executor, and a validator, and the agent gives the agent a score.

A major reason to read Absolute Zero is that it has open source, so we can not only read the theory, but also the actual work.

But in this article, I do not want to talk about the details of this paper, but to introduce me now is how to quickly read the paper together with open source projects thoroughly.

The era of AI

After Google I/O 2025, Google released many tools, among which Jules surprised me the most. At the same time, Gemini 2.5 Pro was also officially put into NotebookLM.

NotebookLM is Google’s AI-powered note-taking assistant, which lets you ground conversations in PDFs, notes, or entire research libraries.

Jules is a code analysis assistant that can read and summarize large GitHub repositories.

These two tools are at the core of my ability to read papers efficiently.

First of all, I put the paper body into NotebookLM, because I already have all kinds of papers I have read and studied internally, and even my notes, so NotebookLM can quickly find out the relevance to this paper from my past study records and make a summary of the key points.

Once a summary of the paper is available, it is much easier to go back to the paper. If there is something I don’t understand in the paper, I can talk to NotebookLM to find ideas, and then use Perplexity to find the corresponding key information.

In this way, I will be able to understand most of the paper.

As for the open source project part, I directly fork a project on Github to my own account, feed this forked project to Jules, and let Jules generate the following:

  1. a list of core components
  2. component description
  3. core code flow
  4. architecture diagram

In this way, I can quickly dive into the core implementation of the paper.

Here is my actual prompt.

1
2
3
4
5
6
7
8
9
10
11
12
13
14
15
16
17
18
19
20
21
22
23
24
25
## 📘 English Prompt (for Agent)  

Analyze this GitHub repository thoroughly and write two separate Markdown files:

1. One in English (`README_EN.md`)
2. One in Traditional Chinese (`README_ZH.md`)

For both files, include **detailed explanations** of the following aspects:

### 1. Core Components
Identify and explain the main modules, packages, or files that form the foundation of the project.

### 2. Key Linkages
Describe how the core components interact with each other. Include both static and runtime relationships.

### 3. Important Implementations
Elaborate on notable or complex code implementations, including the rationale behind them if possible.

### Additional Requirements:
- **Include an architecture diagram** that visually illustrates the system’s structure.
- **Include at least one sequence diagram** to show how key components interact over time.
- Wherever you mention code (classes, functions, files, etc.), embed a **hyperlink pointing to the exact location** in the GitHub repository (with line numbers, if applicable).
- Ensure the tone is clear, technical, and structured.

Goal: Make it understandable for both new developers and technical reviewers.

Overall, by using several AI tools to collaborate with each other, I can read papers at least 10x more efficiently than before.

Finally

I am attaching a summary of what I asked Jules to generate this time, and I am sure you will see why productivity has been greatly improved. If I had to do this manually, it would’ve taken hours — now it’s just minutes.

Originally published on Medium

Taming AI code agents for better workflows

Recently, I’ve taken a lot of time to actually experience vibe coding, and I’ve come up with a few tips.

TL;DR

  1. The used agent must support differential mode modification instead of overwriting the entire file.
  2. Commit continuously.
  3. The commands should be clear and simple, and context-sensitive.

Before describing the experience I’d like to briefly introduce the toolset I use.

As you can see I use free tools, which I believe is the best setup for the common developer. But it also creates a lot of headaches, which I’ll talk about in a bit more detail.

Next, this is a complete project I made using vibe coding.

Alice is a command line tool that converts the natural language into the actual terminal command to be executed and gets the result.

In fact, many tools have similar functions, as follows.

  1. Warp (AI-powered terminal tool)
  2. iTerm2 AI
  3. ShellGPT
  4. ai-shell
  5. etc.

There are many more, but they all have their own problems.

The main one is they don’t support customized models like OpenRouter or Anthropic, and the second one is that the results are not very good, either the results are not on point or they aren’t easy to use.

So I wrote a tool for my own needs, and I won’t dive into the details of the tool.

The whole development process is I wrote a basic working script first, which is main.py and then I rely on vibe coding to start refactoring and adding new features step by step.

This development process should fit the scenario of most developers practicing vibe coding. Instead of using vibe coding to create a project from scratch, we use vibe coding to iterate on an existing project.

Let’s start by explaining the three points mentioned at the beginning of the article.

Diff mode patching

I think this is one of the most important things, why?

When the model is not smart enough, it is easy to overwrite the whole file and change something that is not a problem. Here is an example of deepseek-v3–0324 muddying the water.

The project I developed uses AutoGen to implement the communication between agents, here is the import I used.

1
2
3
from autogen_ext.models.openai import OpenAIChatCompletionClient  
from autogen_core.models import ModelInfo
from autogen_agentchat.agents import AssistantAgent

But when RooCode wanted to make some changes to the code, he would often overwrite my entire file. Then the code breaks. This is the most common “unauthorized” change he does.

For some unknown reason, it often changes models to model and agents to agent, breaking my code.

1
2
3
from autogen_ext.model.openai import OpenAIChatCompletionClient  
from autogen_core.model import ModelInfo
from autogen_agentchat.agent import AssistantAgent

Therefore, I’ve added a couple of absolute rules to my RooCode.

.roo/rules/rules.md

1
2
3
1. Do not overwrite the whole file easily.  
2. Just modify parts that is asked.
3. Do not change any no bug part.

Commit continuously

In vibe coding, agent behavior is largely unpredictable, especially with dummy agents like the example above.

So when you make a command, and you get an acceptable result, you have to make a git commit right away. Even if the command is only partially complete, at least the result is acceptable, so save it.

In the beginning, I often let the agent do what he wants and I ask him to do what I want, and then I have no idea what he’s changed, or even what he’s changed that’s broken.

Therefore, please remember, as long as you see the result is acceptable, then just commit.

With commit, you will be able to compare what you have changed in subsequent commands, and you will also be able to know what needs to be fixed in this prompt.

Prompt should be clear and contextualized

Don’t expect the agent to know what you want to change.

If you want to change something, tell the agent exactly what you want, which file, which function or even which lines you want to change. The clearer you are, the more you can get the expected result, not the free-for-all of a creative person.

When I first came across vibe coding, I always thought that agent can see all the code and structure, so agent should know what to change. But I was wrong, and very wrong.

There is a limit to the context that Agent can see. Of course, you can make that context huge, but there are a couple of problems.

  1. Huge contexts cost money.
  2. Huge contexts are easier to hallucinate.
  3. Huge contexts are not always acceptable in terms of agent capability.

So you have to tell the agent clearly what to look at and where to change.

Will developers be eliminated?

There is often a dream that agent can replace the developer, I can only say, this is really a dream.

The project structure this time is quite simple, and the functions are not complicated.

To put it frankly, it is actually three agents communicate with each other to accomplish one thing.

  1. Planning agent converts the natural language into a command line to be executed.
  2. Execution agent executes the command line and reports the result.
  3. Verification agent checks whether the result is correct or not, if not, it will start again.

Along the way, I added some new features.

  1. Use PyInstaller to generate the executable.
  2. Automatically release with Github Action.
  3. Support both environment variables and configuration files.
  4. Model setting.
  5. Choose the language of the response.
  6. Hide agent interactions and only get the final result.

I’ve also done some refactoring, such as splitting main.py into corresponding modules or turning the config module into a singleton pattern.

But with vibe coding, I feel a bit exhausted, agent’s development efficiency is not as good as my own coding, sometimes, I am really upset to see him playing idiot, but after all, I am practicing vibe coding, so I can only continue to see him playing idiot.

As models improve, this kind of frustrating behavior will become less frequent, that is to say, it can be easier to write down the prompt.

Back to the above conclusion, vibe coding can not replace the developer, but for the skilled developers can improve development efficiency.

For example, if I tell the agent to turn my load_config() into a singleton pattern, he will make a standard singleton class as he imagines, but his context is not enough to change all the callers to load_config and then break the program.

But if I tell him to turn load_config into a singleton while keeping the load_config interface the same, he’ll be able to make something similar to what I imagined.

So the role of the developer has become more important.

Nowadays, more and more agents have orchestractor (dispatcher) mode, which means he will break down complex tasks and assign them to other agents. Honestly, what he does is really not good, it’s better to break down the requirements myself and then use prompt to tell the agent what to do.

Wrap Up

Vibe coding is already a trend among developers, but just like we practice writing programs, vibe coding requires continuous practice.

The more we use an agent, the easier to know where the agent’s limits are, and the easier to make the agent meet the expectations.

Vibe coding is just a tool, a tool to make things easier for the user, not to replace the user. I hope everyone can become a sophisticated user of vibe coding, I am practicing too.

Thank you for being a part of the community

Before you go:

Originally published on Medium
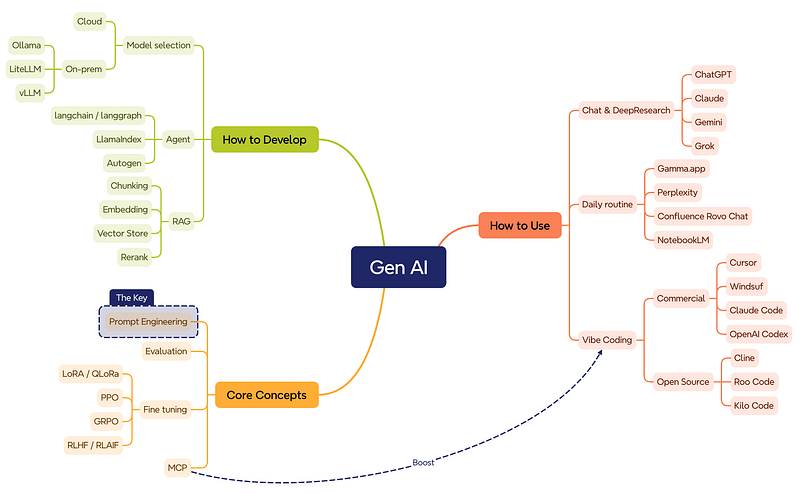
Diagram as Code: from Mermaid to D2

Using D2’s ELK layout and intuitive styling to simplify complex diagrams

Those who follow me on Medium should know I’m a heavy mermaid user.

In almost all of my technical articles, I use mermaid as a way to describe the architecture (and in some cases, Draw.io).

The reason why I rely on mermaid so much is because of its extremely expressive syntax, where notation and arrows are all we need to draw components and connections.

graph LR  
  a --1st--> b --2nd--> c

Moreover, such consistency is also applied to sequence diagrams.

sequenceDiagram  
  a ->> b: 1st  
  b ->> c: 2nd

For software engineers, architecture diagrams and sequence diagrams are the most commonly used tools to show ideas and implementations. Mermaid makes it incredibly easy to draw diagrams, which saves a lot of time for engineers like me who have to draw a lot of diagrams every day.

Nevertheless, mermaid has its limitations.

The simplicity of the syntax makes it difficult to lay out a reasonable diagram. For example, when components and relationships become complex, mermaid drawings start to look worse than expected.

In the following example, when the component relationships become complex, a bunch of intersecting lines start to appear.

graph LR  
  a --> b --> c  
  a --> d --> e  
  a --> f --> g --> h --> i  
  h --> c & e

To avoid crossing lines, I have to manually adjust the order in which the components are declared to make the layout as clear as possible.

graph LR  
  a --> b --> c  
  a --> f --> g --> h --> i  
  h --> c & e  
  a --> d --> e

This undoubtedly adds a lot of work, especially when the diagram becomes complex, and the amount of fine-tuning can be incredible.

In addition, our architecture usually has subcomponents. This is also powerful enough in the mermaid, but it can be confusing when we use the notation of the subcomponents. In the following example, my outer db directly overrides the inner db.

graph LR  
  subgraph Child  
    b --> db[(DB1)]  
  end  
  db[(DB2)]  
  a --> b & db

You might say, wouldn’t the problem be solved by changing the inner db to child_db? True, but this also introduces coupling, i.e. coupling between component names and layers. When the layer changes, the component name will be in an awkward position.

On the other hand, mermaid is cumbersome to set up styles and is not easy to use.

flowchart LR  
    id1(Start)-->id2(Stop)  
    style id1 fill:#f9f  
    style id1 stroke:#333,stroke-width:4px  
    style id1 stroke-width:4px  
    style id2 fill:#bbf,stroke:#f66,stroke-width:2px,color:#fff,stroke-dasharray: 5 5

Declarations and styles are separate, and the attributes of a style can either be declared multiple times, as in id1, or chained together to make them super long, as in id2. Either way, it’s not suitable for complex architecture diagrams.

D2 comes to save the day

Recently, I’ve been gradually migrating my use of the new diagram as code solution, D2, which effectively solves the previous problems and has many more new features.

Let’s take a look at the first problem of intersecting lines. When we used D2, the results were clearly improved.

1
2
3
4
5
6
7
8
9
10
11
vars: {  
d2-config: : {
layout-engine: elk
}
}
direction: right
a -> b -> c
a -> d -> e
a -> f -> g -> h -> i
h -> c
h -> e

Thanks to D2’s built-in layout engine, ELK, we don’t need to manually adjust the layout order anymore, ELK will automatically do the rendering with the least staggered layout.

On the other hand, the problem of sub-component hierarchy is also well solved in D2.

1
2
3
4
5
6
7
8
9
10
11
direction: right  
Child: {
db: DB1 {
shape: cylinder
}
b -> db
}
db: DB2 {
shape: cylinder
}
a -> db

To use the inner components we need to call them explicitly. But we can also find that D2 is significantly more bulky than mermaid when it comes to changing the shape, and the need to set it up through metadata is far less delicious than some syntactic candies.

This is also the advantage of D2, when we want to modify the component styles, mermaid is very annoying.

However, in D2 this becomes very intuitive.

1
2
3
4
5
6
7
8
9
10
11
12
13
14
15
16
17
18
19
direction: right  
id1: Start {
style: {
fill: "#f9f"
stroke: "#333"
stroke-width: 4
}
}

id2: Stop {
style: {
fill: "#bbf"
stroke: "#f66"
stroke-width: 2
font-color: "#fff"
stroke-dash: 5
}
}
id1 -> id2

Besides the mermaid optimizations mentioned above, my personal favorite feature is Globs.

When I draw a data pipeline, I often declare all the databases first, and then add the relationships, this operation is completely revolutionized in D2.

1
2
3
4
5
6
7
8
direction: right  
src_db1
src_db2
src_db3
dst_db1
dst_db2
dst_db3
src* -> transform -> dst*

In mermaid, we have to connect the lines one by one, but in D2, we can solve the problem in one go by using the star sign.

Wrap Up

D2 can be seen as an evolution of mermaid, anything mermaid can do, D2 should be able to do, and more elegantly.

I have to say what drove me to switch from mermaid to D2 in the beginning is the first point of my article, I need to manually rearrange all kinds of declarations just to make the layout clear. This was done with the ELK layout engine built into D2.

But I found out the new version of mermaid can do the same thing, i.e. specify layout engine.

Let’s try again with the above example of a wonky mermaid.

1
2
3
4
5
6
7
8
9
---  
config:
layout: elk
---
graph LR
a --> b --> c
a --> d --> e
a --> f --> g --> h --> i
h --> c & e

Aha! Turns out mermaid works too. Kinda awkward… now I’m not sure if I should even bother switching to D2. Just kidding, D2 has more advantages anyway.

I believe mermaid should continue to evolve, and maybe one day, all the flaws I listed above will no longer be flaws.

Thank you for being a part of the community

Before you go:

Originally published on Medium

0%