CT Wu

Software Architect · Backend · Data Engineering

Master settings.json, MCP, and subagents to bring Claude Code’s power into Pi

In my previous post, I talked about migrating from Claude Code to Pi. Since space was limited, I only covered the basics. In this article, I will explain the specific setup in detail.

First, let’s look at the global configuration layout.

1
2
3
4
5
6
7
8
9
10
ls -al ~/.pi/agent  
608 Jul 18 16:49 .
96 Jul 4 17:21 ..
28 Jun 23 16:25 AGENTS.md -> /Users/ctw/.claude/CLAUDE.md
1856 Jul 6 18:05 APPEND_SYSTEM.md
63 Jul 7 10:09 agents -> /Users/ctw/Workdir/ctw-skills/plugins/ct/agents
118 Jul 16 19:28 mcp.json
27 Jun 25 15:42 prompts -> /Users/ctw/.claude/commands
546 Jul 17 14:47 settings.json
63 Jul 7 10:15 skills -> /Users/ctw/Workdir/ctw-skills/plugins/ct/pi-skills

There is a core configuration file in here called settings.json.

1
2
3
4
5
6
7
8
9
10
11
12
{  
"skills": [
"~/.claude/skills"
],
"packages": [
"npm:pi-mcp-adapter"
],
"extensions": [
"/Users/ctw/.nvm/versions/node/v22.23.0/lib/node_modules/@earendil-works/pi-coding-agent/examples/extensions/subagent",
"/Users/ctw/.nvm/versions/node/v22.23.0/lib/node_modules/@earendil-works/pi-coding-agent/examples/extensions/permission-gate"
]
}

This file defines where skills are inherited from and what plugins to install. Pi has very few core components. We need to customize most of it based on our needs. For example, MCP and subagents are the two most critical features, and they both run as plugins.

As we can see from the configuration, we can directly reuse most settings from Claude Code. However, a few interesting details are worth mentioning.

  1. Pi does not have commands. It only has prompts. In Claude Code, commands are actually just skills with disable-model-invocable enabled. But in Pi, there are only prompts, which are just plain text. The concept is basically the same, so I linked my commands folder directly to prompts.
  2. I actually use two layers of skills. The first layer is inherited from Claude Code, which is defined in settings.json. The second layer consists of skills unique to Pi, placed in my Pi skills directory. I had to do this because Claude Code and Pi handle subagent logic are entirely different. Claude Code can spawn a subagent to do work using simple prompts. This approach does not work in Pi, so I had to write them differently.
  3. The MCP configuration is also inherited from Claude Code, but the approach is slightly different. Pi can import settings directly from Claude Code and then override specific variables. I chose to override idleTimeout because the Pi MCP plugin has an idle timeout setting. This setting makes the Chrome MCP disconnect if it stays idle for a while. Reconnecting Chrome MCP requires manual confirmation every time, so I decided to disable the idle timeout entirely.
1
2
3
4
5
6
7
8
9
10
{  
"imports": [
"claude-code"
],
"mcpServers": {
"chrome-devtools": {
"idleTimeout": 0
}
}
}

Finally, we have APPEND_SYSTEM.md. As I mentioned last time, we can write system prompts in this file if we only want them applied to Pi and not Claude Code.

I defined two core behaviors in this file.

1
2
3
4
5
## Image Reading  
The default model cannot see images. When you need to read or understand an image (screenshot, error trace, UI mockup, diagram, chart, photo), delegate to the `vision` agent via `subagent`. Do NOT pass image files to `read` or refuse image tasks. Instead, delegate to `vision`.

## General-Purpose Delegation
Use the `runner` agent via `subagent` for independent verification/recalculation, heavy batch work, or any well-specified self-contained job. Same tools as the main session, no conversation history, no specialty. Do NOT use it for PR review (`pr-reviewer-*`) or images (`vision`) because those have their own agents.

The first one is vision. Since my default model does not support image recognition, I wrote a vision subagent. This allows the main session to ask for help whenever it encounters an image.

The second one is runner. Claude Code has a general-purpose subagent. Whenever the main session wants to do minor tasks, it calls the general-purpose subagent by default. I did something similar in Pi. I wrote a runner subagent so the main session has a helper ready to take over tasks when delegation is needed.

At this point, I have fully migrated Claude Code’s capabilities to Pi. As I mentioned before, I do not need over-the-top features. I only migrated what I considered essential.

Of course, there are still many details to fine-tune after the migration. A good example is the subagent-related skills I just mentioned. In Claude Code, we can create subagents through prompts, but all those skills need to be rewritten for Pi. For Pi, we must clearly define those subagents in the subagents directory.

Even though it is easy to let the agent rewrite them, there are still some minor issues to work out in practice. I kept fine-tuning my Pi-specific skills over time. Overall, the entire migration only took about half a day to a full day.

Promoting My Side Project

When using Pi or Claude Code, I ran into a few persistent pain points.

  1. When I run multiple agent tasks across many terminal tabs, I need clear notifications. I need to know when a tab is done so I can take over. This is easy to do in Claude Code when using the Warp terminal because Warp has custom features for Claude Code. However, Warp is not going to build custom features for an open-source project like Pi.
  2. While the subagent extension in Pi is feature-rich, it does not show the execution process. It only shows the final result. Claude Code has Agent Teams, which lets us see the details of each subagent, but Pi lacks this feature.
  3. Claude Code has several remote control options. These include built-in solutions, which require a personal account and do not support API keys, and third-party options like Happy Coder. However, I have not been able to find a good remote control solution for Pi.
  4. Warp supports tabs and groups, meaning we can group related sessions together. However, Warp groups do not support collapsing or expanding. When there are too many tabs, it is still hard to find what I need to focus on.
  5. I need clear labels to know exactly what session is running in each tab. Warp allows us to name tabs and groups, but I still have to name them manually. Doing this for short-lived sessions feels highly inefficient. I believe session names should be generated automatically.

To address these issues, I decided to develop a plugin myself. This is how my side project was born.

It has a few key features.

  1. It is a web-based service, so there is no need to install any mobile apps. Even though it is a local service, we can easily expose it and set up basic OAuth using tools like ngrok.
  2. Since it is a web service, it supports parallel work across multiple devices. For example, I can manage session A on my computer browser while handling session B on my phone. We can even control the same session simultaneously from both a phone and a computer without any locking issues.
  3. It has its own storage unit, so it can save session grouping details. It also supports automatic session naming, though this requires configuring an LLM API key.
  4. I use this project every single day. I will keep updating and maintaining it regularly. It also has very high test coverage.

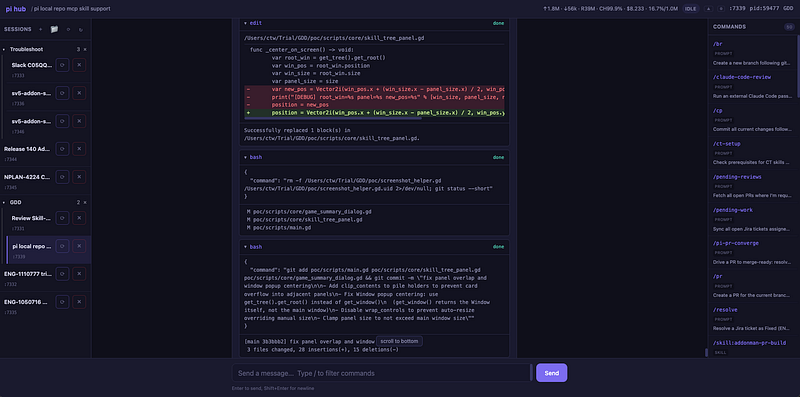
Here is a preview of the main interface. I will add new features over time as I see fit. Contributions are always welcome.

Wrap Up

I have used most GUI and CLI agent tools on the market. Right now, I am most satisfied with Pi. This is not because Pi is perfect or has everything. Quite the opposite, Pi is simple and focuses only on the core, while opening up plenty of APIs for third-party integration.

If we want a specific feature, we can almost always build an extension to solve it. For example, my side project basically gives Pi a full GUI interface, complete with remote control capabilities.

Pi’s stable yet open core is exactly what makes this so easy.

As for model capabilities, whether it is Opus 5, Fable 5, GPT-5.6, or GLM-5.2 (which I mainly use lately), they all have their pros and cons. I will not judge their performance too much here. But without a doubt, GLM-5.2 is currently the most cost-effective option for me.

Originally published on Medium

How I migrated to Pi + GLM 5.2 and quantified the performance drop

I recently migrated my AI toolchain again. The main reason was cost. My daily setup used to be Claude Code with Opus 4.7. Honestly, the cost was just too high. I did delegate specific tasks to cheaper subagents like Sonnet or Haiku. However, most of my usage still ended up on Opus.

Following a “recommendation” from our company, I was asked to try a new toolchain. This new setup combines Pi with GLM 5.2.

I have been using it for exactly a week now. I wanted to share my thoughts on the experience.

In the past, migrating toolchains lacked a solid way to measure success. We usually relied on gut feeling. If things seemed to work and conversations went smoothly, we assumed there was no rework. These are highly subjective evaluations. We always lacked quantitative metrics.

Because of this, I built a special framework for this migration. This framework analyzes all my Claude Code and Pi sessions. It also sets up a semantic evaluation standard.

I will skip the boring details. Building things in the AI era is incredibly easy. The real value lies in the concepts and the know-how.

Here is how my framework works. It parses all the session files from Claude Code and Pi. These are mostly JSONL files. Then, it extracts the dialogue from both the agent and myself.

The system pairs the agent’s response with my reply. I use this pair to perform a pure semantic analysis.

I only look at this single pair without extra context. I want the semantic analysis to be as simple as possible. This back and forth interaction is the easiest way to see what my response means. We do not need complex reasoning or extra interpretation. It is just straightforward semantic analysis.

I categorize these pairs into the following types:

  • fresh_task: This represents a new task with no related preceding assistant output.
  • follow_up: This is a same task extension or supplement, not a correction.
  • pushback_correction: The user is unhappy with the agent’s result and wants changes.
  • steer_interrupt: This is a mid stream cut in. We infer this from the phrasing of both sources using an LLM. Examples include saying “wait,” “stop,” or “no, do X instead” while the agent is in the middle of a task. No offline ground truth signal exists in either format.
  • acknowledge: The user is just acknowledging the message with no task intent.

With this data, we can calculate the revision rate. This rate shows whether I was satisfied with the agent’s output. In other words, it measures first try acceptance.

Based on the first week of testing, here are the results:

  • The revision rate for Claude Code was 17%.
  • The revision rate for Pi was 23%.

The data shows that Pi is noticeably worse than Claude Code. This actually matches my gut feeling.

On the other side, the cost difference is massive. Pi costs only one fifth of Claude Code.

This is a huge gap. It is especially true for power users like me. Paying 20% of the cost to get 80% of the performance is an incredible return on investment.

Migration Details

Now that we covered the background, let us look at some technical details. I have migrated AI toolchains many times. Over time, I built up a lot of experience moving between these tools. This migration took me less than half a day.

You can migrate Claude Code skills without any pain. Pi has built in migration tools for this. For Claude Code commands, I used symlinks to connect them to the prompts directory in Pi. I also mapped Claude.md directly to Pi’s AGENTS.md using a symlink.

I ran into two major issues related to my daily workflow. These were browser use and subagents. Neither feature is built into Pi. Fortunately, Pi offers official extensions that you can install directly. I used the official MCP extension to run the Chrome Dev MCP. I paired this with the subagent extension to build out the required capabilities.

There are a few things to note about subagents. First, because they run as extensions, Pi does not have built in discovery. You must place any subagent you need inside the agents directory. Then, you manually call them using prompts in the main session.

Porting the agents with symlinks is easy. However, manually calling agents is incredibly painful if you are used to Claude Code. To fix this, I used a built in Pi feature called APPEND_SYSTEM.md to extend Pi’s capabilities.

I mentioned that AGENTS.md maps to Claude.md. Since this is a symlink, I did not want to pollute Claude Code with subagent information. This is where APPEND_SYSTEM.md shines. It is a mechanism to expand the system prompt. It does not use a symlink. This allows me to add system prompts meant only for Pi.

Here is a concrete example.

1
2
3
4
5
6
7
8
9
10
11
# pi only additions (not loaded by Claude Code)  

## Image Reading
The default model cannot see images.
When you need to read or understand an image (screenshot, error trace, UI mockup, diagram, chart, photo), delegate to the `vision` agent via `subagent`.
Do NOT pass image files to `read` or refuse image tasks. Instead, delegate them to `vision`.

## General Purpose Delegation
Use the `runner` agent via `subagent` for independent verification or recalculation, heavy batch work, or any well specified self contained job.
Same tools as the main session, no conversation history, no specialty.
Do NOT use it for PR review (`pr-reviewer-*`) or images (`vision`), since those tasks have their own agents.

With this setup, my Pi setup has the exact same subagent delegation capabilities as Claude Code.

Also, I mentioned the vision agent earlier. This helps make up for GLM 5.2’s limitations. Since it cannot process images directly, I needed to attach a subagent for image recognition. In practice, the experience is just like Claude Code. I paste an image, and the system still processes it. It simply delegates the task to an OCR capable model rather than doing it itself.

When we integrate all of this, Pi with GLM 5.2 easily competes with Claude Code with Opus 4.7. As for the fancy features in Claude Code, I never really used them anyway. I did not lose much.

Wrap Up

Claude Code and Opus are truly expensive. In this AI era, I believe most companies will look for ways to cut tool costs. Honestly, setting a hard cap on token budgets is a bad idea. It acts as a penalty for highly efficient power users who know how to leverage AI well.

The alternative is to find a replacement tool.

After a week of usage, Pi with GLM 5.2 does feel slightly worse. However, the gap is not too wide. You can interpret the revision rate difference of 24% versus 17% in a few ways.

By the way, these numbers come from my actual daily work. This was not a head to head comparison on the exact same tasks. I simply made a clean break at a specific point in time. I switched entirely from Claude Code to Pi. The comparison is based on my Claude Code performance before the switch versus my Pi performance during the first week after.

I applied a sliding window to my Claude Code sessions. The 17% rate is highly stable. Because of this, the comparison holds up well. I must add a disclaimer that this method is not academically rigorous.

Originally published on Medium

How to Fix the “AI Vibe” in Tech RCAs

Stop letting AI hallucinate incident reports. Master the human-in-the-loop RCA

Lately, I have been reading a lot of AI-generated RCAs and incident reports, and I noticed a glaring problem.

They scream AI.

I am not talking about the wording, tone, or structure. I do not really hide my own AI usage anyway, since almost everyone uses AI to write reports these days.

What I mean by “screaming AI” is the entire context — specifically, how the author connects the visible symptoms to the root cause. This makes it incredibly easy to spot who is actually driving the investigation. Most of the time, it is obvious that the AI is the driver.

AI outputs have a specific trait: they only scratch the surface, whether we are talking about code or reports.

Let me give you a few obvious examples.

We have all seen an AI review a module or a feature during a production incident and aggressively nitpick a bunch of issues. It then assigns severity levels to these problems like “critical” or “suggestion” with total confidence. But these issues always share a common flaw: a complete lack of domain knowledge.

The AI does not know the history or the original reasoning behind the code. It just attacks the surface-level flaws. Can it solve the problem? Sure. Are these actually the real issues? Usually, no.

It is the exact same story with incident reports. The AI sees a memory spike and immediately calls it a memory leak. It sees a CPU spike and calls it CPU saturation. Are these real problems? Yes. Did it find the root cause? Usually, no.

When we perform an RCA and see a memory spike, our very first goal must be to find the underlying trigger. What actually caused the memory to spike?

However, the AI’s first instinct is always to tell a story. It explains why the memory spiked by piecing together random details that look correct and feel like facts. The metrics and logs it pulls might indeed highlight the reality of the memory spike, and its narrative might perfectly explain the process. But is it the root cause? Usually, no.

This is exactly what I mean by that AI vibe. It writes beautifully and tells a great story, but it falls apart under scrutiny.

So, How Do I Do It?

I break it down into two parts: fundamentals and technical tactics.

The fundamentals refer to the mental model of using AI. This means using a specific methodology to control the AI and guide it toward the correct result. The technical tactics refer to how we can leverage AI tools to get a better outcome.

Honestly, neither requires you to be a domain expert. We just need to execute the right steps and provide accurate judgment.

Fundamentals

Let me start with the fundamentals. I often talk about “systems thinking.” This was the most critical skill back when software engineering was done entirely by hand, and it remains an indispensable mental framework today.

But this is not knowledge we can pick up overnight; it is an accumulation of experience.

Because of that, I only teach two tricks and one simple rule of thumb.

When we receive an AI output, no matter what it is, we must first ask two questions:

  1. Is this a guess, or is it a fact?
  2. Is this a cause, or is it an effect?

The first question forces the AI to track down available evidence, such as logs, metrics, design docs, or code. This stops the AI from making up stories and ensures it uses real evidence as its building blocks.

We need to pay extra attention and ask this question whenever the AI gives an answer that sounds absolutely certain. Many times, its answers are just extensions of various assumptions, yet it presents them as absolute facts.

The second question is even more interesting. When an AI sees a symptom, it immediately tries to explain it. But explaining a symptom offers limited help. Take a memory spike, for example. Once the AI starts explaining it, the conclusion is almost always to scale up or scale out. But we do not want to know if we have enough memory. We want to know the reason behind the spike. Was it a poorly handled socket? A memory leak? Inaccurate metrics? Or something else?

We do not need a story. We need an answer.

When we ask whether something is a cause or an effect, the AI realizes it has been focusing entirely on explaining the result instead of finding the cause. This gives us a chance to make it correct its course.

It is easy to see that these two questions do not require any domain knowledge. Yet, we can use them to make the AI start discovering the domain context on its own. Those are the two tricks.

Now, here is the rule of thumb.

Begin with the end in mind!

Once the AI realizes it needs to understand the cause, it might gather a ton of evidence. But then it might start overthinking or getting stuck in a dead end due to a lack of context or depth.

How do we pull it out?

Let us go back to the most fundamental method: drawing a decision tree.

What is the end? The symptoms and phenomena we see are the end. That is what the very end of the chain looks like. What is the beginning? These symptoms serve as the starting point of our decision tree.

We map out every single possibility that could lead to this result. This becomes our first layer of subtrees. Then, we look at how many options lie behind each possibility, which forms the second layer. We keep repeating this until we exhaust all possibilities. This process does not actually consume many tokens because telling stories is what AI does best.

Once we have the tree, we start pruning. We take all the evidence we gathered and eliminate the nodes on the tree that are impossible. Alternatively, we can have the AI gather evidence based on these specific nodes.

In the end, we are left with only a few possibilities. This time, the AI’s chain of thought is constrained by the tree, preventing it from wandering off while still allowing it to be creative.

This is what it means to begin with the end in mind.

Technical Tactics

Once we have the right mental model, let us look at how we can make this process more stable and reliable from a technical standpoint.

I will use Claude Code as an example, but you can achieve similar results with almost any tool.

I mentioned those two tricks earlier, and their goal is simple: to make the agent understand that appearances can be deceiving. Beyond that, we can also use fixed workflows to make everything run smoother.

For instance, my favorite approach is to use the following prompt or skill right when the agent delivers a conclusion (or something that looks like one).

Assemble an Agent Team of three agents and hold a workshop. Their context must only contain raw evidence, with absolutely no inferences. One agent will support your viewpoint but must find supporting arguments strictly from this raw evidence. Another agent will oppose your viewpoint and must also find counterevidence strictly from this raw evidence. The final agent will cross-reference the conclusions and evidence from both agents and deliver a report.

Even though this approach leverages the Agent Team feature in Claude Code, these agents do not actually need to talk to each other. So even without an Agent Team feature, we can manually summon two opposing agents to give their conclusions, and then ask a third agent to cross-reference them.

This gives us an extra layer of defense before finalizing the conclusion. It allows us to check whether we or the agent fell into a bias due to self-suggestion.

Wrap Up

We must always remember that AI is an LLM. Every single word it speaks is based on probabilities and parameters, not facts. If it happens to state a fact, it is only because we constrained all the parameters enough to bring it close to reality.

“We cannot reach human-level intelligence by scaling up Auto-Regressive Large Language Models (LLMs). It’s a dead end… They don’t understand the physical world, they don’t have persistent memory, they cannot reason, and they cannot plan.” — Yann LeCun

This Turing Award winner points out that by relying solely on LLMs, we actually drift further away from AGI.

In this AI era, we must always remember the importance of keeping a human in the loop. The human is the driver. If we do not drive the investigation ourselves, the AI is just hallucinating.

Fortunately, using the fundamental and technical prompts mentioned above can make this task a lot less daunting. In fact, it actually makes it pretty simple.

Originally published on Medium

Stop Using Markdown with Claude Code

Why Confluence beats HTML and Markdown for human-AI collaboration

A recent article on the Anthropic blog sparked a massive debate.

The main idea is that using HTML is actually better than Markdown when collaborating with Claude Code.

And then the arguments started.

Supporters say Markdown looks terrible. By terrible, they mean it is both ugly to look at and hard to read, plus it lacks interactivity. On the flip side, critics argue that HTML burns through a ton of tokens and is just plain inefficient.

As for me, I do not really lean toward the Markdown camp, but I do not buy into the HTML argument either.

So let me break down the issues I ran into and how I solved them.

The Friction in Human-in-the-Loop Workflow

If you follow my work, you probably know I am not the type to just let agents run wild and do whatever they want. I constantly talk with them and guide their direction to get the exact output I need. To me, an agent is an accelerator and an amplifier, not a clone or a proxy.

Because of this, I need to communicate and iterate with my agents all the time.

At first, I used Markdown just like everyone else. My reasons were pretty standard: it uses fewer tokens, it is efficient, and it is easy for humans to edit.

But I quickly realized that when an agent generates a massive Markdown file, I lose interest in reading it. There are two main reasons for this. First, it is just too raw, which causes serious reading fatigue. Second, and this is my biggest pain point, it is incredibly hard to interact with. If I want to ask a question about a specific line, I either have to write it directly into the Markdown, which makes a mess, or copy and paste it back into the chat window to keep the conversation going.

Neither approach is sustainable. This is especially true for copying and pasting. I believe most people use agents specifically because they hate copying and pasting. Yet, here we are, going right back to our old ways just to keep the discussion alive, only in reverse: copying the agent’s output back into the chat window.

So, using Markdown for these discussions genuinely caused a lot of friction for me.

Another major issue is that all the back-and-forth edits on a Markdown file never get recorded.

  • What problem did we solve?
  • How did we solve it?
  • Why did we do it that way?

This context quickly vanishes as the Markdown gets edited over and over, especially when the agent updates it autonomously. The whole discussion process is completely lost.

These two massive roadblocks made me give up on Markdown as a collaboration tool.

The Problems with HTML

I actually gave HTML a shot.

I tried this tactic way before that blog post came out, and honestly, the results were mediocre at best.

There is no doubt that agents are great at writing HTML. However, adding interactive elements, like a text box for feedback, makes communication way too complicated. You have to give the agent explicit prompt instructions on how to build that highly interactive HTML, and you also have to tell it how to handle the communication loop.

After all, HTML itself is stateless. Usually, you just end up writing a file to some directory. You then have to establish a strict contract with the agent regarding where that file lives and what it looks like.

Plus, HTML still does not solve the missing context problem. To keep that context, you have to design precise contracts for those interactions. That is just as hard as architecting a whole system from scratch.

My Solution

So, we need to solve the following problems:

  1. High interactivity
  2. Context retention
  3. A simple, highly reusable design

Ultimately, I went with a very simple approach.

Since Markdown is hard to interact with, we just need to make it interactive.

All we have to do is send the Markdown into Confluence, and it instantly becomes an interactive page.

Confluence natively has every single feature we need:

  1. It looks clean and polished.
  2. It allows for interaction, using both inline and footer comments.
  3. It retains context because you can resolve comments without losing them.
  4. It includes version control, and Confluence can even show diffs between versions.

I already had a script that the agent could call to upload Markdown and turn it into a page anyway. In our organization, Confluence is the only place we publish RCAs and design docs.

I did not need to design anything new. I just called my predefined Confluence skill, and I solved all the pain points I mentioned earlier in one shot.

This was so much easier than trying to reinvent the wheel with HTML.

The One Thing I Didn’t Get

HTML does have one feature that Confluence cannot naturally replicate.

It can handle interactions that go way beyond text. By that, I mean doing more than just leaving comments. For example, if I were a data analyst, I could embed sliders directly into the HTML to build a live report. Or, I could generate fancy trend charts that let users dynamically switch timeframes and parameters.

Confluence simply does not offer that level of interactivity.

But frankly, I do not need it, so I do not care. I just wanted a medium to collaborate with my agent. I was not looking for a presentation layer to show off to other people.

Using Confluence was more than enough to solve all my pain points.

Originally published on Medium

I think you might have misunderstood a few things. First of all, you don’t need that many requests to scrape data for a dashboard. You can use GraphQL to pull most of the data you need all at once, and then just do some filtering and analysis on the application side. Plus, a dashboard doesn’t need to update every second or minute—even hourly updates are a bit overkill because people don’t write code or open PRs that fast, and we don’t need to stare at the dashboard 24/7.

So you might be over-engineering this.

Originally published on Medium

Build Free Web Scrapers with GitHub Actions

Master cost-free web scraping and automated dashboards using GitHub Actions

In our daily lives, we often encounter scenarios that require cron jobs and lightweight web scrapers. For example, I might need to periodically scrape data from a rental property website. Or I might want to extract statistical data from certain sites to create a report. These are actually simple daily tasks. However, they need a stable and reliable execution environment.

This sounds like a simple need. But it is actually quite hard to achieve without a cloud server or if we want to keep costs at zero. After all, we do not want to leave our own computers running 24/7 just to process extra tasks in the background. Not only does this consume a lot of electricity, but we also have to maintain a constant internet connection. On top of that, we need to store a massive amount of raw data.

So, is there a simple way for us to get a stable and reliable environment to run scripts periodically without spending extra money?

The answer is yes. In fact, I have been doing this a lot lately. The solution is to use GitHub Actions.

The great thing about GitHub Actions is that it provides a reliable runtime environment out of the box. It can continuously use cron jobs to run scripts on a schedule. At the same time, GitHub offers a massive amount of storage space. Most importantly, we do not have to pay anything at all when we use a public repository.

Here is an example. I regularly monitor our team members’ development progress to ensure the entire workflow runs smoothly without any bottlenecks.

For this specific example, I need a script to continuously scrape GitHub data. I also need to store that raw data. Furthermore, I need a dashboard to display this data and show how the team is operating. We typically use an AWS EC2 instance or a similar cloud server for this kind of requirement. However, I actually accomplished all of this by simply using a single GitHub repository.

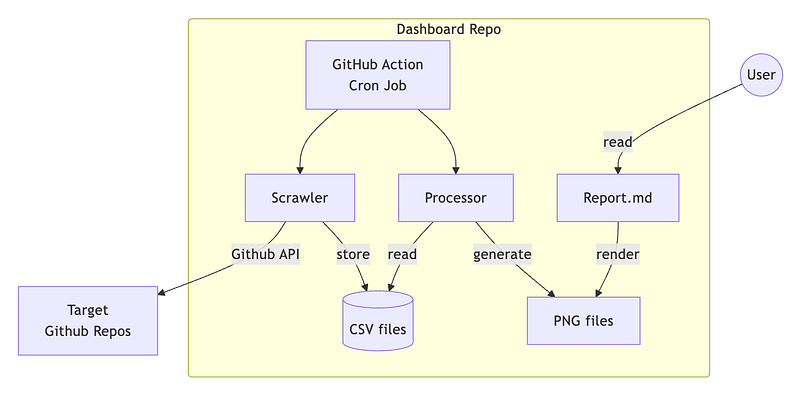
The overall architecture looks like the following.

Let us break down the core components first.

  • GitHub Actions is the key to everything. It sets the cron rules to trigger the process periodically. Every time it triggers, it first runs the Scrawler to collect the targeted data. In my case, it fetches metrics from another set of GitHub repositories. Then, it saves the data into CSV files. Each CSV file uses the timestamp as its filename. We can also organize them into directories by year if necessary.
  • The Scrawler and Processor are relatively straightforward. The Scrawler simply fetches and stores the data. The Processor then converts this raw data into visual charts. I personally prefer using Python’s Matplotlib for this task. It generates various line charts as PNG files and saves them right back into the repository.
  • GitHub Actions will automatically commit and push these generated files at the end of its run. This creates a complete and self-sustaining loop.
  • How do we present the dashboard? We can prepare a Markdown template in advance to render and display the PNG charts. We just need the Processor to overwrite the exact same set of image files every single time. This makes the dashboard look like it is constantly updating.

We have now built a highly cost-effective scraper. Both the computing resources and the storage are completely free.

GitHub Actions also comes with an added bonus. We can easily rerun the workflow when we encounter an error. This makes debugging very fast. It offers a massive maintainability advantage over a traditional cloud server.

In fact, I have already used this approach to build many scrapers for various purposes. Some examples include internal team dashboards and stock trading trackers. It becomes incredibly easy to mass-produce scrapers for different use cases once we have a solid template. I consider this a nice little bonus from my recent AI side projects.

Originally published on Medium

Interesting, so we’ve evolved from the Agile Manifesto to the Agile Vibe Coding Manifesto.

Personally, I still do design, I just don’t call it a “spec” anymore. To me, design is a fundamental, a deliverable intended for humans to read and review, rather than a “specification” that obsesses over every tiny detail.

I feed this design to the AI and use vibe coding to help it understand the goals and details that need to be executed at each stage. This is way more efficient than an SDD, and it actually lowers the chances of hallucinations.

Originally published on Medium

Master senior engineering hires with this high-concurrency RDBMS challenge

I recently designed an interview question for our team’s hiring process. I put a lot of thought into it and hid some clever details inside. Without further ado, let’s take a look at the prompt.

[Interview Prompt: Large-Scale Security Agent Status & Event Tracking System]
We have an enterprise-grade security monitoring product. The system must ingest telemetry from 100,000 endpoint Security Agents deployed globally. The reported data includes “Endpoint Connection Status” (e.g., Online/Offline) and “Security Events / Alerts”.
Due to the massive fleet size and high-frequency reporting, the system experiences a write throughput of 100,000 RPS.
To evaluate your understanding of core database mechanics, you are strictly constrained to use a traditional RDBMS (PostgreSQL or MySQL) as the primary storage layer. You may not rely on NoSQL solutions (such as Redis or Elasticsearch) to bypass this constraint.
Please provide the following:

  1. DB Schema Design: Detail your table structures, column data types, and Primary Keys.
  2. Index Design: Specify which indexes you would create and explain the reasoning behind your choices.
  3. SQL Queries: Write the exact SQL statements responsible for “Agents reporting data” (writes) and “Querying an Agent’s current status and events” (reads).

The beauty of this question lies in its hidden details. For example:

  1. It closely mirrors our actual product scenarios. This allows me to introduce our daily work and job requirements during the interview.
  2. Depending on my guidance or the candidate’s approach, we can turn this into a system design question for senior roles. Alternatively, we can scale it down to a basic CRUD problem for mid-level positions.
  3. It looks simple but contains many traps. It is very easy to make mistakes.

Let’s walk through the details one by one. I will explain this from the perspective of interviewing a senior candidate.

Level 1: CQRS

First, I expect the candidate to ask the most critical question. With such high RPS, what is the read-to-write ratio? I can tell them it is 1:100 or even higher. This is heavily write-bound.

When designing the database schema, we must optimize for writes. This means we need to design a separate data model specifically for reads.

How we design the read model leads to the second key question. What do the reports look like? After all, we need to customize the read model to handle this massive volume of data.

If we are building time-based aggregated reports, we might need to consider a sliding window design. If we are tracking recent events for individual agents, we could use a simple, lean table and implement data rotation to balance costs.

This is the first level. If the candidate fails this, I mentally lower the bar and switch to mid-level mode. Naturally, they will not secure a senior offer from me at that point.

Level 2: Insert or Update

Usually, a candidate’s first reaction is to design an agent table. Each agent gets a row with a status field indicating online or offline.

This design is fine for small datasets. However, it carries severe risks at scale, such as lock contention. When a company has a massive fleet of agents and the network is unstable, online and offline events trigger constantly. If we update a single column, countless services might end up waiting for the same row lock at the same time. This creates massive backpressure and can crash the service.

Therefore, we should prioritize an append-only design pattern for the status table.

But this introduces another problem. How do we handle agent retries? For instance, an agent sends a request but does not receive a response due to network issues. The standard behavior is to retry. How do we guarantee idempotency? A common approach is for the agent to generate a GUID (like UUIDv4) for each request. The service then writes this field to the database to deduplicate entries.

Level 3: Pagination

Whether we use CQRS or a single table for reads and writes, querying massive fact tables always requires pagination. We obviously cannot load all the data at once. So, how do we paginate?

I am sure many people immediately think of offset and limit. This is known as offset-based pagination. When the offset gets huge, the pressure on the database becomes immense. If a candidate can suggest keyset-based pagination here, they definitely earn bonus points.

What we need to do is design an auto-incrementing ID in the fact table. Every batch remembers the maximum ID of the current fetch. We then use that value as the starting point for the next batch. This method drastically reduces database pagination overhead.

If the candidate notices that this incrementing ID should be the primary key, that earns extra points too.

I have written an article about pagination before. Feel free to check it out if you are interested. I used several real-world examples to explain why we need to abandon offset. Explaining Pagination in Elasticsearch

This also brings up another issue. Keyset-based pagination makes it impossible to jump to a specific page or get the total record count. What if the product requires those features? This is not a technical test question, but I want to leave it here for everyone to ponder.

Level 4: Auto-increment

The previous level mentioned using an auto-incrementing ID as the primary key. The problem is that such massive tables will easily overflow a standard auto-increment integer. We have two options here.

The first option is to use a relatively large number space as the primary key. Timestamps are a good example. It is even better if the candidate knows about Snowflake IDs.

Timestamps solve most problems, but we do need to watch out for clock skew. However, clock skew does not cause major issues on this type of fact table.

The second option is to consider data partitioning or sharding. This leads us directly to the next level.

Level 5: Shard Key

Given our current setup with both a fact table and a dedicated read model, how would we shard the data?

There are two common approaches. One is to shard by tenant or even by agent. This is simple, intuitive, and effective. However, it creates hotspots. Shards belonging to large or highly active customers might not hold up for long.

I previously shared a classic formula for choosing a shard key. If you have not seen it, you can review it here. How to Choose a MongoDB Shard Key

The other approach is to shard by time. This adds extra complexity to our queries. This is standard practice in data engineering, but backend engineers are usually not accustomed to it.

Level 6: Index

How should we build indexes on the read table? The answer is simple. It completely depends on the specific product requirements. But what about the fact table?

The answer might be surprising. Do not use indexes. More accurately, do not build any extra indexes other than the primary key.

I actually already mentioned the reason. We are using keyset-based pagination. We only need the primary key as our query condition. We will not use any other queries.

Every added index on a fact table is an extra burden. This includes hardware costs and write performance penalties. The hardware burden happens because fact tables are massive, meaning the index will also consume a huge amount of disk space. On the other hand, writing data also involves updating the index B-tree, which slows down performance.

Level 7: Hot and Cold Data Separation

No matter how we shard, infinitely growing data will eventually hit physical limits or budget constraints.

How do we implement hot and cold data separation? This steps a bit outside the realm of pure SQL. However, a candidate who can consider this level of architecture is definitely expert-tier.

Why do we need to think about this from the start? If we do not establish this premise early on, adding it later as a new requirement becomes exceptionally troublesome.

I wrote an article detailing my practical experience with hot and cold data separation. It took months to finally push it to production. I linked the article right here, and it is absolutely a great read. How SHOPLINE Saves 40% Space in Main Database

Therefore, it is best to factor this into the design right from the beginning.

Wrap Up

The clever part of this problem is its flexibility. We can adjust the scenario at any time based on the candidate’s answers. This allows us to evaluate every candidate as fairly as possible.

The biggest problem with system design interviews is the lack of objective standards. Carefully crafted questions like this let us clearly grade a candidate’s actual skills.

Practical validation has shown that this approach brings solid guidelines to otherwise chaotic system design interviews.

Besides that, we can always scale this question down into a coding interview. For instance, we can ask the candidate to design a pagination algorithm or a sliding window algorithm. We can set goals based on the desired difficulty while avoiding the trap of AI-generated answers. I find this type of question very interesting.

I will continue to try expanding my own question bank. I want to design even more useful and practical interview questions in the future.

Originally published on Medium

Hexagonal Architecture: The Best AI Vibe Coding Guide

Boost review efficiency and code accuracy using layered architecture with AI

I finally found a development workflow that suits me best. It is highly efficient and ensures extremely high accuracy at the same time.

I think we can all agree on delegating the tedious task of coding to AI as much as possible. We humans just need to define what to do and verify the results. But I am not sure if we have noticed a problem. Humans eventually become the blocker in the whole process. AI writes code incredibly fast. We simply cannot do a complete code review. This usually results in an “always approve” situation.

This “always approve” habit is the exact reason why various bugs keep popping up. AI is great at writing code. However, it definitely does not guarantee zero mistakes.

So how can our review process keep up with the speed of AI? This is a question I have been thinking about lately.

Actually, the answer is already there. Long before AI came into the world, we already had a methodology to improve software maintainability. That methodology is layering.

Yes, layered architecture is nothing new. I have also written many articles about how to implement layered architecture and Domain-Driven Design (DDD). The most classic one is this article.

But in fact, I only favored basic layering in the past. I did not favor extreme layering strategies like hexagonal architecture. However, it is exactly the hexagonal architecture that can completely solve the current problem of inefficient reviews and excessive errors. Let us see why.

Hexagonal Architecture

This is a classic hexagonal architecture diagram. It has a few key points.

  1. Clear external dependencies. This includes the inbound interfaces (ports) flowing into the service and the outbound dependencies. All external dependencies have clear and well-defined interfaces to set the boundaries.
  2. Every external dependency has a corresponding adapter for implementation. For instance, a Postgres has a database adapter. External API calls have REST adapters.
  3. Inside the service, aside from boundary definitions, the rest is purely domain-specific business logic.

I believe even those unfamiliar with clean architecture or DDD can easily see the strengths of hexagonal boundaries from this diagram.

But the main reason I did not promote hexagonal architecture in the past is the manual labor involved. All these layers, adapters, and boundaries require manual coding one by one. This involves a massive amount of coding effort just to describe specifications instead of actually solving problems.

Therefore, at that time, hexagonal architecture would ironically become another blocker. It was not a review blocker but a coding blocker.

Let me give a classic example from my own experience. I can build three APIs in Golang with about 600 to 1000 lines of code, excluding tests. But if I use hexagonal architecture, it takes about 3000 to 4000 lines of code. This means 4–5x more effort, or even more, just for coding.

Vibe Coding Era

But times have changed now. Writing code is no longer the bottleneck. As long as we have clear and specific specifications, AI can easily generate thousands of lines of code.

That is right. Clear and specific specifications are exactly the strengths of hexagonal architecture. And the shortcomings of hexagonal architecture are perfectly covered by AI. They are a perfect match.

So what are the benefits of hexagonal architecture for us today? Let me explain using a concrete development workflow.

When we need to develop a complex microservice API, it will have many external dependencies. These include RPC between services, its own data storage, and even complex business logic.

We can manage all of these using the following development workflow. This is a specific example from a project I am currently working on. I strictly followed everything defined by hexagonal architecture.

Phase 1: Domain and Ports

  • Details: Struct fields and interface method signatures.
  • Human Focus: Check if the design is correct and if anything is missing.

Phase 2: Repository

  • Details: SQL, SQLC, and mapping.
  • Human Focus: A quick glance is enough. Tests will catch errors.

Phase 3: Infrastructure

  • Details: HTTP adapter, middleware, and Wire.
  • Human Focus: A quick glance is enough. If it compiles, it is mostly fine.

Phase 4: Service Layer

  • Details: State machine, validation, and notification.
  • Human Focus: Read line by line to ensure business rules are correct.

Phase 5: Integration Test

  • Details: 16 DB tests.
  • Human Focus: Ensure important scenarios are covered.

We can almost completely let AI write code for all phases. Each phase will correspond to a complete PR. This naturally includes a complete CI/CD process.

We can see that the scope requiring my careful review is clearly defined. It only includes phase 1 and phase 4.

Once I deeply verify in phase 1 that the interfaces of every external dependency are defined correctly, the behavior of the entire microservice is basically solid. Then, I just need to verify the internal core business logic is correct. This keeps the quality of the entire microservice at a high level.

Wrap Up

Through the strict layering of hexagonal architecture, we can easily achieve separation of concerns. We only need to focus on where we must focus. For the rest, we can trust the power of AI.

This is the core reason why I am embracing hexagonal architecture again in this era.

When we have the correct interfaces, even if errors occur, they will not be disastrous. Moreover, reviewing interfaces is relatively easy for humans.

I have been running this workflow for a while now. Facts prove that it is highly effective. It can significantly boost overall productivity. After all, we always say humans are the bottleneck of AI. I am working hard to eliminate this blocker.

Originally published on Medium

Claude Code vs Copilot: My 2026 AI Workflow

How to adapt to the unstoppable AI wave and new agent-driven workflows

My last article wrapped up at the end of 2025. This means I haven’t put out anything new for a few months.

I have a few direct and indirect reasons for this.

Direct Reasons:

  1. Winter is when I take long vacations for skiing and outdoor activities. The snow conditions are perfect in January and February.
  2. I need to stay extra focused on work to make those long breaks happen.
  3. I used to spend a lot of energy on Copilot. Now I am moving to Claude Code. It takes a lot of time to fine-tune the new workflow.

Indirect Reasons:

  1. I noticed that fewer people read traditional or digital media in the AI era. This includes platforms like Medium.
  2. Most new learning principles and methods are actually the same as before. Only the tools changed.
  3. I can already delegate most tasks to agents. There isn’t much left to share.

One major point to watch is media influence.

I used to work in e-commerce. I know how traditional operations work. This includes things like SEO, ads, and CRM. But AI is taking over the entry points for media. In the future, people might not even browse stores. AI will just place the orders directly. Traditional methods will not be very effective then.

This is happening on platforms like Medium too. To be honest, my month-over-month views on Medium are dropping fast. My revenue reflects this as well. This is a huge turning point for content creators. We must adapt to this new digital transformation. If we don’t, we will get left behind.

Another key point is tool integration. Every coding tool uses the same models now. The winner will be whoever can build a better workflow.

Let’s look at Skills as an example. Claude Code launched Skills to fix a major pain point with MCP. Usually, listing an agent’s abilities eats up a lot of context. Skills provides an index instead. The agent only reads the details when it actually needs a specific ability.

This concept is simple. I was already using Copilot this way before Skills even existed. I wrote my own Markdown files for common commands like gh.md, jira.md, and confluence.md. I told the agent about these files in the system prompt and to check those files when it needed details.

This gave the agent clear instructions for platforms like GitHub or Jira. This is exactly what Skills does. Claude Code just made it a built-in feature. Copilot recently added a similar Skills concept too. These are not groundbreaking features. They are just workflow integrations. But these tiny tweaks are what created the massive agent ecosystem we see today.

I didn’t feel a massive jump in quality when I moved from Copilot to Claude Code. Instead, the whole process just felt smoother. Take Hooks for example. I used to spend a lot of time tuning Copilot to get them right. Claude Code has them built-in. This makes everything much easier.

These are my takeaways from working and learning in 2026. I can’t put together a fully structured report yet. But I can say one thing for sure. This AI wave is unstoppable.

Originally published on Medium

0%