CT Wu

Software Architect · Backend · Data Engineering

導讀

在討論數據品質(Data Quality)前,我們往往是看著別人提出的品質指標,並且想方設法的套進自己的組織內,但這樣的流程是不對的。即便是Uber這種已經建立完整監控數據品質架構的公司,也不是一步登天的。

事實上,Uber也經過很長一段時間去摸索該如何設定指標以及如何建立架構,因此我們看到的一套完整架構也是根據組織內部的需要逐步調整最後才能貼合現實。


翻譯自:Uber Tech Blog

Uber在全球市場能有效維運線上環境歸功於數以百計的服務、機器學習模型和成千上萬的資料集。當成長突飛猛進時,Uber透過維護數據品質來提供優秀的商業決策。若是沒有數據品質保證,下游的服務和機器學習模型成效會顯著下降,這需要很多額外操作才有辦法回填那些髒資料。最糟糕的是,這有可能會根本無法被察覺,而變成隱形殺手。

這促使Uber建立一個數據品質平台(UDQ)來監控這些問題。為了資料品質能夠達標,UDQ支援超過2000個重要資料集,被且偵測到超過90%的資料問題。這篇文章會描述Uber怎麼定義數據品質標準,以及如何整合工作流程以便良好維運。

Read more »

Boosting Elasticsearch Cluster Performance: 3 Proven Tips

Tuning Elasticsearch configuration for improved resource utilization

This article will explain what the application does better from the underlying Elasticsearch implementation, but I’m not going to dive into too much detail in a very obscure way, so I’ll try to use a simplified process.

Before we get started, let’s go over a few important Elasticsearch terminologies.

  • Index: This is like the table in RDBMS or the collection in MongoDB, not to be confused with index in RDBMS.
  • Shard (aka Primary Shard): The access point where the data is written to the index, and of course the data can be read.
  • Replica: Access point to read data, can not be used to write data.

These terminologies are closely related to today’s three tips.

So, what is the role of these components in Elasticsearch?

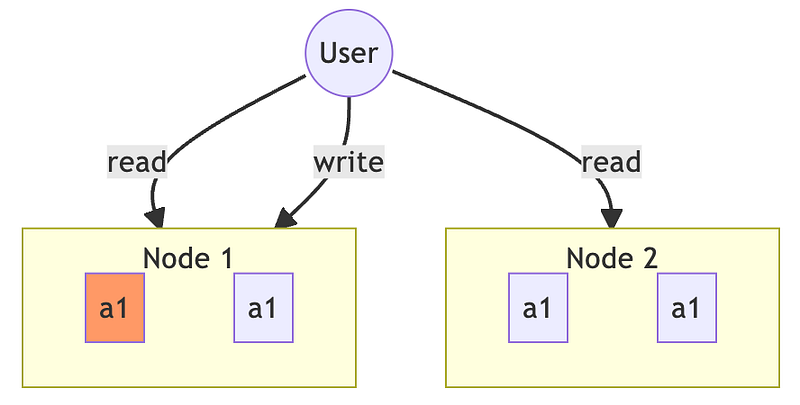
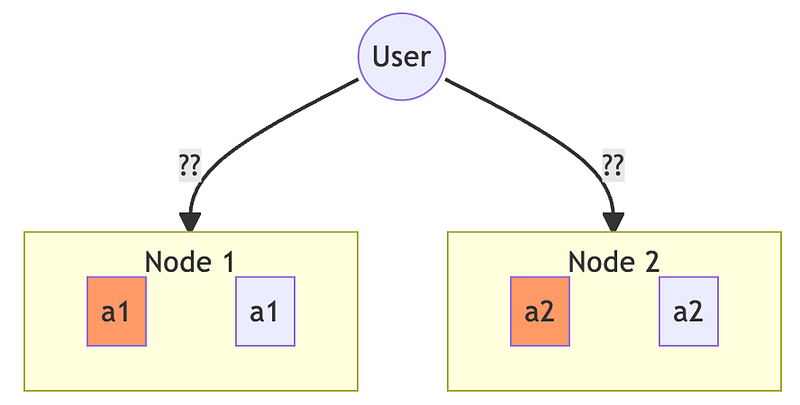
Let me illustrate with an example. Suppose we have a two-node Elasticsearch cluster with two indexes, A and B, and they are configured as follows.

A index

  • number_of_shards = 2
  • number_of_replicas = 1

B index

  • number_of_shards = 1
  • number_of_replicas = 2

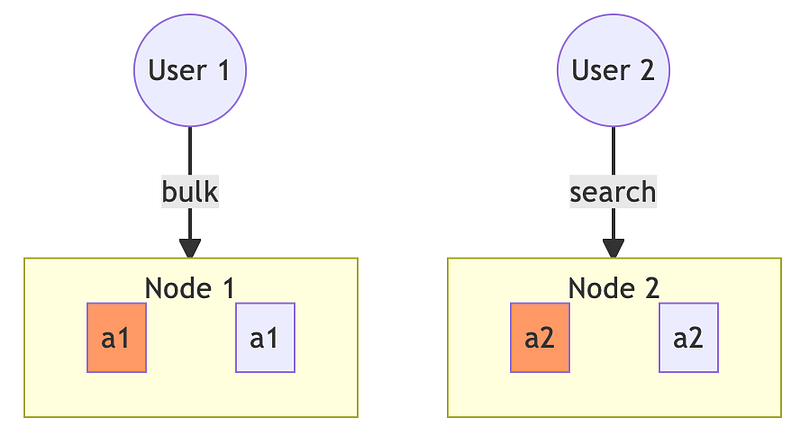
These are the index settings, which clearly indicate how many shards and replica are required, and the following diagram shows how Elasticsearch looks internally.

The red block represents the shard, and the normal block is the replica; the user, or application, will access both nodes to manipulate the corresponding data.

Tip #1: The number of shards should align to the number of nodes

This tip is limited to those large indexes, because we know the more shards are used, the more evenly the data is distributed, and if the data in each shard is only a little bit and distributed in many nodes, it will cause more search overhead.

According to the official recommendation, the data volume of a shard should be less than 50GB.

Why such a tip? Let’s use a counter-example to observe. Suppose we have many nodes, but each index has only one shard.

A index

  • number_of_shards = 1
  • number_of_replicas = 3

Then the user’s read operations will be evenly distributed on each node, but the write operations will be concentrated on a single node.

In the case of a large volume of writes, such a setting can create a performance bottleneck on a single node and affect every operation on that node.

Since Elasticsearch 5.x started to support hot warm architecture, if a cluster has hot warm architecture enabled, then the number of shards should align to the number of hot nodes.

Tip #2: The document should be routed

Let’s continue with the top example, assuming a two-node cluster, and index A has two shards and one replica each.

When a user writes to a document, which node does he write to?

This is determined by Elasticsearch’s built-in routing rules, briefly, by the following formula.

shard = hash(_id) % number_of_shards

The _id is automatically dispatched by Elasticsearch, but can of course be specified by the user. As for the hash algorithm, it is murmur3, which is not a consistent hash, so a specific shard will be calculated.

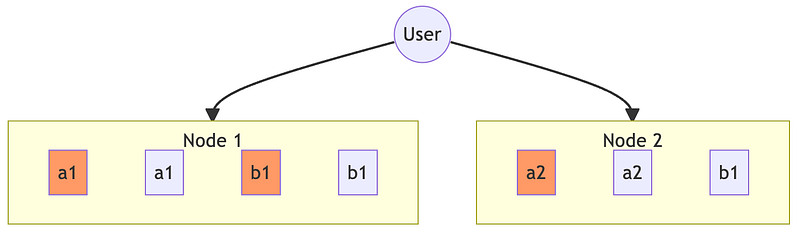
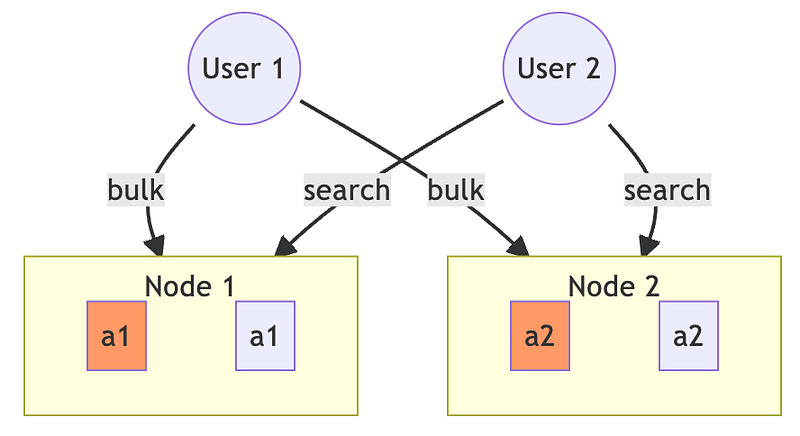
So, the worst case would look like the following diagram.

When one user starts a bulk operation, writing a large volume of documents to the cluster, and at the same time, one user is searching, the two users’ operations interfere with each other.

If there is a way to keep the data of a single user in a single node, then the above case can be effectively avoided. At most, one user’s search performance will be affected when he writes a lot. This is called custom routing.

Elasticsearch is able to add a routing parameter to read and write operations, so that the formula mentioned earlier becomes

shard = hash(routing) % number_of_shards

Nevertheless, it is also the need to pay attention to whether there will be a hotspot problem, i.e., data is overly concentrated in certain nodes.

I have an article to explain the design of sharding keys. Although this article is about MongoDB, the concepts are the same.

Tip #3: Turn off replica and refresh when doing a large volume of writes

When doing a large volume of writes, stop replication first to reduce resource consumption, and then turn on replication when the large volume of writes is complete. This can significantly reduce write consumption and improve the performance of the cluster.

Disabling replica is easy to understand, but what about disabling refresh?

Before we explain, let’s understand the mechanism of refresh.

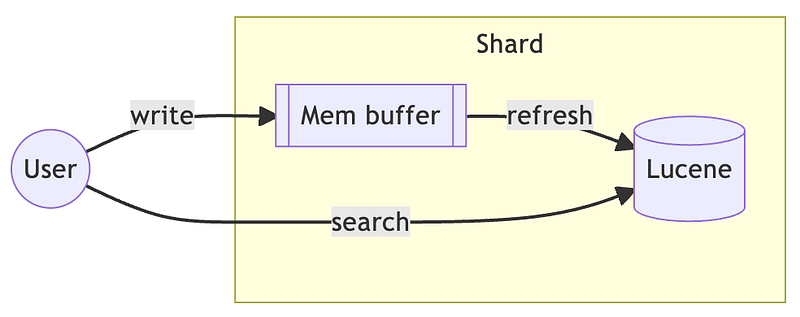
When a user writes data to the shard, it is first written to the memory buffer, and the data is invisible to the search operation at this time. Then, Elasticsearch writes the data in the memory buffer to the hard drive via refresh and converts it into Lucene format, and then it is really searchable.

There are two ways to refresh.

  1. refresh_interval in Index setting, refresh will be triggered automatically when the time is up.
  2. Explicitly call Refresh API.

We don’t actively invoke the Refresh API during heavy writes, so by turning it off, we mean turning refresh_interval longer or even off.

Of course, either turning off replica or turning off refresh is to reduce resource consumption so that all resources can be dedicated to processing large amounts of writes.

So, you may wonder, won’t turning off refresh cause data loss?

No, it won’t.

The reason is that Elasticsearch’s persistence model relies on more than just refresh. Let’s dig a little deeper.

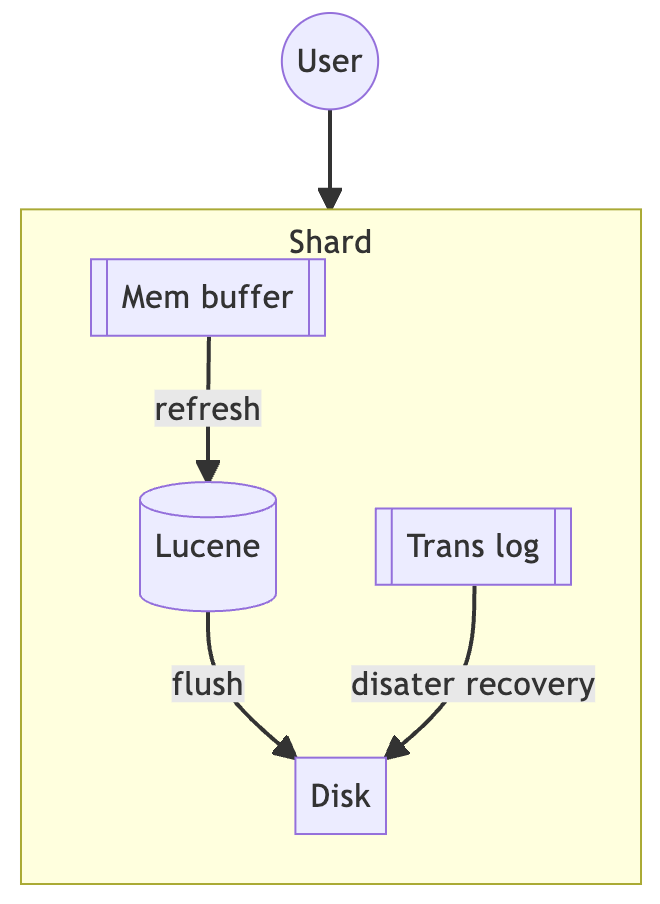
From the above diagram, we can see even the process of writing from the memory buffer to the hard drive is not really on the hard drive yet, it still needs to go through flush before it is really persisted.

However, this is a pretty long path, which is totally unreliable for a database, so in fact, when writing data, it will write to two places at the same time: the memory buffer and the transaction log.

In the event of a disaster, the entire written dataset can still be recovered through the transaction log. But of course, there is a price to pay for this. There is no insurance mechanism, and if the transaction log is corrupted, the data will really be lost. Nevertheless, I believe the chance is definitely much lower, and the loss is only for the data during this bulk writing period.

Conclusion

This time, we introduce three ways to significantly improve the performance of Elasticsearch clusters.

I have to say that in the big data world, it is obviously not enough to use all kinds of data storage. Without a deep understanding of the underlying implementation of data storage, there is a high risk of wasting resources. This will not only result in lower cluster performance, but also in higher hardware costs as more hardware is used to solve these overheads.

In this article, we briefly explain a few terminologies behind Elasticsearch, and then use this knowledge to learn more about optimization techniques. I believe you may be able to learn more details through this process.

If you have any good tips, please feel free to share them with me.

Originally published on Medium
這篇文章會從Elasticsearch的底層實作解釋應用程式要怎麼做會更好,但我不打算使用很晦澀的方式來描述太深入的細節,因此我會盡量使用簡化過的流程來說明。

在開始之前讓我們先來了解Elasticsearch幾個重要的術語。

  • Index:這就像是RDBMS的table或是MongoDB的collection,不要和RDBMS的index混淆了。
  • Shard(或稱Primary Shard):資料要寫入index的存取點,當然也能夠讀取資料。
  • Replica:讀取資料的存取點,無法用來寫入資料。

這幾個術語跟今天的三個技巧息息相關。

Read more »

Why choose TiDB? What problems does TiDB solve?

Before explaining the process of importing HTAP into Xiaohongshu, let’s briefly introduce Xiaohongshu.

Xiaohongshu is known as the Chinese version of Instagram, but in addition to the usual social functions such as video and image sharing, it also includes an e-commerce platform. According to the official website of Xiaohongshu, as of 2019, active users have exceeded 100 million.

It is both a social media and e-commerce website, and the amount of data generated each day is in the billions. In order to support data-driven decision making, these massive amounts of data must go through multiple layers of cleansing, transformation and aggregation, and more importantly, the real-time nature of decision making also need to address.

In addition, Xiaohongshu’s application scenarios and user numbers continue to grow, so the scalability of the entire data infrastructure is also a major challenge.

In the end, Xiaohongshu adopted TiDB as their real-time streaming storage.

Why Xiaohongshu chose TiDB?

In fact, Xiaohongshu already adopted TiDB for some projects in 2017, but it was widely used until 2018.

The three main reasons are as follows.

  1. Due to data-driven decision-making, there will be various OLAP needs of ad hoc queries, so the traditional OLTP database can not support the use.
  2. Many OLAP databases can handle queries efficiently, but the write performance is not good, while TiDB write also has great performance.
  3. In the scenario of horizontal scaling of data clusters, new instances must be available as fast as possible. TiDB keeps datasets consistent across all instances through a Raft majority mechanism.

Now, TiDB has been widely used in various domains of Xiaohongshu, including

  • Data warehouse application
  • Report Analysis
  • Real-time dashboard for sales promotion
  • Anti-fraud detection
  • etc.

Past Pain Points

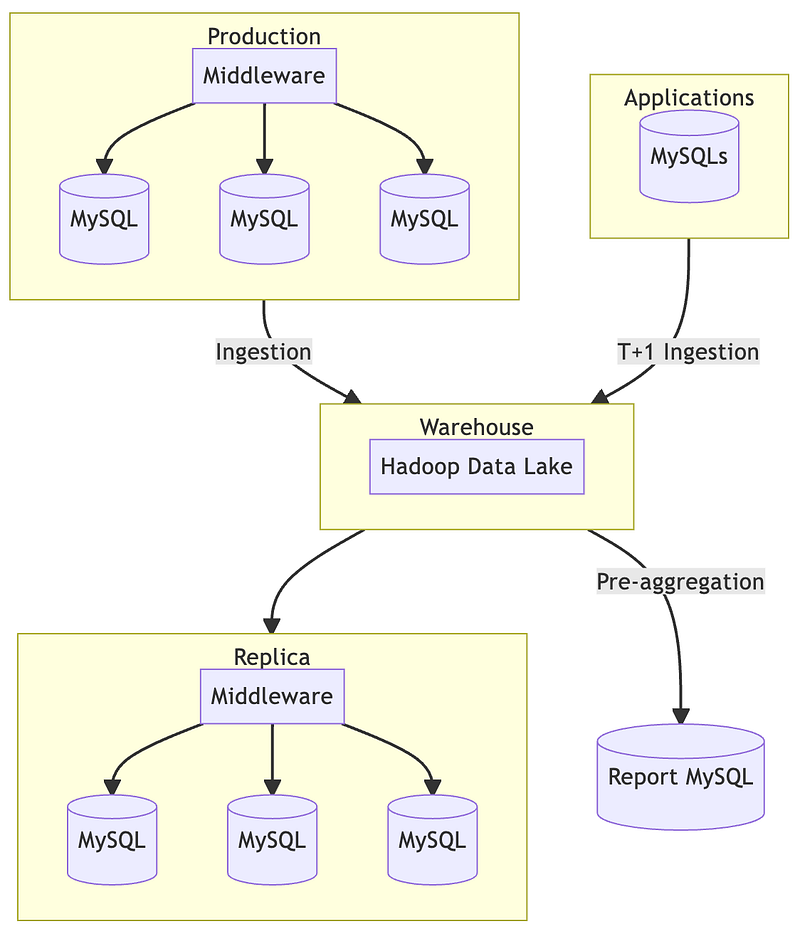
In general, the entire data architecture is as follows.

There are three typical use cases in such an architecture with poor performance.

Firstly, ad hoc queries are performed on the production database. To avoid increasing the overhead on the production database, a complete copy of the production database must be made, and all ad hoc queries are run on the replica.

However, the MySQL for production uses sharding, which creates a high complexity in operation. In addition to the difficulty of operation, the implementation of aggregation, such as group by, join, etc., on the middleware of sharding also leads to the complexity of implementation, and on the other hand, the transactions on the sharding MySQL is also a big challenge.

Secondly, in order to query reports more efficiently, report analysis is generated through pre-aggregation and stored in a standalone MySQL to avoid the latency of Hadoop direct query. However, since it is pre-aggregated, it cannot effectively respond to requirement changes. Moreover, a standalone MySQL has less scalability due to the lack of sharding.

Finally, to perform anti-fraud detection in various application scenarios, it must rely on the data stored in the data lake, which is not real-time, but T + 1 ingestion. This makes it impossible for anti-fraud to work within time, and even if fraud is detected, the damage is already done.

Solution

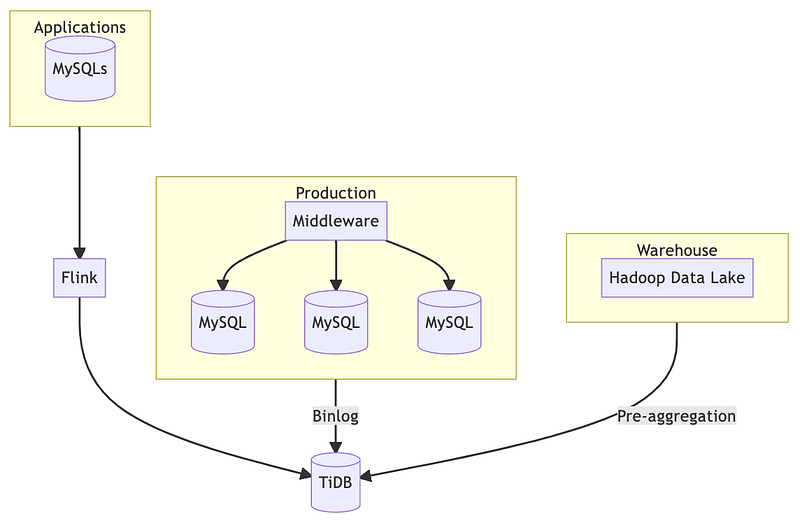
The answer to these three cases is TiDB.

In the use case of ad hoc query, there are two pain points must be dealt with, one is the difficulty of operation, and the other is the complexity of implementation. Then, just put all the data into TiDB and maintain one TiDB. Because TiDB fully supports MySQL 5.7, so it can be synchronized by MySQL binlog.

Of course, it is not as simple as that. To put the sharding databases into TiDB, it needs to process the data properly, i.e. merge them into one big wide table. Therefore, it needs to deal with the issues of merging and auto-incrementing primary keys in the streaming. But eventually, all the production databases will be synchronized with TiDB, and even for the data volume of Xiaohongshu, the synchronization delay is within 1 second.

Then, the same practice can be applied to report analysis and anti-fraud.

Because of real-time streaming, anti-fraud no longer takes T + 1 time to respond, and real-time streaming can be handled directly through Flink SQL. On the other hand, report analysis is easier because all the data is available and can be operated on a single database.

New Problem Occurred

When TiDB was first introduced, the version of TiDB used in Xiaohongshu was 3.x.

TiDB 3.x is still a row-based storage engine, and although it can achieve good performance in OLAP, it is still not good enough for large data volume. Furthermore, all scenarios use the same TiDB cluster which cannot isolate ad hoc queries and production applications.

But these problems are solved after upgrading to TiDB 4.x version.

The reason is TiDB 4.x introduces the HTAP architecture, which enables the coexistence of row storage engine and column storage engine. The new column storage engine called TiFlash is independent from the original row storage engine TiKV and will not interfere with each other.

When the application writes data to TiKV, the data is quickly synchronized to TiFlash through the Raft learner mechanism, so that the row storage and column storage are consistent.

In addition, TiDB uses internal CBO to know whether the query should use the row or column engine as soon as it comes in and automatically routes the query, which greatly reduces the complexity of the application.

TiDB 4.x also has a new mechanism that helps improve the performance of the entire data architecture: pessimistic locking. In TiDB 3.x, there was only optimistic locking, which made it easily possible for inter-transaction conflicts under huge data volume of continuous writes.

Once a transaction conflict occurs, it can only be retried on the client side, which significantly increases the complexity of application development. But pessimistic locking can effectively solve this problem, and the error handling of the application becomes more simple.

Conclusion

Actually, Xiaohongshu has also referred to ClickHouse when making technical selections, and the performance of ClickHouse has some better than TiDB. However, ClickHouse is relatively difficult to operate and maintain.

In addition, ClickHouse is a column storage engine, in the data update scenario performance is not good. If rewriting “update” to “ append”, it needs a lot of modification cost on one hand and extra de-duplication logic on the other.

Therefore, TiDB is the final choice.

From my point of view, HTAP is the future and can cover various use cases by merging row storage engine and column storage engine. It is cost effective to use only one database to handle various needs with big data.

In the past, in order to support a variety of data products, we had to continuously make technical selections among many databases and carefully consider various use cases, but with HTAP, these complexities no longer exist.

Personally, I am looking forward to seeing the gradual simplification of data engineering.

Originally published on Medium
在講解小紅書導入HTAP的過程之前我們先來簡單介紹一下小紅書。

小紅書號稱是中國版的Instagram,但除了一般的影音圖文分享等社群功能外,還包含電商營運平台等。根據小紅書的官網,截至2019年為止,活躍用戶已經破億了。

既是社交平台又是電商平台,每天產生的資料量是億級。為了要支援資料驅動決策,這些海量資料必須經過多層的清洗、轉換和聚合,更重要的是,決策的實時性也需要關注。

除此之外,小紅書的應用場景和用戶數都持續增長,因此整個資料基礎建設的擴充性也是一大挑戰。

最終,小紅書採用了TiDB作為他們實時串流的存儲。

Read more »

技術階梯

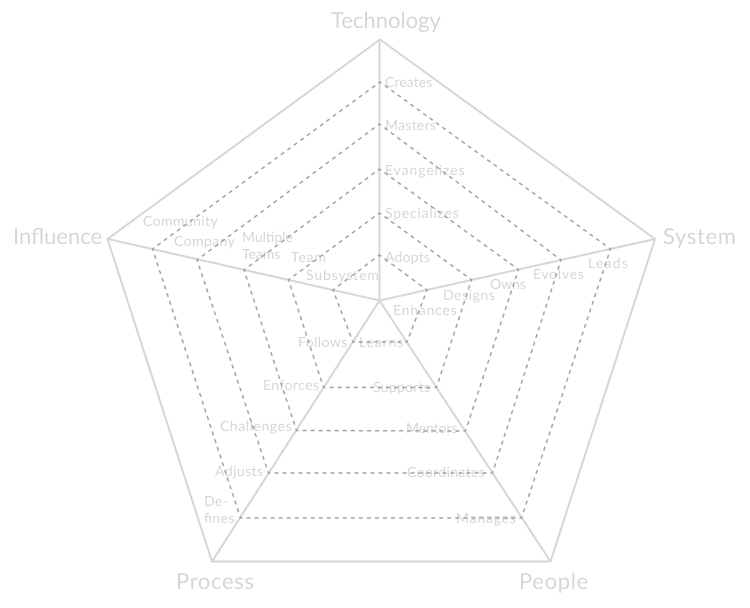
之前身為EM的時候(Engineering Manager)很喜歡在1對1會議上問團隊成員一個問題:把能力分成幾個象限,你會各給自己幾分?你預期要達到幾分?

這套流程我很喜歡,能夠有效在1對1會議上開啟一個有用的對話,並且也能同步彼此的認知以及安排未來的職涯發展和工作規劃。

事實上,這樣的作法並不是我獨創的,也有很多制式的模版,在Github上甚至也有人開源一個工程端的泛用型的模版。

這篇文章是對這個模版的翻譯。

上一篇文章我們提到主任工程師的四種角色,在這篇文章中我們對工程端的常見四個角色定義其能力象限。

  • Developer:另外常見的稱呼有programmer或軟體工程師,這角色需要有很深的技術底子。
  • Tech Lead:這就上一篇文章提過的角色,算是系統的擁有者之一,需要兼顧實際開發、架構知識以及線上環境維運。
  • Technical Program Manager:TPM是驅動跨工程團隊協做的先鋒,為的是讓產品走向不至於與技術脫節。
  • Engineering Manager:部門的管理者,負責讓部門維持和諧氣氛以及提昇部門的技術水準。
Read more »

主任工程師的種類

大部分公司內的生涯階梯(career ladder或說職涯規劃)都對主任工程師(staff engineer)定義了一組一致的標準。每個人都希望能從這清楚的標準中知道公司內的權責,但我們要知道,這標準其實是一般性的,不是為了每個人量身訂做的。對於主任工程師來說更是如此,一個主任工程師的權責往往結合了數種角色,很難被清晰定義。

不過這其中還是有規則可循的,大部分主任工程師的權責其實都能被歸納出一些模式,了解這些模式能更有效了解主任工程師這個角色。大致上來說有以下這四種。

  • Tech Lead:負責引導特定團隊,有點像是管理職,但多數時候這個角色會負責複數個特定領域。有些公司也會賦予這個角色管理權限,使其更貼近管理職,可以招聘、打考績等。
  • Architect:架構師負責確保某些關鍵系統的方向、品質和策略。這個角色必須同時具備深厚的技術底子並了解商業需求,甚至要領導組織決策。
  • Solver:這常被稱為救火隊,負責處理複雜難解的問題以及給予適當方向,有時候這角色會在特定領域深耕,但也有可能會隨著組織需要輪調。
  • Right Hand:這像是經營高層的左右手,具有一定的決策權。當要運作一個大型組織,這角色會扮演中樞角色,用來快速做出正確決策。
Read more »

Replacing Medium with Hexo

A complete replacement for Medium with nearly zero overhead

Recently I reached 1,000 followers, and it’s been a long journey, much longer than I thought ever.

Since a year half ago, I’ve been trying to post one article every Monday (except holidays), mainly about my work and studies, with the intention of getting more consistent exposure to attract more software engineers to discuss with me.

In this process, I found out the algorithm of the article exposure should have been drastically modified, even though the number of followers exceeded 1,000 but the number of views could be counted, and this is not even the number of reads.

This is not quite the same as what I wanted to achieve in the beginning, so I had the idea of building my own blog.

To this blog, I have several requirements.

  1. To be easy to manage, I do not want to manage this site also need too much coding or operation overhead.
  2. It should be easy to publish articles, the biggest advantage of Medium is it is easy to write.
  3. Be able to render charts and Mermaid. My articles rely heavily on these visualizations, but right now Medium is completely incapable of doing anything with charts and Mermaid, so I have to cut and paste them from another place.
  4. Be able to leave comments, this is very important, I just want to have more discussion to write articles.
  5. To support clipboard uploading images, this feature of Medium is really convenient.
  6. Be able to track hit rates and SEO, but the technical details of this are more complicated and not my top priority.

In the end, I chose Hexo with Github Pages as my website.

Firstly, it is quite easy to achieve this through Hexo’s built-in functions, and the generated static website is directly rendered as a Github Pages without the operation.

Secondly, after integrating Github Action, basically, after writing a Markdown file, it can be automatically published by directly pushing it to Github, which is almost the same process as writing articles on Medium.

To do the third and fourth points need to choose a good theme, I chose NexT.

For the fifth point, I used some tricks, nevertheless, I was able to do it, by using VS Code with Paste Image plugin.

This article will enable every engineer familiar with Git and open source software to build a fully functional blog in less than an hour.

Hexo + Hexo Action

About the basic usage of Hexo and Hexo Action here will not explain in detail, their official documentation is written completely.

I provide a SOP of my own, which can quickly generate a blog on Github Pages.

  1. Create two repositories, one for the Hexo source code and one for the generated static website. The name of the repository for the static website must be: <username>.github.io.
  2. Hexo’s source code repository just needs to git push the entire package of code after hexo init blog. Hexo has a sufficient .gitignore.
  3. If you need to use Hexo Action, you need to run npm install first to generate package-lock.json, which will be used in the deployment process.
  4. Generate a pair of keys for the deployment, set the private key in Hexo’s source code repository, and set the public key in the repository where the static site is located (which is still empty). For detailed process, please refer to Hexo Action’s official document.
  5. Put a Github Action workflow in the Hexo source code repository, basically the example of the official Hexo Action document can be applied directly after referring to the description.
  6. At this point, the two repositories are now connected properly, although the static site is not yet deployed. So we need to modify the Hexo config file: _config.yml to complete the deploy section at the bottom. For example:
1
2
3
4
deploy:  
type: 'git'
repository: git@github.com:<username>/<username>.github.io.git
branch: master

After following the SOP, you should be able to see the static site Hexo has created at your URL, https://<username>.github.io.

NexT Theme

To install a new theme is simple, just find the theme’s Github and add it via git submodule, in this article we’ll use NexT as an example.

git submodule add https://github.com/next-theme/hexo-theme-next themes/next

That’s it.

If you want to develop locally, remember to pull the submodule.

git submodule init
git submodule update

Next, modify Hexo’s config file: _config.yml, change the default theme to next, and the theme is applied.

Then, it’s time to customize NexT.

Since Hexo 5.0.0, it supports the dedicated theme config, which is _config.[theme].yml. So we only need to copy the default NexT config file to modify it.

cp themes/next/_config.yml _config.next.yml

I only care about two functions, Mermaid and comments.

Mermaid’s settings are as follows. Just turn it on, of course, you can also modify the layout.

1
2
3
4
5
6
mermaid:  
enable: true
# Available themes: default | dark | forest | neutral
theme:
light: default
dark: dark

The comment function is more interesting, NexT supports many kinds of comment functions, including the popular Disqus and Gitalk.

But I am hosted in a public Github repository, so Disqus is directly out because Disqus requires a shortname setting, but if the shortname is obtained, it will directly cause the account breach. Many other comment functions also face the same security concerns.

Even if the Hexo source code is hosted in a private repository, as long as the static site repository used by Github Pages is public, it will still be compromised. By the way, you can pay Github to use a private repository to host Github Pages.

Therefore, the comment system needs to choose OAuth base Gitalk or Utterances, nevertheless, I don’t know why NexT needs to set Gitalk’s secret key, so Gitalk is also out.

To enable Utterances is simple as well, follow the official website process to install the OAuth App and modify the NexT config file.

1
2
3
4
5
6
7
utterances:  
enable: true
repo: <installed repo>
# Available values: pathname | url | title | og:title
issue_term: title
# Available values: github-light | github-dark | preferred-color-scheme | github-dark-orange | icy-dark | dark-blue | photon-dark | boxy-light
theme: github-light

Thus, the third and fourth requirements are completed.

Uploading pictures via clipboard

To meet this requirement, we must first understand how the images are processed in Hexo.

There are two options for searching for images in Hexo:

  1. Under source folder.
  2. Under the asset folder, please refer to link for details.

We want to use the first way, as long as there are images under source, we can read them directly using Markdown syntax.

![](/images/abc.jpg)

In the above example, the absolute path to the image is actually <projectRoot>/source/images/abc.jpg.

But we also need a helper to read the clipboard, convert the content to image files and generate the corresponding Markdown syntax.

VS Code has a plugin, Paste Image, that makes this easy, and it can adjust the upload location and the resulting Markdown syntax accordingly. But Hexo currently places images under the source folder, which is different from the Markdown Preview plugin I currently use (Markdown Preview Enhanced).

The preview plugin is not very compatible, so I can’t get the project directory of VS Code to match the root directory of Hexo, so my VS Code project directory can only be opened under source folder as a compromise.

This makes the Paste Image settings need to be adjusted accordingly. Here are the settings I use, at <projectRoot>/source/.vsconde/settings.json.

1
2
3
4
5
{  
"pasteImage.basePath": "${projectRoot}",
"pasteImage.path": "${projectRoot}/images/",
"pasteImage.prefix": "/"
}

The reason for this compromise is I need the Mermaid preview feature of Markdown Preview Enhanced. Until I find another way to do it, this compromise is a doable solution.

The good thing is that my writing process is not affected. When I need to publish an article, I just add a new Markdown to my VS Code project path, push it to Github after writing, and then it will be automatically deployed, so it doesn’t matter if the VS Code project path is source.

Conclusion

By combining these following components, it allows me to write articles in a more efficient way than Medium, and the previous pain points of having to cut and paste Mermaid and tables have disappeared.

  • Hexo
  • Github Action
  • Github Pages
  • NexT

In addition, there is more room for customization, which is the best solution at the moment.

Currently, my audiences are divided into English and Chinese circles, and Medium’s exposure to Chinese articles is lower than English, so I will gradually adjust the posting frequency and content in the future. After that, I will adjust my posting strategy based on the tracking data I collect.

My main profession is a data architect, so this is my experiment with Medium and the blog I own.

Originally published on Medium
對於電商來說,大促是很重要的,無論是中文圈的1111或外語區的黑色星期五,這些大促事件基本上可以為店家帶來鉅額收益,甚至一天就佔一年GMV的兩成以上。

當然,大促期間也會伴隨巨大的流量,並為電商網站帶來嚴重挑戰。因此,這篇文章我會就我看到的資訊來介紹Shopify如何應對大促事件。

在開始談論技術細節前,我們先來看一些Shopify在2022黑色星期五的數據

  • 在每分鐘3 TB的egress流量下維持99.999+%的uptime。
  • MySQL的尖峰QPS超過14M,平均也超過8.5M。
  • 尖峰時刻每秒索引16G的log。
  • 為了監控擴充性和可用性,每分鐘收集20B以上的運維指標,並且每秒儲存27G的指標資料。
  • 全站QPS為1.27M。
  • 透過Resque處理超過32B個非同步任務。
  • 傳送超過24B個webhook。
  • 批次的資料管線總共寫入1.1T個訊息。
  • 尖峰時刻Kafka每秒處理20M個訊息。
Read more »

有鑑於繁體中文的資源太少,我想或多或少做點翻譯,把一些有用的文章和書籍翻成中文。

當然,會以我日常閱讀為主,主要是架構師、大數據相關的。

順便測試一下放圖片。

Read more »
0%