CT Wu

Software Architect · Backend · Data Engineering

Making Debezium 2.x Support Confluent Schema Registry

Build a Debezium 2.0 connect image with Avro support

We have talked about how to design a real-time data pipeline, and one of the important components is Debezium. In order to load OLTP databases from various microservices into the data warehouse seamlessly, we often rely on Debezium to do this task.

In addition, in previous article, we mentioned the evolutionary features of Apache Avro and the usage of Confluent Schema Registry, which can be integrated to build a more automated real-time data pipeline.

Nevertheless, since Debezium 2.0, it removes the native Confluent support, and if we want to use Debezium with Confluent schema registry, we have to build the Debezium Connect images manually.

The reference is as follows.

The original image repository is at GitHub. We can follow the Dockerfile of connect-base/2.0 to build the connect-base image.

In addition to the original dependencies, we need more about Confluent supports.

  • kafka-connect-avro-converter
  • kafka-connect-avro-data
  • kafka-avro-serializer
  • kafka-schema-serializer
  • kafka-schema-registry-client
  • common-config
  • common-utils

Therefore, Dockerfile should be as follows.

1
2
3
4
5
6
7
8
9
10
11
12
13
14
15
16
17
18
19
20
21
22
23
24
25
26
27
28
29
30
31
32
33
34
35
36
37
38
39
40
41
42
43
44
45
46
47
48
49
50
ARG DEBEZIUM_DOCKER_REGISTRY_PRIMARY_NAME  
FROM $DEBEZIUM_DOCKER_REGISTRY_PRIMARY_NAME/kafka:2.0

LABEL maintainer="Debezium Community"

USER root
RUN microdnf -y install libaio && microdnf clean all
USER kafka
EXPOSE 8083
VOLUME ["/kafka/data","/kafka/logs","/kafka/config"]
COPY docker-entrypoint.sh /
COPY --chown=kafka:kafka log4j.properties $KAFKA_HOME/config/log4j.properties
COPY docker-maven-download.sh /usr/local/bin/docker-maven-download
#
# Set up the plugins directory ...
#
ENV KAFKA_CONNECT_PLUGINS_DIR=$KAFKA_HOME/connect \
EXTERNAL_LIBS_DIR=$KAFKA_HOME/external_libs \
CONNECT_PLUGIN_PATH=$KAFKA_CONNECT_PLUGINS_DIR \
MAVEN_DEP_DESTINATION=$KAFKA_HOME/libs \
CONFLUENT_VERSION=7.0.1 \
AVRO_VERSION=1.10.1 \
APICURIO_VERSION=2.2.5.Final \
GUAVA_VERSION=31.0.1-jre
RUN mkdir "$KAFKA_CONNECT_PLUGINS_DIR" "$EXTERNAL_LIBS_DIR"
#
# The `docker-entrypoint.sh` script will automatically discover the child directories
# within the $KAFKA_CONNECT_PLUGINS_DIR directory (e.g., `/kafka/connect`), and place
# all of the files in those child directories onto the Java classpath.
#
# The general recommendation is to create a separate child directory for each connector
# (e.g., "debezium-connector-mysql"), and to place that connector's JAR files
# and other resource files in that child directory.
#
# However, use a single directory for connectors when those connectors share dependencies.
# This will prevent the classes in the shared dependencies from appearing in multiple JARs
# on the classpath, which results in arcane NoSuchMethodError exceptions.
#
RUN docker-maven-download confluent kafka-connect-avro-converter "$CONFLUENT_VERSION" fd03a1436f29d39e1807e2fb6f8e415a && \
docker-maven-download confluent kafka-connect-avro-data "$CONFLUENT_VERSION" d27f30e9eca4ef1129289c626e9ce1f1 && \
docker-maven-download confluent kafka-avro-serializer "$CONFLUENT_VERSION" c72420603422ef54d61f493ca338187c && \
docker-maven-download confluent kafka-schema-serializer "$CONFLUENT_VERSION" 9c510db58119ef66d692ae172d5b1204 && \
docker-maven-download confluent kafka-schema-registry-client "$CONFLUENT_VERSION" 7449df1f5c9a51c3e82e776eb7814bf1 && \
docker-maven-download confluent common-config "$CONFLUENT_VERSION" aab5670de446af5b6f10710e2eb86894 && \
docker-maven-download confluent common-utils "$CONFLUENT_VERSION" 74bf5cc6de2748148f5770bccd83a37c && \
docker-maven-download central org/apache/avro avro "$AVRO_VERSION" 35469fee6d74ecbadce4773bfe3a204c && \
docker-maven-download apicurio "$APICURIO_VERSION" f7874b2e2a59dfa829242d9a52b44230 && \
docker-maven-download central com/google/guava guava "$GUAVA_VERSION" bb811ca86cba6506cca5d415cd5559a7
ENTRYPOINT ["/docker-entrypoint.sh"]
CMD ["start"]

There are three required environments to specify those versions of dependencies.

  • CONFLUENT_VERSION: 7.0.1
  • AVRO_VERSION: 1.10.1
  • GUAVA_VERSION: 31.0.1

Confluent packages rely on Guava, which is a common util package.

The latest Confluent version is 7.3.3 until now.

Avro and Guava are located at official maven repo.

After having connect-base, we can build connect like main Dockerfile except the base image, which should be our owned.

Conclusion

Once the image is built, how do we verify the image works?

Here is an official Debezium tutorial.

If the built image can pass the tutorial, then the image works.

By the way, if you need a Debezium 2.0 with Confluent 7.0.1 image, here’s a ready-made.

Originally published on Medium

Experimenting in Python with specific Avro compatibility scenarios

There is a complete article on Avro compatibility and what should we do in the various compatibility modes.

In my opinion, this article is really good and makes it easy to understand how to make a breaking change with Avro format. But I still want to actually test what results these steps will have, so this article records my experimental process.

First, we build an experimental environment, basically we only need a schema registry. I choose Confluent Schema Registry, mainly because it’s simple to deploy and use, and the Confluent official document provides a complete local experimental environment. Nevertheless, I only need two core components, the broker and the schema-registry.

1
2
3
4
5
6
7
8
9
10
11
12
13
14
15
16
17
18
19
20
21
22
23
24
25
26
27
28
29
30
31
32
33
34
35
36
37
38
39
40
41
42
43
44
45
46
47
48
49
50
51
52
53
version: '2'  
services:
zookeeper:
image: confluentinc/cp-zookeeper:7.2.1
hostname: zookeeper
container_name: zookeeper
ports:
- "2181:2181"
environment:
ZOOKEEPER_CLIENT_PORT: 2181
ZOOKEEPER_TICK_TIME: 2000

broker:
image: confluentinc/cp-server:7.2.1
hostname: broker
container_name: broker
depends_on:
- zookeeper
ports:
- "9092:9092"
- "9101:9101"
environment:
KAFKA_BROKER_ID: 1
KAFKA_ZOOKEEPER_CONNECT: 'zookeeper:2181'
KAFKA_LISTENER_SECURITY_PROTOCOL_MAP: PLAINTEXT:PLAINTEXT,PLAINTEXT_HOST:PLAINTEXT
KAFKA_ADVERTISED_LISTENERS: PLAINTEXT://broker:29092,PLAINTEXT_HOST://0.0.0.0:9092
KAFKA_METRIC_REPORTERS: io.confluent.metrics.reporter.ConfluentMetricsReporter
KAFKA_OFFSETS_TOPIC_REPLICATION_FACTOR: 1
KAFKA_GROUP_INITIAL_REBALANCE_DELAY_MS: 0
KAFKA_CONFLUENT_LICENSE_TOPIC_REPLICATION_FACTOR: 1
KAFKA_CONFLUENT_BALANCER_TOPIC_REPLICATION_FACTOR: 1
KAFKA_TRANSACTION_STATE_LOG_MIN_ISR: 1
KAFKA_TRANSACTION_STATE_LOG_REPLICATION_FACTOR: 1
KAFKA_JMX_PORT: 9101
KAFKA_JMX_HOSTNAME: localhost
KAFKA_CONFLUENT_SCHEMA_REGISTRY_URL: http://schema-registry:8081
CONFLUENT_METRICS_REPORTER_BOOTSTRAP_SERVERS: broker:29092
CONFLUENT_METRICS_REPORTER_TOPIC_REPLICAS: 1
CONFLUENT_METRICS_ENABLE: 'true'
CONFLUENT_SUPPORT_CUSTOMER_ID: 'anonymous'

schema-registry:
image: confluentinc/cp-schema-registry:7.2.1
hostname: schema-registry
container_name: schema-registry
depends_on:
- broker
ports:
- "8081:8081"
environment:
SCHEMA_REGISTRY_HOST_NAME: schema-registry
SCHEMA_REGISTRY_KAFKASTORE_BOOTSTRAP_SERVERS: 'broker:29092'
SCHEMA_REGISTRY_LISTENERS: http://0.0.0.0:8081

Next, let’s follow the steps in the reference document to actually evolve a field, in other words, evolve a string field into a record field.

I wonder what happens in the following scenarios in the default BACKWARD compatibility mode, and also how the unworkable scenarios described in the article will be presented.

  1. The consumer is fully engaged in the producer’s schema.
  2. The consumer only uses the initial schema.
  3. The consumer lags behind the producer’s version.

The whole experiment process is as follows.

To run this script needs to install the dependency first.

pip install confluent-kafka fastavro

The execution results are actually as expected, i.e., there are no problems, and the consumer only parses the parts that can be understood.

In addition, if the compatibility mode is BACKWARD_TRANSITIVE, the following error will be encountered.

SchemaRegistryError: Schema being registered is incompatible with an earlier schema for subject “example.test.BACKWARD_TRANSITIVE-value”, details: [Incompatibility{type:READER_FIELD_MISSING_DEFAULT_VALUE, location:/fields/0, message:person_name, reader:{“type”:“record”,“name”:“Person”,“namespace”:“example.test.BACKWARD_TRANSITIVE”,“fields”:[{“name”:“person_name”,“type”:{“type”:“record”,“name”:“Name”,“fields”:[{“name”:“first_name”,“type”:“string”},{“name”:“last_name”,“type”:“string”}]}}]}, writer:{“type”:“record”,“name”:“Person”,“namespace”:“example.test.BACKWARD_TRANSITIVE”,“fields”:[{“name”:“name”,“type”:“string”,“default”:“”}]}}] (HTTP status code 409, SR code 409)

On the other hand, if it is FORWARD_TRANSITIVE, we will encounter the following.

SchemaRegistryError: Schema being registered is incompatible with an earlier schema for subject “example.test.FORWARD_TRANSITIVE-value”, details: [Incompatibility{type:READER_FIELD_MISSING_DEFAULT_VALUE, location:/fields/0, message:name, reader:{“type”:“record”,“name”:“Person”,“namespace”:“example.test.FORWARD_TRANSITIVE”,“fields”:[{“name”:“name”,“type”:“string”}]}, writer:{“type”:“record”,“name”:“Person”,“namespace”:“example.test.FORWARD_TRANSITIVE”,“fields”:[{“name”:“person_name”,“type”:{“type”:“record”,“name”:“Name”,“fields”:[{“name”:“first_name”,“type”:“string”,“default”:“<NOT_IN_USE>”},{“name”:“last_name”,“type”:“string”,“default”:“<NOT_IN_USE>”}]},“default”:{“first_name”:“”,“last_name”:“”}}]}}] (HTTP status code 409, SR code 409)

The above error also occurs at the corresponding step and cannot be continued, as stated in the reference document.

Conclusion

This article is mainly about the experimental process, but after experiencing it, it is also better to understand the best practices that should be followed for schema evolution.

The best practice principles for schema evolution are mentioned in this article.

  1. Make your primary key required.
  2. Give default values to all the fields that could be removed in the future.
  3. Be very careful when using ENUM as the can not evolve over time.
  4. Do not rename fields. You can add aliases instead.
  5. When evolving schema, ALWAYS give default values.
  6. When evolving schema, NEVER remove, rename of the required field or change the type.

I’m not sure where his source is from, but the descriptions match my past experience quite well.

Originally published on Medium

A practical example of authentication via Google

Authentication is always an important topic, basically, any website needs authentication function. Traditionally, we need to maintain our own database, frontend, backend and middleware to achieve complete authentication. But thanks to OAuth, we now have many easy options, such as using Google accounts for authentication.

In this article, we would like to introduce a way to make any website have Google authentication without any modification.

Why is there a need for this? Sometimes we can easily deploy a tool to the cloud, but we don’t want the tool to be available for public access, so we want to add authentication to it. However, we don’t want to modify the tool’s code, so we’re attempting to find a more efficient way to do this.

For example, Apache Flink is a powerful and easy to develop streaming framework that provides a fully functional web portal. Nevertheless, the web portal has no authentication mechanism, so anyone who can access it can upload jobs.

The official documentation recommends several approaches to mitigate this downside, but those approaches are too lightweight, on the other hand, to provide a full authentication mechanism, Flink supports Kerberos integration which is too heavy. Therefore, we need a plugin that makes it easy for a website to support common authentication.

Solution Concept

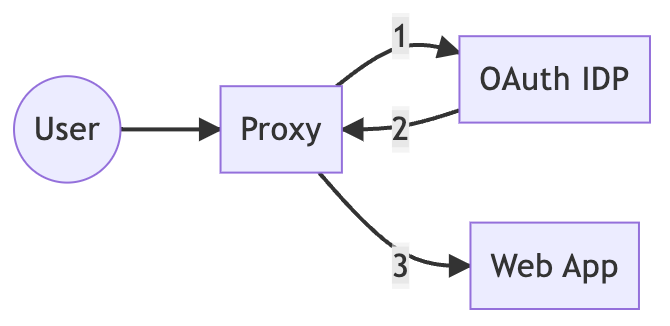
From the above diagram, we can find out a user does not access the service directly, but through a Proxy, which verifies and determines whether to allow access.

Therefore, we do not need to modify the code of the service, we just need to plug a Proxy in front to achieve our goal.

In fact, there are many Proxies that provide this function, in this article we choose the most common one OAuth2 Proxy, and use Google OAuth as an example.

Setup Step by Step

First, we need to go to Google Cloud Console to create a new project, the process is not difficult, just fill it out.

Next, navigate to Credentials under API & Service and create a new credential. There is only one field that needs careful consideration, Redirect URL, here fill in the http://localhost:4180/oauth2/callback that is needed for the example.

Please remember the Client ID and Client Secret after you finish creating, we will need them later.

Now, let’s use a simple web app as an example, which is the hello-app provided by Google.

1
2
3
4
5
6
7
version: '3'  

services:
hello-world:
image: gcr.io/google-samples/hello-app:1.0
ports:
- "8080:8080"

Running this docker-compose.yml should start hello world, and you can see the corresponding message at http://localhost:8080. At this point, the web app is working without authentication.

Let’s add a Proxy to implement authentication.

1
2
3
4
5
6
7
8
9
10
11
12
13
14
15
16
17
18
services:  
oauth2-proxy:
ports:
- "4180:4180"
image: bitnami/oauth2-proxy:7.3.0
command:
- --http-address
- 0.0.0.0:4180
environment:
OAUTH2_PROXY_UPSTREAMS: "http://hello-world:8080/"
OAUTH2_PROXY_CLIENT_ID: <YOUR_CLIENT_ID>
OAUTH2_PROXY_CLIENT_SECRET: <YOUR_CLIENT_SECRET>
OAUTH2_PROXY_COOKIE_SECRET: <A_STORNG_SALT>
OAUTH2_PROXY_HTTPS_REDIRECT: "false"
OAUTH2_PROXY_EMAIL_DOMAINS: "*"
OAUTH2_PROXY_PROVIDER: "google"
OAUTH2_PROXY_REDIRECT_URL: "http://localhost:4180/oauth2/callback"
restart: always

There are three fields to fill in this example, including the Client ID and Client Secret just mentioned, as well as the secret needed by a proxy, if there is no special need, then just generate it. I am using a Python script to generate, in fact, there are many ways, choose the one you are familiar with.

1
2
import secrets  
print(secrets.token_hex(16))

Just launch this docker compose directly after completion. You can find that if you access http://localhost:4180, you will be redirected to Google Authentication. Once authenticated, you can see the original hello world result.

Finally, we can close the originally opened 8080 port. Here is a complete docker-compose.yml, copy and paste it directly with minor modifications and it will work.

1
2
3
4
5
6
7
8
9
10
11
12
13
14
15
16
17
18
19
20
21
22
23
24
version: '3'  

services:
hello-world:
image: gcr.io/google-samples/hello-app:1.0
ports:
- "8080"
oauth2-proxy:
ports:
- "4180:4180"
image: bitnami/oauth2-proxy:7.3.0
command:
- --http-address
- 0.0.0.0:4180
environment:
OAUTH2_PROXY_UPSTREAMS: "http://hello-world:8080/"
OAUTH2_PROXY_CLIENT_ID: <YOUR_CLIENT_ID>
OAUTH2_PROXY_CLIENT_SECRET: <YOUR_CLIENT_SECRET>
OAUTH2_PROXY_COOKIE_SECRET: <A_STORNG_SALT>
OAUTH2_PROXY_HTTPS_REDIRECT: "false"
OAUTH2_PROXY_EMAIL_DOMAINS: "*"
OAUTH2_PROXY_PROVIDER: "google"
OAUTH2_PROXY_REDIRECT_URL: "http://localhost:4180/oauth2/callback"
restart: always

If the function is not working properly, it is possible that Google’s OAuth client needs start time, wait for it a little.

Conclusion

This article is a real example of what can be done, and it is quite straightforward.

Nevertheless, it is important to accomplish our goal to add authentication to any web app. For this example, we chose Google OAuth as the easiest to implement, but actually OAuth Proxy supports a lot of IDPs, and there is a complete list in the official document.

To understand this article, you don’t even need any background knowledge of OAuth, just follow the steps. Enjoy.

Originally published on Medium

Another Way to Design Short URL Service

An out-of-the-box feature in AWS

Short URL service is a common feature, not only does it look better with shorter URLs, but it also has many additional benefits. For example, when a commercial website is sending out promotion SMS, shortening the URL can effectively save the cost of SMS.

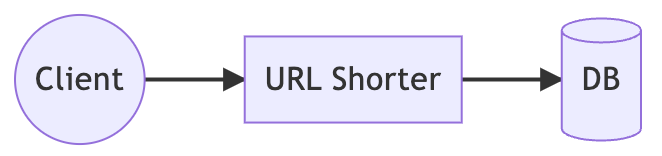
In addition, short URL services involve many important concepts of system design and are a common question during technical interviews. To design the architecture of a short URL service, we usually start with the following diagram and discuss some considerations.

General Rules

  • Generation rate: Knowing the rate at the client side to generate short URLs allows us to evaluate what kind of database is needed. In addition, the generation rate also affects whether ACID, i.e. InsertIfNotExisted, is required.
  • Read frequency: If it is a system with a large number of reads, we will always need to consider caching.
  • Retention period: How long to keep the generated short URLs and the generation rate can be multiplied to know the collision probability of the algorithm and whether the database needs to be sharded.
  • Additional features: The need to provide additional features also directly affects the system design, e.g., if we want to track usage, how to update the counters in the case of caching.

The above is a list of functional requirements, but of course, there are also non-functional requirements.

  • Availability: How long does the short URL service allow for downtime, which will determine whether a load balancer needs to be used and whether the database needs to be clustered.
  • Scalability: When the usage increases, not only the service itself must be able to scale horizontally, but also the bottleneck of the database must be addressed.
  • Consistency: What should be done when two concurrently generated short addresses are the same?

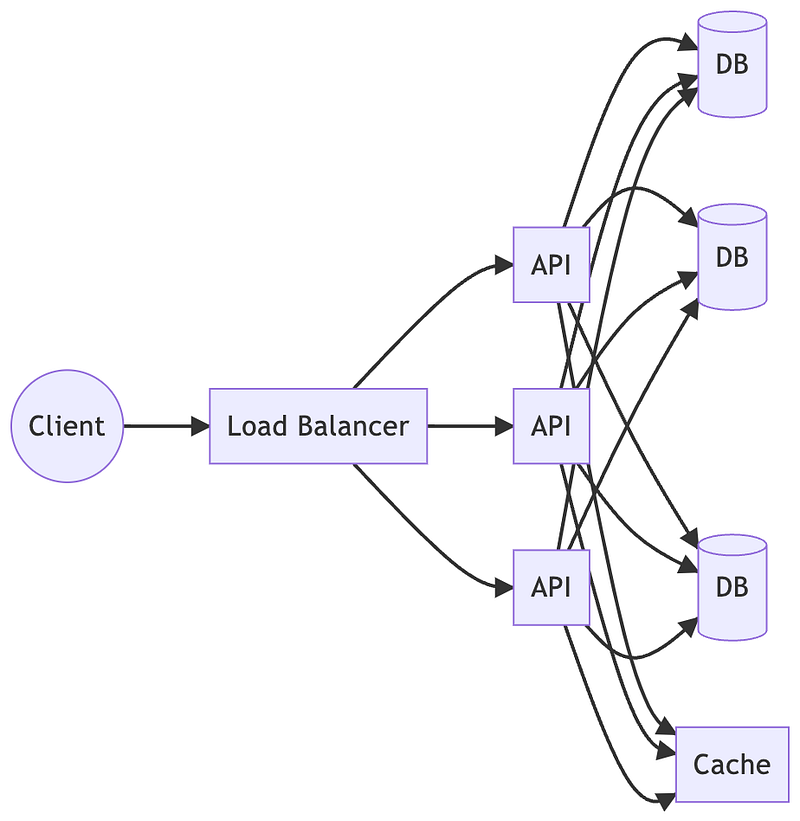
In the end, in order to achieve a scalable and highly availability short URL service, the architecture diagram usually becomes as follows.

Well, it’s a bit complicated, but it’s actually putting in all the factors mentioned before.

In order to provide scalability, there is a load balancer to spread the traffic to many API services, and each API generates its own short URL and writes to the corresponding database cluster based on sharding rules. When reading, in order to reduce the database load, we first read from the cache, and then read from the database if it does not exist.

In addition, we have to consider whether the database is SQL or NoSQL, and if it is SQL, we have to design our own sharding mechanism. If it is NoSQL, how to implement ACID. Oh, we haven’t mentioned the monitoring, the monitoring of API, the monitoring of each database shard, and so on and so forth.

As for the hashing algorithm, that is not the focus of this article. After all, the system architecture alone is troublesome enough.

Another Way

In fact, there is a simpler way to achieve a highly scalable and available short URL service.

Using AWS S3 with AWS Cloudfront, there is a step-by-step tutorial in the following article.

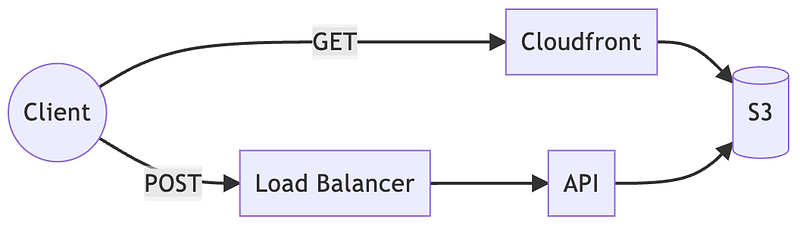
Briefly, the S3 object setting x-amz-website-redirect-location can automatically convert the read object to HTTP 301 Redirect, and then with the built-in integration of AWS Cloudfront and S3, we can do the caching.

The whole architecture will become very simple.

Because S3 itself is highly available and scalable, and can be treated as unlimited volume, our problem becomes very simple, we just need to manage the creation of the short URL itself.

Furthermore, both S3 and Cloudfront are monitored by AWS Cloudwatch, so it saves a lot of maintenance effort.

If we want to know the performance of short URLs, we just need to enable Cloudfront’s access log and analyze it with AWS Athena. The official AWS documentation will have enough information.

One more point to note is that AWS S3 has a built-in rate limit. If short URLs are generated and written directly to the root directory, then the entire service is limited to 3500 short URLs per second.

However, this can be avoided by a little trick. The rate limit rule is based on the object prefix, so we just need to add slash appropriately after generating short URLs. For example, if the generated short URL is 10 characters, abcdefghij, then the mid slash can effectively avoid the rate limit by turning it into abcde/fghij.

Another problem is that AWS S3 itself does not have ACID, so when two objects with the same path but different metadata will occur the latter override the former. To avoid this problem is not difficult, we need only to add additional characters into the short URL, e.g. the last few digits of epoch.

Consider the ten-character short URL abcdefghij with the rate limit problem can become 12/abcdefghij.

This depends on creativity, there is no fixed answer.

Conclusion

Short URL service is a good topic to learn system design, although the function is simple, but can cover most of the system design issues.

But if we really want to implement a short URL service on our own, then those interesting topics will soon become nightmares. Therefore, I prefer to use some existing solutions, such as AWS S3, rather than building a complete system from scratch.

However, even with an existing solution, those system design issues must be carefully evaluated, such as rate limit and ACID.

System design is interesting, especially when there are many alternatives, and the process of weighing the pros and cons is always engaging.

Originally published on Medium

How to Make Example-based Testing Better

Writing maintainable unit tests

I have introduced property-based testing before and mentioned that property-based testing is designed to cover the shortcomings of example-based testing. Since it is difficult to generate examples to hit various edge cases and boundary conditions, we generate a large number of examples in an automated way to cover the tests completely.

Nevertheless, there is a big challenge in property-based testing, how to write a validation condition?

We can’t expect what kind of input will be there, so it’s like we have to rewrite the original test target in a different way to be able to verify it. For example, if we want to verify the function add by a property-based test, then our verification condition will be as follows.

a + b == add(a, b)

When the test target is complicated enough, writing such a condition is extremely hard, not to mention, if I have a way to write the verification condition, why didn’t I write the test target in that way?

Anyway, the example-based test still has its value.

Then, how to write a good example-based test? I’m not sure you have ever encountered a problem when there are too many examples in a unit test, making it almost impossible to modify the unit test.

When we are not the author of a unit test, it is difficult to understand the author’s thinking in a complex unit test, and it is also difficult to understand a complex test case completely.

Therefore, this article introduces a few ways to make example-based testing easier.

Table-based Testing

First of all, before simplifying the unit test, we need to understand the structure of the unit test, which I call the 3A principle.

  • Arrange: At the beginning, we need to prepare test data and test preconditions.
  • Act: Then the actual execution of the test target.
  • Assert: Finally, we verify that the execution results are as expected.

No matter what kind of unit test is used, it basically involves these three steps. There are several reasons why unit testing becomes complicated.

  1. Expected results are hard to produce.
  2. The number of test cases becomes larger over time.
  3. Relationship between the arrangement and the assessment cannot be identified.
  4. Arrangement workload is huge.

The root cause of the first one is usually the complexity of the test target, which means the unit itself is too large, so it is necessary to reduce the scope of the unit test.

The second reason is the focus of this article. When writing unit tests, we often add a corresponding test when we encounter a new bug, resulting in a test case getting larger and larger. Here is a simple example.

1
2
3
4
5
6
7
8
9
10
11
12
13
14
def test_calculator():  
# 1st
expression = "2 + 3"
ret = calculator(expression)
assert ret == 5
# 2nd
expression = "2 + 3 * 4"
ret = calculator(expression)
assert ret == 14
# 3rd
expression = "(2 + 3) * 4"
ret = calculator(expression)
assert ret == 20
# and so on

Such a case will get larger and it is not difficult to find plenty of duplicate codes that differ only in parameters. So how should we simplify it?

Building a table.

1
2
3
4
5
6
7
8
9
10
def test_calculator():  
table = [
("2 + 3", 5),
("2 + 3 * 4", 14),
("(2 + 3) * 4", 20),
# and so on
]
for expression, expected in table:
ret = calculator(expression)
assert ret == expected

By building a table, all we need to do for adding new cases in the future is to add the corresponding entries to the table. There is a more elegant solution to this approach in the PyTest framework: parametrize. Here is a PyTest example.

1
2
3
4
5
6
7
8
9
10
11
12
13
import pytest  

@pytest.mark.parametrize("expression,expected",
[
("2 + 3", 5),
("2 + 3 * 4", 14),
("(2 + 3) * 4", 20),
# and so on
]
)
def test_calculator(expression, expected):
ret = calculator(expression)
assert ret == expected

With parametrize, it can handle loops directly, so the code is much more simple. Of course, I feel building a table is enough to achieve our goal.

Building a table also solves problem 3, so we can easily know in the table what are the changing conditions of the test and how to relate them to the expected results.

And what is problem 4? Let’s continue with the calculator example as an extension. Suppose our calculator is able to remember the results, how should we test it?

1
2
3
4
5
6
7
8
9
def test_calculator():  
calculator = Calculator()
expression1 = "x = 5 * 10"
calculator.calculate(expression1)
expression2 = "y = 2 + 3"
calculator.calculate(expression2)
expression3 = "x / y"
ret = calculator.calculate(expression3)
assert ret == 10

From the above example, we know the state of the target will change with time and input, so how to build a table?

1
2
3
4
5
6
7
8
9
10
11
12
13
def test_calculator():  
table = [
("x = 2", "y = 3", "x + y", 5),
("x = 2", "y = 3 * 4", "x + y", 14),
# and so on
]
for *expressions, expected in table:
calculator = Calculator() # no init params
for expression in expressions:
ret = calculator.calculate(expression)

assert ret == expected
calculator.reset() # important

It still seems to work, but this simple example already makes the test logic a bit complicated. If our target changes its state not only with the input, but also with the initialization state and many external conditions, then the table will have more and more columns and complexity will arise.

Is there a way to simplify it even further? So that people who need to add new cases in the future will know what to do at a glance?

Yes, I call it config-based testing.

Config-based Testing

Let’s continue to look at the example of this calculator.

1
2
3
4
5
6
7
8
9
10
11
12
13
14
15
16
17
scenario:  
- calculator_test1:
expressions:
- x = 2
- y = 3
- x + y
execute: calculate
expect:
result: 5
- calculator_test2:
expressions:
- x = 2
- y = 3 * 4
- x + y
execute: calculate
expect:
result: 14

By writing a human-readable configuration file, we can simply describe the test scenario we want, and in addition, we can read the purpose of the past cases. I believe maintaining a configuration is more relaxing than maintaining code.

Of course, in the beginning, we have to use a parser to handle the configuration, but it is worth such an investment. Moreover, when the behavior of the target is affected by many factors, we only need to add descriptive fields to the configuration file.

Frankly speaking, such a configuration file will not be any difficult even if it is written by someone who does not know how to write programs, and anyone can help us improve the test coverage.

Conclusion

It is not hard to write a unit test, but it takes a lot of effort to write a unit test that is easy to maintain.

When we write a unit test, we often look at the test case from the author’s point of view, but in fact, it is often someone else who maintains the case. That other person does not have the original idea of the author, which makes it very difficult for us to maintain the unit test.

Even worse, when the test cases become large, the functional evolution is seriously affected. Have you ever changed a little bit of code and the unit test exploded: a lot of red lights, and you wanted to fix it but found that you couldn’t understand what it was testing?

Sometimes, we document the purpose of these test cases in a file, but document synchronization is a major challenge, and the documents are often not up-to-date.

It is better to let the file itself be an executable object. It is far more efficient to write documents as a unit test than to “explore” the concept of testing afterward.

This article uses an interesting feature of PyTest, but actually, PyTest is very deep and profound, so if you have more great uses for PyTest, please feel free to share them with me.

Originally published on Medium

Orchestrating DBT with Airflow

Make an easy management data pipeline

Airflow is one of the great orchestrator today. It is a highly scalable and available framework for orchestrating, and more importantly, it is developed in Python. Therefore, developers can develop in Python based on the various operators provided by Airflow. In addition, the Airflow community is quite active, and many operators are constantly added to the ecosystem.

These advantages make Airflow the preferred choice for data engineers working on ETL or ELT, although there are many other frameworks for orchestrating workflows, such as Argo workflow, but for engineers who rely heavily on Python development, Airflow is much easier to harness and maintain.

But Airflow is not without drawbacks, one of the biggest problems is it is a monolith. When workflows are continuously added, this monolith will sooner or later become a big ball of mud. Another problem is that Airflow is a distributed framework and it is not easy to verify a complete workflow in local development. There are many tools that improve on Airflow’s shortcomings, such as Dagster, but the fact of the monolith remains unresolved.

Although Airflow has been widely used in a diversity of data engineering domains, the role of the data domain has been further differentiated as the domain has become increasingly popular. In addition to the traditional Data Engineer, Data Analyst and ML Engineer, a new role has recently become more common and is called Analytical Engineer.

Let’s briefly describe the responsibilities and capabilities of these roles.

  • Data Engineers: are responsible for developing and managing the entire data pipeline lifecycle, i.e. they are the main developers of ETL and ELT. They are mainly proficient in distributed architectures, programming (mainly Python), and data storage and its declarative language (mainly SQL).
  • Data Analyst: End-user of data, using already structured data for analysis in various business situations. Very good at using SQL and various data visualization tools.
  • ML Engineer: This role is interesting and has a different position in each organization, but in general, work related to machine learning, such as tagging data, data cleansing, data normalization will be involved, so there are opportunities to develop ETL/ELT, but the main responsibility is still the framework and model of machine learning, of course, is mainly in Python.

So, what is the position of an Analytical Engineer?

They are also responsible for managing the lifecycle of the data pipeline, but the biggest difference between them and data engineers is their lack of the concept of distributed architecture and the ability to develop programs.

Well, how to develop a data pipeline without programming? Thanks to the various tools in the data ecosystem, especially dbt, even if you don’t know programming, you can still implement data pipelines as long as you are familiar with SQL.

The emergence of such a role brings a new perspective into the data world.

Traditionally, in an Airflow-based data pipeline, although most of the business logic is made up of SQL, there is a lot of code that must surround the SQL in order to make it work. For example

  1. the declaration of the DAG.
  2. database connections, including credentials, connection pools, etc.
  3. implementation of SQL calls through PythonOperator or the corresponding database operator.
  4. defining the upstream and downstream dependencies of the DAG

In Airflow, all these must be developed in Python, but it is undoubtedly a big challenge for those who do not know how to program.

Decomposing the data pipeline

It’s time to decompose Airflow, but before we talk about decomposition, let’s talk about why we need Airflow still instead of replacing it.

Airflow is a competent orchestrator, i.e., workflow manager. Have you wondered before

What exactly is an orchestrator?

Let me illustrate with a simple example.
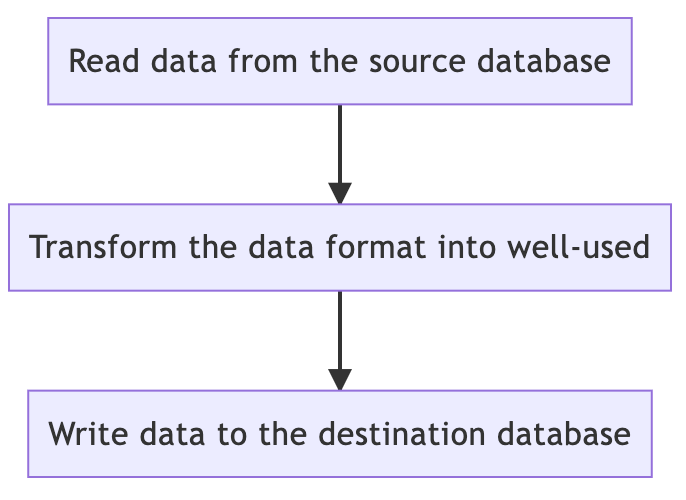
From the above diagram, this is a typical ETL, the following tasks cannot be executed until the previous task is done, and there is a dependency relationship between all tasks, which is a workflow. The purpose of the orchestrator is to ensure that each task can follow the instructions, one after the other.

What if the previous job fails? Then it automatically retries. The orchestrator will make sure that the entire workflow follows the direction you have planned. If it does fail, it can also send a notification to inform the developer something wrong.

From the above description, we know it cannot be solved by replacing Airflow, although it is feasible to move all the business logic from Airflow to dbt. If we put all the processing into dbt, we will immediately encounter a problem: what should we do if something goes wrong after executing dbt run?

Do we execute dbt run again?

A huge package of retries has several issues as follows.

  • It can take a long time
  • The development must be done with extra care, all models must be idempotence.
  • The cost of accessing the database and the cost of network transmission are not low when the volume of data is high.

Therefore, decomposing Airflow seems to be a more reliable solution.

The tasks can be delivered to dbt are done by dbt, but the whole workflow is still under Airflow’s control.

Oops, that’s a loop, isn’t it? We still need Airflow and we still need programming. No, not really, we can still do complete development on dbt, we just need a mechanism to enable Airflow to understand the model composition and relationships within dbt, and then Airflow can trigger dbt.

Back to the topic

What we want to do is exactly as the title is orchestrating DBT with Airflow.

In fact, we have surveyed many solutions in this process, all of which are not ideal. But finally, we found a relatively reliable solution.

Here is the reference we found, which is a trilogy and similar to the problem we are trying to solve.

Let me summarize briefly.

First, we still use dbt for complete development, which also solves the problem that Airflow is not good at local development.

Then, the CI/CD pipeline is triggered to execute dbt compile when we commit the dbt-related code into the version control system, in order to get the artifact manifest.json under the target folder.

With manifest.json, we can get the dbt model dependencies by reading the file in Airflow, then we only need to write the basic conversion framework, and then we can call the dbt corresponding models through Airflow’s BashOperator.

The whole development process can be dbt-based, and take full advantage of Airflow’s workflow management capabilities.

Conslusion

Decomposing monoliths is the trend of complex software development nowadays, just like the rise of microservices architecture, there will be a need for decomposing in the big data area.

However, in the big data area, decomposition is not just a clear cut of each domain based on domain-driven development. After all, when doing data analysis, we always want to have a centralized data warehouse.

Therefore, the data engineer’s approach to decomposition will be different from the software engineer’s. In this case, although we are decomposing Airflow, we still have a new dbt as a monolith, except Airflow calls dbt by model.

The decomposition is done at the level of the model and the execution period, which is a new attempt. I feel this concept can also be introduced into software development.

There is also a decomposition approach that is introduced from microservices architecture into the big data area, i.e. data mesh. But this article is already too long, let’s save the data mesh for the future.

Originally published on Medium

Microservices start Here: Chassis Pattern

A good service template is the top priority

When we talk about microservices, we have to understand that the number of services within the microservices architecture is significant; in some large organizations where the number of microservices is even in the tens of thousands.

If each service setup has to go through a complicated programming process, then it will be a huge overhead to develop a large number of microservices just to build them. Therefore, we would like to have a service template that can be applied across the organization, so that we can develop a new service without the complicated “first step” and start directly from the functionality.

Such a design pattern is called a microservice chassis.

Nevertheless, there is no standard definition of what should be included in the chassis, but a few essential items are listed in some books.

  • Security
  • Externalized configuration
  • Logging
  • Health check
  • Metrics
  • Distributed tracing

Indeed, these are the keys to running a microservice, but from my point of view, they are far from enough. Because, in an organization, there is a lot of additional works must be handled when setting up a service.

So, this article will describe what my ideal chassis should contain. I will divide these items into three parts: must-have, nice-to-have, and best-effort, and explain the meaning of each item.

Must-have

Let’s start with the must-have items, which can be divided into several categories within the must-have items.

  • CI/CD related
  • Function related
  • Troubleshooting related

CI/CD related

Items under this category are when a new source code repository is created and there are established rules based on organizational specifications or team practices, so whether it is a microservice or not, these items should be available as long as the code is managed.

  1. Linter: Whatever the programming language is, there are actually corresponding development specifications, for example, Python has PEP8, Javascript has ESLint’s Airbnb rules, etc.
  2. Formatter: In addition to code writing conventions, there are also conventions for code layout, such as Golang’s built-in gofmt.
  3. Folder structure: The structure of folders has some fixed conventions in various programming languages or frameworks, for example, Golang has standard project layout.
  4. Unit testing: Of course, as long as the software is developed, it should be tested, so each source code repository needs to have a well-defined test framework. In addition to the test suite that must be installed, it is also necessary to define where the test files should be placed, such as in the src/tests directory or on the same level as the source code.
  5. Integration testing: With unit testing, integration testing is also important. If you are not sure how to distinguish between the two, please refer to my previous article. Integration testing will need to prepare application dependencies, such as databases, etc. A common practice is to define the entire test environment through docker-compose.yml.
  6. Package management: Each language has a corresponding package management tool, such as pip or poetry for Python, npm or yarn for Javascript, etc. In addition to the package management tool, it is also necessary to prepare a lock file to fix the versions of the dependent packages.
  7. Dockerfile: In the microservices architecture now mostly exists in the container system, so it is important to prepare a Dockerfile developed based on best practices, in order to make containers more secure and efficient. Here are some best practices for building Python containers.
  8. Pipeline template: When the Dockerfile is available, I believe it should be possible to publish at least one of the simplest applications. Then, depending on the version control system or release system used by the organization and the organization’s defined release specifications, a basic CI/CD release pipeline can be written. Because each organization uses a different system, it should be prepared to meet the needs of the moment, such as Bitbucket pipeline, Gitlab CI, Github Action, etc. They all use different formats.
  9. Static application analysis: The last item is static analysis, which is divided into code level analysis and application level analysis. Common code analysis includes test coverage, memory leaks, package dependencies, etc. Application-level analysis is for possible vulnerabilities, such as the use of Synk.

Function related

There are many items listed above, but they are not finished yet.

Those items focus on CI/CD, but application development is the core, so there will be some preconditions in the software development.

  1. Config loader: An application’s configuration may come from many different sources, for example, the default configuration file can be overwritten by environment variables, and even specify the path to a new configuration file. Take the Postgres container as an example, it is possible to create a database through POSTGRES_DB, and if we want to create multiple databases, then we can mount the sql files under docker-entrypoint-initdb.d. These rules should be part of the template when setting up a new application, so we don’t need to write each once again.
  2. Feature toggle loader: The feature toggle and its use are described in my previous article. Feature toggles are already a common strategy in software development, so they should be pre-defined in the similar way as the config loader.
  3. Web framework: The most important thing in a microservice chassis is of course to choose the front/back end framework. I believe that the same framework should be used cross the same organization, then the framework should be from the template.

Troubleshooting related

When there is a function that can be published, what happens when there is a problem in the production environment? Especially when there are a large number of microservices under the microservice architecture, it is necessary to provide sufficient observability to identify the root cause of the problem.

  1. Distributed tracing: It is a common requirement for microservice architectures to be able to trace the processing rate between each service, and even the time share of database calls within each service, so that the entire service mesh can be mapped. There are many common tools, such as the open sourced Open Telemetry or the commercial New Relic, Elastic APM, etc. These tools require an agent to be installed in the application, and therefore the package and initialization need to be defined.
  2. Logger: In order to analyze the behavior of applications, logging plays a significant role. How to record logs, how logs are collected and the format of logs are all related to the team practice, so how logger should be implemented will also be a standard process.
  3. Health check: Among the tens of thousands of microservices, how to know each service is still alive? The most common practice is to define a fixed REST API for monitoring, so this fixed API will be defined by the template, but the implementation still has to be developed based on each service’s characteristics.
  4. Metric exporter: Although distributed tracing is already available to collect general metrics, some application-related behaviors cannot be collected, and some distributed tracing frameworks provide the ability to customize metrics, so how the application’s custom metrics are exported also needs to be defined.
  5. Local development environment: In the VM era or earlier machine era, we used to debug directly on the production environment and even reproduce the problems on it, but in the microservice era, we should develop and debug locally. After all, with thousands of microservices and many instances of each service, it is impractical to run them in the production environment, so how to develop and debug locally? I believe templates also need to provide the corresponding capabilities.

In fact, all these items are closely related to organizational specifications or team practices, so each different organization should have a service template of its own, and there may be a corresponding template for each programming language.

But the above list is the basic requirements of microservice development, and I will list some more advanced items. However, whether these advanced items are needed depends on the size of the organization and the nature of the service.

Nice-to-have

In order to build a stable, robust and secure service, there are many items to consider.

Robustness related

  1. Circuit breaker: One of the issues we need to consider in a microservice architecture is that when a downstream service fails, it will not cause an avalanche, i.e., a cascade failure. Circuit breaker is a common strategy we use to ensure the system will not crash even if the downstream service fails, please refer to the link for more details.
  2. Rate limiter: On the other hand, when our service is faced with a large number of requests, can the service handle it? Some services may rely on external gateways to block excess traffic, but I believe that every service should know its capacity and act on excess traffic, so a rate limiter is a worthy option.
  3. Authenticator: External communication sessions or JWT tokens, which require specific packages to be installed, and access control for each interface is also a topic that usually requires middlewares or decorators to be added to the API development, which should also be included in the templates. Furthermore, APIs often need to have Role-based access control, which requires domain experts to participate during development.

I believe there are many organizations that have a practice of cutting internal and external services over a physical network, so internal services use a full trust model without any authentication or even using unencrypted channels to communicate, which is not really appropriate.

In recent years, the concept of Zero Trust has emerged that any service should have basic authentication capabilities to avoid unexpected access.

Security related

If the service is for external users also need security mechanisms other than authentication, including CSRF and CORS, the details and principles are not the focus of this article, but all these security features should be provided by the service template.

  1. CSRF
  2. CORS

Best-effort

In addition to the items listed above, a service usually requires many external dependencies, such as various databases, message queues, and so on. For example, Python with Postgres may be SQLAlchemy and nothing else, and the version number will be fixed.

A complete service template should also include the various drivers used within the organization, although not every service will need to use the full toolset.

Therefore, some large organizations use scaffolding to allow developers to set options when applying templates, such as whether they need databases, message queues, programming languages, etc.

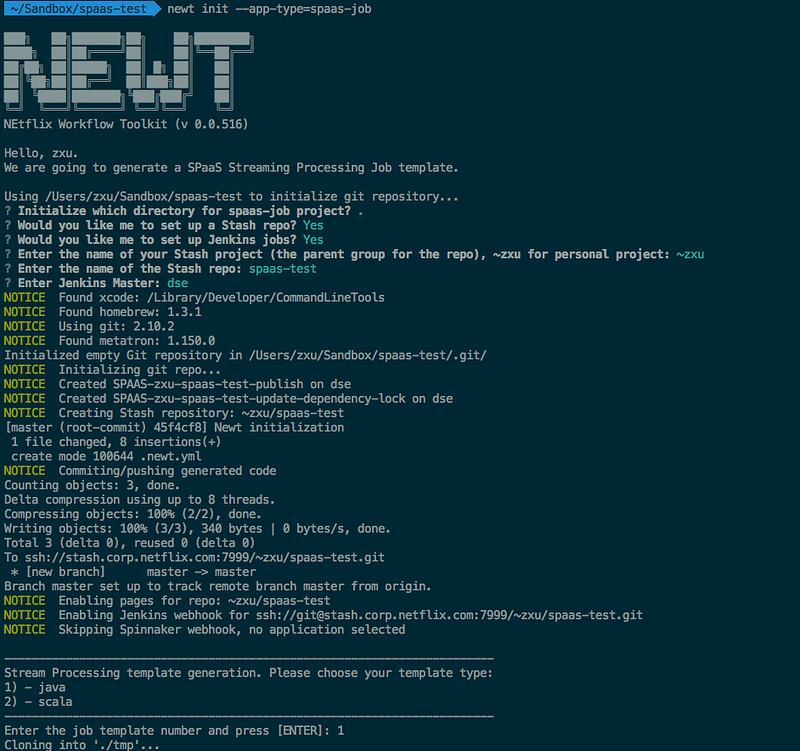
The example above is Netflix’s job generator, NEWT.

A complete project can be generated with simple commands and interactive options. This is the ultimate in service templates.

Conclusion

In this article we have introduced the items needed to build a microservice, which should not be built manually by the developer, but rather as a turnkey solution. Ideally, the developer should be able to interactively build the entire project in one shot, depending on the requirements.

Although we have listed many items, these are actually a checklist of production-ready microservices, compiled from my past experience. If there are items that you are not entirely sure what they mean, I suggest looking at the links in the article or the information in the relevant books. After all, the items listed in this article are not super tricky concepts, but rather design patterns for general purposes.

Of course, if you or your organization has other items in the service templates, feel free to share them with me. I’d be glad to know more about design patterns.

Originally published on Medium
Introducing Decision Making Process

Top-down and Bottom-up, which one is better

Last time we talked about how to do technical selection, the key is to understand the requirements completely, so that we can pick the most fit among the options. Remember, it’s the right fit, not the best, because there is no perfect solution.

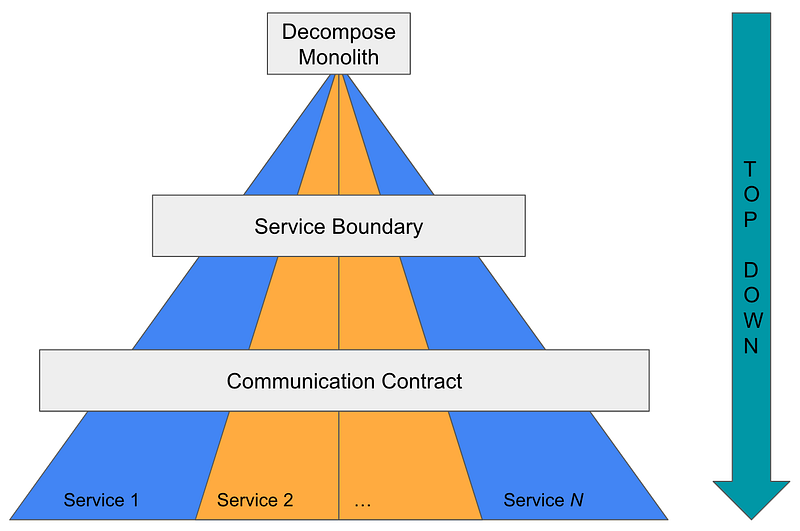
Nevertheless, sometimes we don’t just make one selection, we have to make a series of decisions, especially when doing a paradigm shift. For example, if we want to decompose a monolith into microservices, then in addition to making technical selections among many databases and backend frameworks, we must also make decisions about service boundaries, communication contracts, and so on.

This series of decisions will ultimately achieve what we started with: decomposing the monolith.

In fact, such a decision making process is called top-down decision making.

Top Down Decision Making

At first, we know exactly what we are aiming for, as we evaluated microservices as a more appropriate architecture for the moment, with a high flexibility and scalability. At the same time, to avoid getting further away from the best practices, we learned the details of microservices and the steps of decomposition from various books and articles.

After making a series of decisions to define the final service blueprint, that is, the N microservices, we then carefully develop a migration plan on how to implement those services from a monolith step by step. The whole process is established from top to bottom.

When designing an architecture, we tend to use top-down decision making.

The most important reason is we know exactly what to do and how to do it right. In order to avoid confusion, we set a complete plan at the beginning and implement it step by step to achieve our goal.

In fact, many of my previous articles on paradigm shift were written with a top-down decision making process.

These articles cover how to scale a service, how to decompose a service, and even introduce the evolution of a data architecture. The common point in all these decision making processes is to evolve the system when the current architecture encounters a problem that cannot be solved, but we know how to do it better.

Bottom Up Decision Making

Since there is top-down decision making, is there the opposite? Of course yes, that is, bottom-up decision making.

But this is a strange process, isn’t it? We first define which services we want to do, then we decide the communication medium between the services, and finally we define the service boundaries.

Well, it’s incorrect.

Because in this context, a bottom-up decision process “doesn’t fit”.

What kind of context is right for bottom-up decision making? Let’s take another example.

Suppose we want to build a complete online environment monitoring, with the goal that any problems are detected and started to be solved before they are aware by the customer, then the customer may not even feel the problem or report it and it is solved in a very short time.

First, we try to use top-down decision making to see what happens.

In general, we might start building a monitoring and alerting system that generates alerts and gets people involved when any problem occurs. Hardware metrics such as CPU, memory, and network throughput are basic requirements, while service response latency, error rates, and exception logs are common software metrics.

But is that enough?

One very common malfunction is not covered, i.e., data consistency. In addition, I believe there are various software behavior problems that cannot be disclosed by the basic metrics.

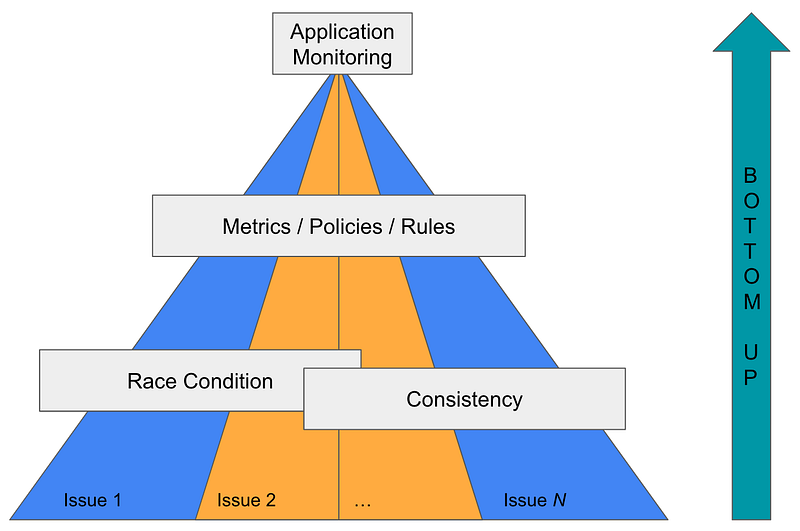
This is where the bottom-up decision process comes into play. First, we analyze the many problems that have been reported, and then set a goal of detecting the same problem next time without being reported.

Through these practices, we can categorize the types of problems and the corresponding practices, and finally generate a set of rules that can be applied to achieve our original goals.

Such a process is a classic bottom-up decision. We cannot define a complete framework to achieve our goals at the beginning, whether the scope is too large to focus or the impact level is too large to cause a big bang, so we eventually find a reasonable framework boundary by accumulating successful practices.

Conclusion

The top-down and bottom-up decision making processes are fundamentally different and therefore apply in different contexts. So how do we know from the start whether to go top-down or bottom-up?

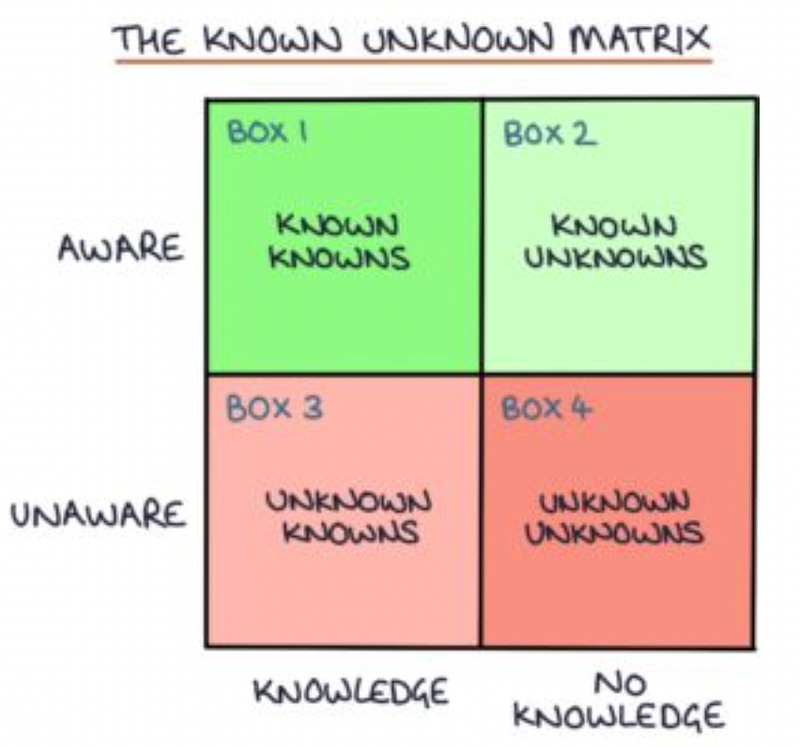
Let me borrow the above diagram to explain, although what I want to express is not equal to the source diagram.

In the context of Box 1 and Box 2, we would use top-down, and conversely, in Box 3, we would use bottom-up. As for Box 4, I believe that we rarely need to touch this box in software development.

Back to the first example of decomposing a monolith, we were convinced that microservices was the most fitting approach and we understood the details of microservices and decomposing a monolith, so we landed at Box 1.

Even so, we may use unfamiliar databases, software frameworks and even programming languages in the process of implementing microservices, so there must be many problems that need to be experienced, and that would land at Box 2, but that does not affect our migration plan, at most we need to make more decisions and experiment more.

But if we only have a practice direction, know how to do it better, but do not have an overall view, then we will fall in Box 3. At this point, what we need to do is to accumulate more successful practices, and then find the rules to make those unknowns known.

Of course, these are ideal scenarios, and most of the time we need to make additional trade-offs in terms of human resources and time, so sometimes the top-down process has to become a bottom-up process. But, no matter what the decision making process is, it is important to choose what is most appropriate at the moment.

Never shoot for the best architecture, but rather the least worst architecture.
 — Neal Ford

Originally published on Medium
There are so many tradeoffs, how to carry on?

Last week, an engineer asked me how to make a technical selection. And he provided a real-world example. Their organization wanted to implement an event-driven architecture, and there were three options available right now — MQTT, AMQP, and Kafka — but he didn’t know how to make a decision.

My answer, as always, was “it depends”.

“Everything in software architecture is a tradeoff”. — Mark Richards

Because of the tradeoffs, there will never be a standard answer, in other words, there will never be a silver bullet.

However, we always have to make a decision, what are the tradeoffs? At that moment, I turned back to him and asked.

  • Do you understand your requirements completely?
  • Do you know what these three techniques are exactly doing?

Take message queues as an example, I have written an article previously on what use cases to consider when choosing a message queue.

  • Propagation: Can fan-out be supported?
  • Delivery: What kind of delivery guarantee does it have? At least once or exactly once?
  • Persistence: Can messages be persisted?
  • Consumer group: Does the receiver scale horizontally?

These are the generic requirements for a message queue, and even if you don’t choose a message queue, listing the generic requirements for a technical stack can more or less filter out some options.

Then, after filtering by generic requirements, further filtering could be done based on the specific use cases. For instance.

  • Is there a large volume of messages to be written?
  • Is there a limit to the bandwidth that can be transferred?
  • What kind of security is required?
  • What programming languages are expected to be integrated?

To answer questions such as these, in addition to a precise understanding of the requirements, we must also have a clear understanding of the technical stack candidates.

Therefore, architects use a similar thought process when making a technical selection to clarify requirements and learn about the technical stack, and finally make a decision. The decision is not about choosing the latest technique, or just playing around with it as if it works.

Nevertheless, we will always encounter the situation that all needs are well met, after all, nowadays technology is developing rapidly, and many of our needs have already been implemented, so what should we do? Throw the dice?

Wait, you can ask more questions.

  • Should we maintain this technical stack ourselves or purchase a managed service?
  • Is there a budget limit?
  • How do we monitor it, whether we operate it ourselves or buy a managed service?
  • Do we have any experience in using it?

When there is no more question to ask to filter, then the last thing to do is to choose what we love and love what we choose, and not to waver from one option to another.

Any technical stack from finalization to production environment must go through time, experience and learning in the process of use. If we change our choices easily, it’s hard to become an expert.

Originally published on Medium

Data Pipeline: From ETL to EL Plus T

New challenges lead to new tools, then new challenges?

In the data pipeline, we often talk about ETL, aka Extract-Transform-Load, which is actually a very simple process as follows.

Given an application extracts data from a source and saves it to another data storage after some processing and conversion, this is what ETL does. This is a complete ETL process, and to be honest, most non-ETL applications are doing something like that.

Let me use a simple Python example to demonstrate the implementation of ETL.

1
2
3
4
5
6
7
8
9
10
11
12
13
14
15
16
17
18
19
# Open the CSV file containing the data  
with open("orders.csv", "r") as file:
# Use the CSV module to read the data
reader = csv.DictReader(file)

# Iterate over the rows in the CSV file
for row in reader:
# Extract the data from the row
order_id = row["order_id"]
customer_name = row["customer_name"]
order_date = row["order_date"]
order_total = row["order_total"]
# Insert the data into the database
cursor = db.cursor()
cursor.execute(
"INSERT INTO orders (order_id, customer_name, order_date, order_total) VALUES (%s, %s, %s, %s)",
(order_id, customer_name, order_date, order_total)
)
db.commit()

This is a simple ETL example, we extract each line from a CSV file (data source), and convert the order details from CSV format to the corresponding columns in the database, and finally write to the database.

As the database evolves, this process also evolves, and the ETL also has a variation, ELT, which seems to be a sequential exchange of T and L. But behind the scenes, the database has actually become more powerful.

Let’s continue with the above example, and see how would ELT be handled?

1
2
3
4
5
6
7
with open("orders.csv", "r") as file:  
# Use the LOAD DATA INFILE statement to load the data into the database
cursor = db.cursor()
cursor.execute(
"LOAD DATA INFILE 'orders.csv' INTO TABLE orders FIELDS TERMINATED BY ',' ENCLOSED BY '\"' LINES TERMINATED BY '\n' IGNORE 1 ROWS"
)
db.commit()

In this example, we use MySQL’s LOAD DATA command to write a CSV file directly into the database, converting it during the writing process, rather than converting the format first and then writing it to the database.

In the data pipeline, it is actually various combinations of ETL and ELT, and eventually we will produce a data structure to fit the analysis and utilization.

This process is the same concept in the big data domain, except that the data pipeline of big data multiplies a much larger volume of data and needs to face a more diverse data storage.

From ETL to EL plus T

In my previous articles, we have already discussed the implementation of many big data pipeline architectures.

For the data source part, we rely heavily on Debezium to capture data changes (CDC).

The process underlying Debezium is that a group of workers extracts the binlogs of various databases, restores the binlogs to the original data, and identifies the contents of the schema to be passed on to the next data storage.

In other words, each data source must have a group of Debezium workers to be responsible for it.

When the number of data sources is large, it is a huge effort just to build and maintain the corresponding Debezium. After all, the software does not work properly when left alone, but also requires a complete monitoring and alerting mechanism, which will eventually create a huge operation overhead.

In fact, E and L in ETL are the most worthless things in a pipeline. For a pipeline to be effective, the most important thing is to produce effective data based on business logic, and T should be the part we should be focusing on.

However, we have to take a lot of time on E and L in the operation of the pipeline, which is not what we expect.

So, is there a solution to this dilemma?

Yes, absolutely, Airbyte, and there are many similar solutions, but Airbyte is open source and relatively easy to use.

Let’s take MongoDB to Kafka as an example, as soon as the setup is done it will be like the example below.

Airbyte can sync automatically or manually according to the settings, and it can choose incremental sync or full sync. Each sync record is listed, and the sync process can be seen after expanding logs.

As a result, the creation of data pipelines is effectively simplified, and data storage can be integrated smoothly through Airbyte’s Web UI.

Conclusion

This article is not to promote Airbyte, nor is it to introduce the Airbyte architecture in depth, but from the standpoint of an architect, we will find that in the domain of big data, we will face various challenges, and each challenge has a corresponding solution, but also requires high learning costs.

In fact, Airbyte also has its limitations, for example, the synchronization period must specify a regular time interval, such as every hour, even though it can use cron representation, but still limited by the fixed time, can not do the real streaming, i.e., once the data is triggered.

In addition, when relying on additional tools, it can be frustrating to encounter this problem.

Once the problem occurs, where to start to troubleshoot, and how to clarify the scope of the disaster, all need to experience and in-depth learning before there is a way to deal with.

Learning these tools is also the biggest challenge for data engineers and data architects, there are many tools to solve many problems. However, big data is really big, and learning all tools is almost impossible.

Finally, let me conclude with a picture.

What’s the next?

Originally published on Medium

0%