Boost Microservice Testing with DNS Hijack
Boost Microservice Testing with DNS Hijack
Use DNS spoofing to create mock services for easier local integration tests

When developing and testing microservices, we often encounter a common challenge, that is, the functionality of microservices heavily relies on external services. This makes it difficult to conduct functional testing in a closed environment or even a local environment.
Here is a classic example.
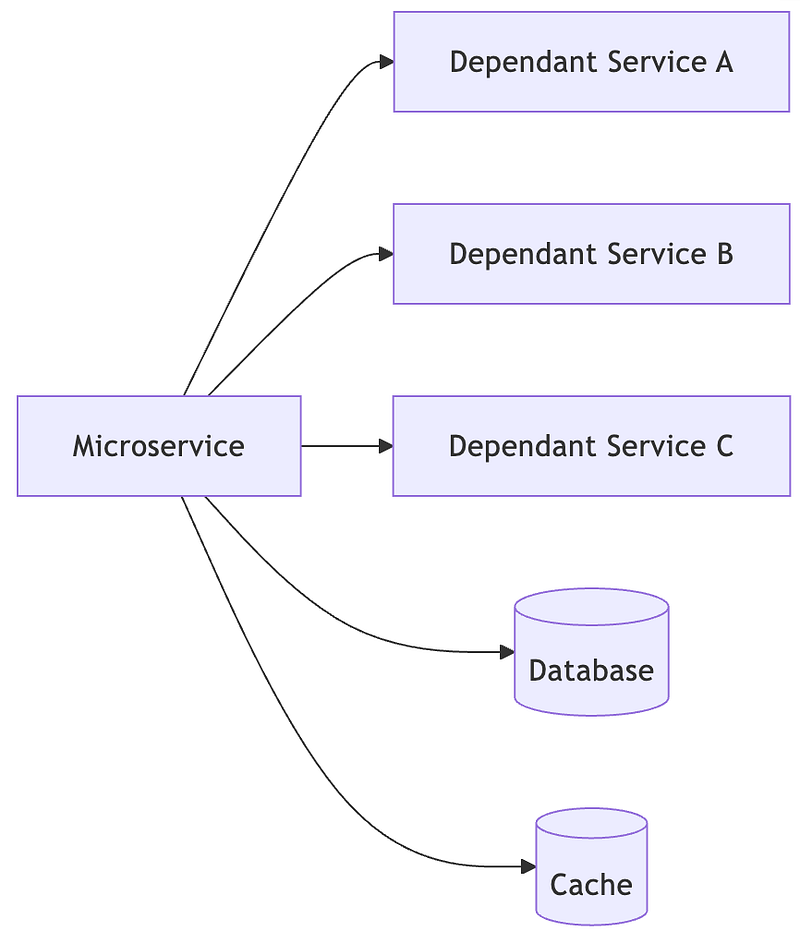
This microservice has numerous dependencies, some being internal databases and others external web services. When doing integration testing, especially when running locally, we encounter a serious problem, most tests either fail or become difficult to execute.
There are several common challenging scenarios.
- HTTP requests time out because the external service is unavailable, causing subsequent calls to fail.
- HTTP requests are processed correctly without timeouts, but return unexpected results, such as a 404 Not Found error.
- HTTP requests are received by the corresponding service but cause side effects.
This scenario makes development and testing extremely difficult. Without a real environment to validate the correctness of our own services, the entire correctness is constrained by those external dependencies.
Is there a solution?
Well, we can use DNS Hijack.
DNS Hijack
DNS Hijack is a common cyberattack that redirects our network connections to unexpected destinations, potentially causing harm.
The most classic example occurs when using public Wi-Fi, where the DNS server is hijacked to a malicious DNS. When you visit specific websites, your connection is redirected to phishing sites. This leads you to unknowingly enter your credentials, resulting in credential leakage.
However, DNS Hijack can also be a highly useful tool, particularly during integration testing in development environments, where it significantly boosts development and testing efficiency.
Let’s continue using the example above to illustrate.
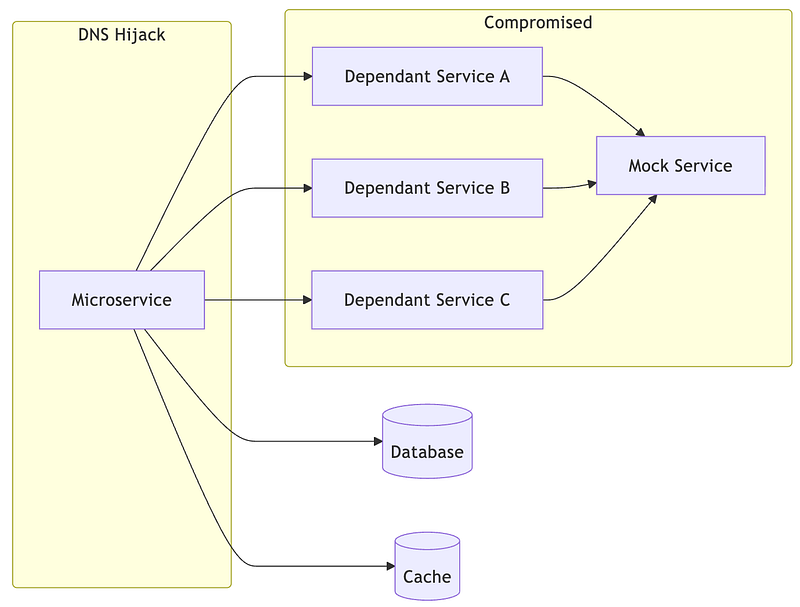
For the microservices we’re developing, it remains completely unaware. Everything proceeds as usual, continuing to request services A, B, and C. However, these services have actually been hijacked and redirected to a mock service.
This mock service is highly customizable, capable of consistently returning a 200 OK status or even generating different responses based on the service path and payload.
As a result, microservices can complete various integration tests without being interfered with or even noticing any changes.
How-to
To implement this functionality, two core components are required. One is a DNS server capable of performing spoofing, and the other is a mock service that can handle various requests.
I am not teaching you how to perform DNS hijacking. Please exercise caution when deciding where to use this.
The final solution is available in this GitHub Repo.
Let’s quickly understand this project.
It has three components.
- The
appplays the role of the original service. It demonstrates a non-intrusive implementation, so theappcan be replaced with any service. dns-proxyis the project’s core component. It redirects all “unknown” hosts tomock-server. The emphasis on “unknown” is crucial because, in microservice integration testing scenarios, we still need microservices to correctly access databases and other essential dependencies.mock-serveris another core component. It responds with a 200 OK to “any” HTTP request. The emphasis on “any” means it can handle requests regardless of the port.
The entire process is straightforward. The app first sends a hostname query to the DNS proxy to obtain the IP address. Since this is merely a proxy, the DNS proxy then queries the actual DNS server for the IP.
If the DNS server recognizes the hostname, it returns the real IP address; otherwise, the query fails. When the DNS proxy fails to obtain the IP, it returns the IP address of the mock server to the app.
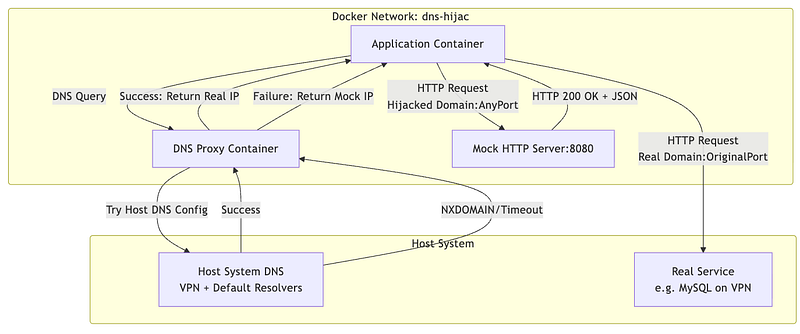
Although it’s non-intrusive for the app, we did make a minor modification to it. However, this change is at the infrastructure layer, not at the code level.
The key to achieving DNS hijacking lies in manually specifying the app’s DNS server and configuring it as a DNS proxy. Details can be found in the docker-compose.yml file.
1 | app: |
When using public Wi-Fi, this DNS server is assigned by the DHCP server, which is precisely why public Wi-Fi poses such risks.
The process above details how a DNS proxy operates. Now let’s examine the mock server.
The mock server functions relatively simply, it’s essentially a basic HTTP server that always returns a 200 OK response. Despite this, its core functionality lies in the startup script. Within this script, we use a series of iptables nat rules to redirect any destination port to port 8080, which the mock server is listening on.
This enables the mock server to handle any destination. In other words, when the application initiates requests to external services, whether abc.test:1234 or def.svc:5678, they ultimately reach port 8080 on the mock server.
Integration Details
Since we’re using a DNS proxy without overriding the original DNS server, the network access that was originally available to the app remains completely unaffected.
I tested numerous target combinations in my end-to-end tests, including hosts within the VPN (internal-db.company.example). If you run the e2e tests directly, they will likely fail. The primary reason is that if your network segment cannot access internal-db.company.example, requests will be redirected to the mock server, which is inconsistent with my test assertions.
Therefore, you can modify the e2e validation conditions to better align with your use case.
Additionally, while I mentioned in README.md that swapping the app image allows testing any service, sometimes we already have a complex Docker Compose script where such changes are difficult. That’s okay, as there’s an even simpler approach.
Simply add include to the original microservice’s test script and manually configure dns and networks.
1 | include: |
If the service was originally running on a VM or physical machine, it’s straightforward, just edit /etc/resolv.conf. Essentially, you need to specify the DNS server to point to the DNS proxy.
Wrap Up
Although this article explains DNS Hijack, our use case is development and testing within our local environment. Within our controllable scope, redirecting DNS to our required mock server is the fastest and most effective approach.
In this project, it’s evident that the mock server I’m using currently has minimal functionality. It simply responds with a 200 OK to all requests. However, we can expand the mock server’s capabilities to better suit integration testing scenarios.
For example, when the app expects /v1/user/info to return JSON data containing a test user, we can configure the mock server to customize responses based on this path. This depends entirely on what we aim to validate in integration testing and which workflows we wish to replicate.
Any cyberattack is essentially a double-edged sword. On one hand, we need to understand its underlying principles to avoid being compromised. On the other hand, we can leverage its mechanisms to achieve remarkable results.
I hope this project brings some fresh insights.
A message from our Founder
Hey, Sunil here. I wanted to take a moment to thank you for reading until the end and for being a part of this community.
Did you know that our team run these publications as a volunteer effort to over 3.5m monthly readers? We don’t receive any funding, we do this to support the community. ❤️
If you want to show some love, please take a moment to follow me on LinkedIn, TikTok, Instagram. You can also subscribe to our weekly newsletter.
And before you go, don’t forget to clap and follow the writer️!
Originally published on Medium