CT Wu

Software Architect · Backend · Data Engineering

Gitlab CI for Node Testing and Coverage

A look at the Gitlab CI v15.0 features for Nodejs

Gitlab is a popular open-source version control system which is free to use and can be built on an intranet, and Gitlab has many useful features such as Gitlab CI.

Gitlab has been integrating CI/CD pipelines into Gitlab for a long time, and has evolved the so-called Gitlab Flow. In this article, I won’t go through the entire Gitlab CI guide, nor will I explain the CI/CD concept, but will focus on how to make Node testing reports more presentable.

Why this topic? The main reason is that we often use nyc and mocha together to build testing reports for Node, but such a combination needs a little twist in order to fit into the rich functionality of Gitlab. This article is about those approaches and will use an actual .gitlab-ci.yml as an example.

Please be aware that this article is written based on Gitlab v15.0

Testing Report

In a good testing report, we will need several important features.

  1. an artifact of the full report.
  2. test summary for each Pull Request or Merge Request.
  3. the change coverage of each Pull Request or Merge Request.
  4. the status of the entire pipeline, including the latest success or failure and its coverage, preferably in the form of a badge.

Report Artifacts

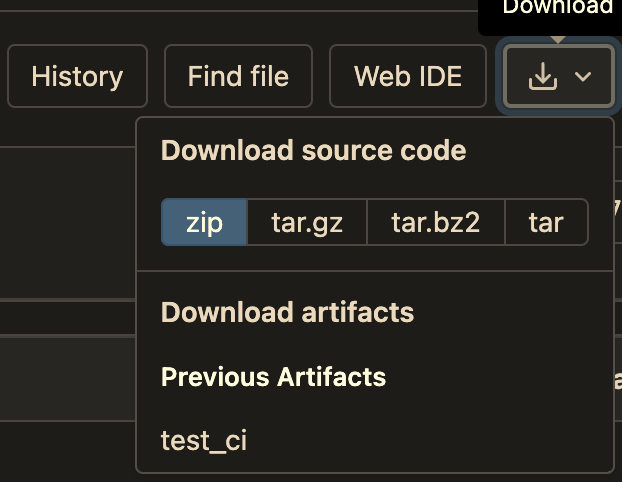
This is the latest pipeline report, to be able to be downloaded here, we need to add a new artifacts field to specify the path we want to export at the desired stage. For example, in the figure above, the setting would be as follows.

1
2
3
4
5
6
test_ci:  
script:
- npm run test
artifacts:
paths:
- coverage/

This means we will export everything under the coverage folder as a package.

Test Summary

In order to display the results of a test in Merge Request, including how many cases were tested and how many succeeded or failed, and even to see how long each case took, you need to let Gitlab know the format of the testing report and produce the results in the corresponding format.

So let’s continue to extend the .gitlab-ci.yml example above.

1
2
3
4
5
6
7
8
9
test_ci:  
script:
- npm run test
artifacts:
paths:
- coverage/
reports:
junit:
- test-results.xml

In this example, we use the JUnit format to create the testing report and inform Gitlab of the path to the CI report. In this way, Gitlab has the ability to present the correct report content and summary in each Merge Request.

Change Coverage

When doing a code review, we all click into Changes to see what parts have been changed.

It would be more efficient for the reviewer to see the test coverage of the changes here in one place. So, we would like to make it easy for the reviewer to know which code has not been tested.

In this picture, we can see at a glance that line 14 is not covered by the test, while the other lines are tested. It is worth mentioning that even if there is test coverage, it does not mean that the test is complete, for example, here it is impossible to determine the conditions of the boundary test, and we have to rely on the experience of the reviewer.

Then, we continue to extend the original settings.

1
2
3
4
5
6
7
8
9
10
11
12
test_ci:  
script:
- npm run test
artifacts:
paths:
- coverage/
reports:
junit:
- test-results.xml
coverage_report:
coverage_format: cobertura
path: coverage/cobertura-coverage.xml

Pipeline Badges

In popular open source projects nowadays, users are informed of the project’s health at the beginning of README.md, which is a useful information for users and a quick way for developers to know the project’s health.

If you see the status of the pipeline as a failure, something is wrong. On the other hand, the coverage badge is a great indicator of whether the project’s test coverage is complete.

Fortunately, badges are a built-in feature of Gitlab. You can find out the badge location at Gitlab settings.

Settings > CI/CD > General pipelines

There are three types of badges, Pipeline status, Coverage report, and Latest release. You can pick what you want.

Since Gitlab v15.0, we can assign a regular expression in re2 syntax at .gitlab-ci.yml to identify what the coverage digits are.

1
2
3
4
test_ci:  
script:
- npm run test
coverage: '/All files\s+\|\s+\d+\.\d+/'

The rule for this re2 syntax is to find the floating point number that follows All files as the coverage. If you are not using nyc, you have to adjust the rule based on the content.

Detail in package.json

The above example has fully implemented the necessary features for development. But we haven’t explained how to generate coverage reports, JUnit reports, and change coverage at the same time.

The key to all of this is in the npm run test, i. e. package.json.

1
2
3
4
5
{  
"script": {
"test": "nyc --reporter=html --reporter=text --reporter=cobertura mocha"
}
}

As we can see from the above settings, this busy nyc is responsible for generating three types of outputs for the three different features.

  • html: Serves as a coverage report for the entire project, and will be used when downloading artifacts.
  • text: The console output is required to generate the badges.
  • cobertura: As we know from the previous section, the change coverages are presented using the cobertura format.

Wait, there’s one missing? Who creates the reports for JUnit? The answer is mocha. But this is not a built-in feature of mocha, so we have to use an additional tool to do it.

First, download the mocha-junit-reporter package.

1
npm i mocha-junit-reporter — save-dev

Next, create the mocha configuration file, .mocharc.js.

1
2
3
module.exports = {  
reporter: "./junit-spec-reporter.js"
};

In the configuration file we tell mocha to generate the report through another file, which is also the JUnit generator.

The following is the content of junit-spec-reporter.js.

1
2
3
4
const mocha = require("mocha");  
const JUnit = require("mocha-junit-reporter");
const Spec = mocha.reporters.Spec;
const Base = mocha.reporters.Base;
1
2
3
4
5
6
7
function JunitSpecReporter(runner, options) {  
Base.call(this, runner, options);
this._junitReporter = new JUnit(runner, options);
this._specReporter = new Spec(runner, options);
return this;
}
JunitSpecReporter.prototype.__proto__ = Base.prototype;
1
module.exports = JunitSpecReporter;

At this point, all the formats we need can be generated correctly, and Gitlab CI will present a rich view based on these outputs, and developers can do most of their routine work on Gitlab’s web page without actually building the outputs locally.

Conclusion

CI/CD is a very important software development practice. However, in order for every developer to have the interest and even the confidence to “continue” the practice, people must be able to “see” the change.

For engineers, seeing is believing is the belief of most of us. Therefore, these rich features are essential for the pipeline to be effective enough.

The full .gitlab-ci.yml, which includes all mentioned features, is as follows.

1
2
3
4
5
6
7
8
9
10
11
12
13
test_ci:  
script:
- npm run test
artifacts:
paths:
- coverage/
reports:
junit:
- test-results.xml
coverage_report:
coverage_format: cobertura
path: coverage/cobertura-coverage.xml
coverage: '/All files\s+\|\s+\d+\.\d+/'

In my experience, when a testing platform is built, not everyone is happy to use it, after all, writing tests is extra work. But when the platform is rich enough, most people will be willing to try it.

For a team just starting to establish a development process, it’s more important to get people willing to try it than anything else.

So this article focuses on the presentation of Gitlab CI and introduces the role of CI from a different perspective in the development process.

Originally published on Medium

Analyzing How to Scale Web Services From Various Perspectives

Scaling web services

This article is an internal training for my team to explain to newcomers what are the practices and what are the aspects to consider when scaling a web service.

The scaling mentioned in this article is divided into several different levels.

  1. Read loading
  2. Write loading
  3. Data volume size
  4. Task loading
  5. User distribution

In addition, there is another level of scaling that is not explained in detail in this article, feature scaling, but I will describe the concept of feature scaling a little bit at the end of the article.

Next, let’s evolve our system step by step.

Bare Metal

All products start with a single machine. For proof of concept, we take the simplest approach and put everything on the same box, perhaps the laptop at hand. Whether it’s a physical machine, a virtual machine, or a container, a single machine with everything you need on it is as follows.
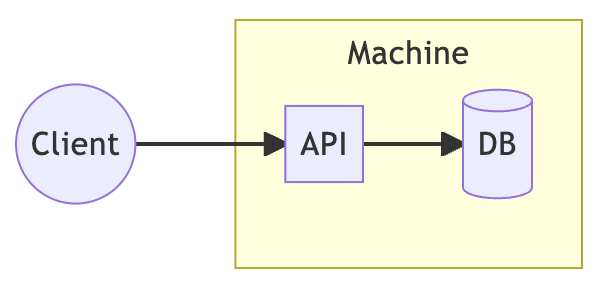
Users can use this basic service either through the web or through a mobile device. This machine contains the APIs for business logic and a database for data storage. This is where all projects begin and is the easiest to implement.

When the concept has been successfully validated, the number of users will start to rise, easily exceeding the limit of what a single machine can handle. At this point, we choose to move the service from a laptop to a professional server in order to continue to verify that the project will continue to grow and not be a flash in the pan. The upgrade of hardware specifications is called vertical scaling, a.k.a. scale-up.

However, even for professional servers, where hardware can be easily upgraded and swapped out, there are limits. The limit here is not only a physical limit, but also a budget limit. For example, a 1TB SSD drive is more than twice as expensive as a 512GB drive. The curve of increasing hardware costs is exponential.

Therefore it is necessary to separate the components to make the cost more manageable, especially for the database, which is usually the most costly component.

Layered Architecture
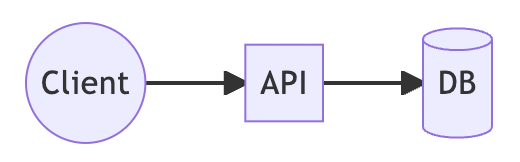
When we separate the database from the API, we are able to upgrade their hardware individually. From the original scale-up of a single machine to the scale-up of individual components.

The hardware specifications of the database are usually very advanced, but the API ones are not. The main reason is that as the users grow, the API needs a stronger CPU to handle more traffic, but the rest of the resources are not as urgent. Upgrading CPUs runs into the same problem as hard drives, an exponentially increasing cost curve.

In other words, it is much more cost effective to increase the number of CPUs than to increase the size of CPUs. So in order to handle the increased traffic, we usually adopt the strategy of increasing the number of APIs.

Horizontal Scaling
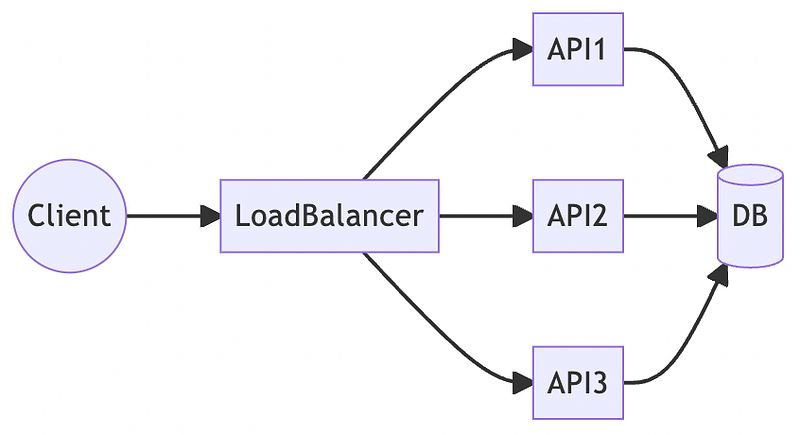
In order to get the number of APIs to scale smoothly, we will need a new role to assign all incoming traffic, called load balancer. The load balancer assigns the traffic based on its algorithm, the common algorithms are RR (Round Robin) and LU (Least Used), but I suggest to go for the simplest one, RR, because the complex algorithm puts an extra load on the load balancer and makes it another kind of bottleneck.

When the user’s usage changes, the number of APIs can be dynamically adjusted, for example, the number of APIs is increased when the usage goes up, which is called scale-out, and the opposite is called scale-in.

So far, the APIs can be scaled up to handle the increasing traffic, but there is another bottleneck, the database, which can be found in the above diagram.

When usage increases to a certain amount, a single database will not be able to handle it efficiently, resulting in an overall increase in response time. The result is a poor user experience and possibly even a failure of functionality. There are many articles on how page speed affects web user experience, so I won’t go into detail here.

In order to solve the database bottleneck, we would also like to have horizontal scaling of the database. However, unlike the stateless characteristic of APIs, databases are usually stateful and therefore cannot be simply scale-out.

Read Write Splitting

To enable the database to be scaled horizontally, a common practice is called Read/Write Splitting.
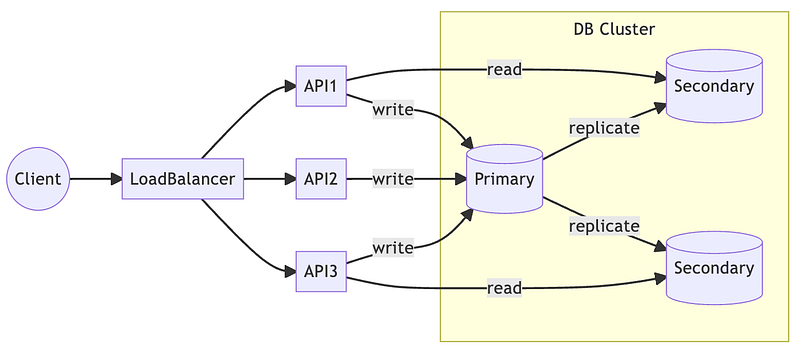
First, we keep all writes to the same database entity to maintain the state of the database. Reads, on the other hand, are reads on entities that can scale horizontally. Keeping reads and writes split makes it easier to scale-out the database.

When there are data updates, the primary is responsible for replicating the changes to each of the read entities. In this way, the read entities can be scaled out based on usage.

This is seen in several common databases, such as MySQL Replication and MongoDB ReplicaSet.

Nevertheless, there is a problem that in order to handle more reads, we have to create more replicas of the database, which is a challenge for the budget. Because of the high hardware specifications of the databases, creating replicas is a very high price to pay.

Is there a way to support the traffic and save cost at the same time? Yes, caching.

Caching

There are several types of caching practices, the common ones are:

  1. Read-aside cache
  2. Content Delivery Network, CDN

There are advantages and disadvantages to both approaches, which will be briefly analyzed below.

Read-aside Cache
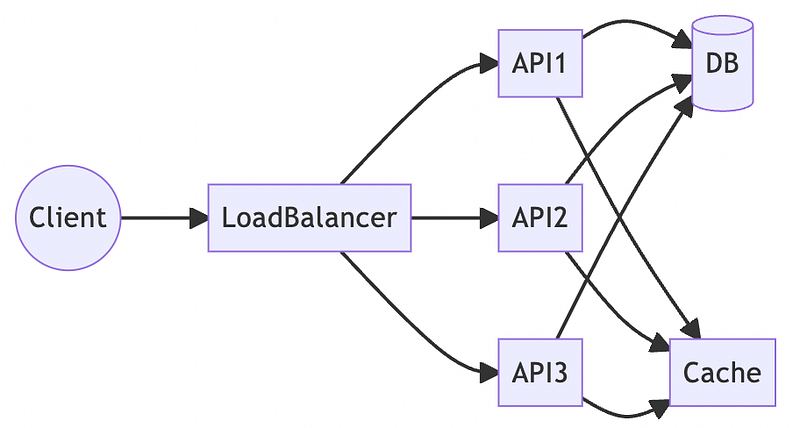
In addition to the original database, we put a cache aside. The whole process of reading is,

  1. first read the data from the cache.
  2. if the data does not exist in the cache, read it from the database instead.
  3. then write back to the cache.

This is the most common scenario for caching. Depending on the nature of the data, different time to live, TTL will be set in the cached dataset.

CDN

Another caching practice is CDN.
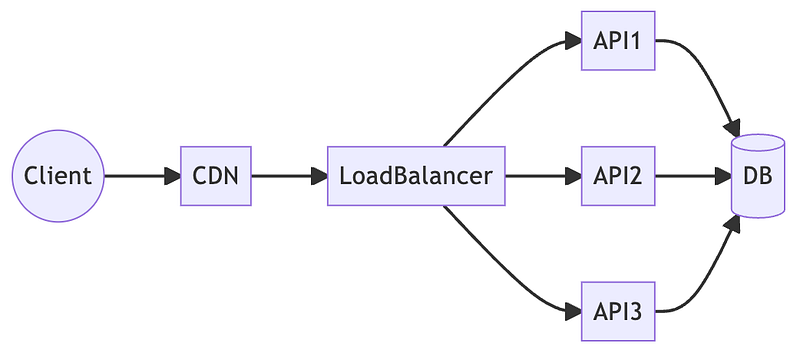
Instead of building a cache, a new component is used and placed in front of the load balancer. When any read request comes in, the CDN first determines if there is already cached data based on the configured rules. If there is, the request will be replied directly. On the other hand, the request will follow the original process, and the data will be cached when the response passes through the CDN so that it can be replied directly next time.

Compared with the read-aside cache, we can see from the diagram there are fewer lines in the CDN. Fewer lines means less complexity in application implementation and easier to achieve. After all, the CDN only needs to configure the rules and the application does not need to be changed at all.

One potential problem with caching is the inconsistency of the data. When the data is updated in the database, if the TTL of the cache does not expire, the cached data will not be updated, and then the user may see the inconsistent result.

For read-aside cache, when the API updates the database, it can delete the data in the cache at the same time, so that the next time when it reads in, it can get the latest data. On the other hand, CDNs have to perform invalidation through the APIs provided by each vendor, which is more complicated than read-aside cache in practice.

Writing Bottlenecks

Caching and read/write splitting have been effective in handling the increasing amount of read requests, but as you can see from the above diagrams, there is still no effective way to deal with the large number of writes to the database. To solve the write bottleneck, there are many different mechanisms that can be applied, and two common approaches are listed below.

  1. Master-master replication
  2. Write through cache

These two approaches are orthogonal and have completely different practical considerations and are difficult to compare with each other. Then, let’s analyze these two approaches.

Master-master Replication
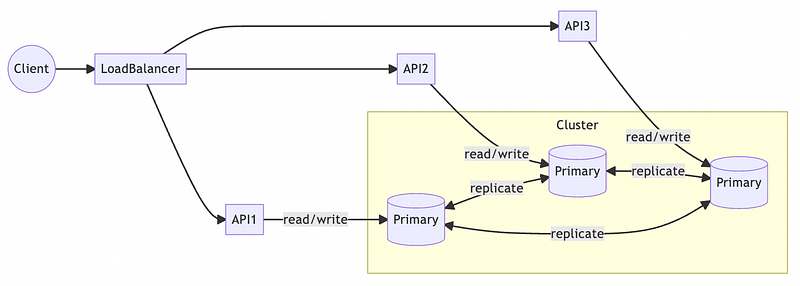
Although there is a corresponding database entity for each of the APIs in the above diagram, the APIs are not actually locked to a particular entity, depending on the database implementation in use and configuration.

Comparing with read-write split, you will find both read and write can be executed on the same database entity. Writes on any database entity will be synchronized to other entities.

A typical example of master-master replication is Cassandra, which is very scalable for writes and can support very large numbers of simultaneous writes. On the other hand, MySQL also supports master-master replication, but one major problem with MySQL master-master replication is its replication is performed asynchronously in the background, which sacrifices MySQL’s most important feature, consistency.

If master-master replication is needed, PACELC must be taken into account.

Master-master replication is a technique that tolerates partition failure, so you can only choose between consistency and availability. In addition, MySQL can achieve consistent master-master replication with external frameworks, such as Galera Cluster, which in returns, creates long latency.

Therefore, when choosing master-master replication to improve write performance, it is important to consider whether the usage scenario is appropriate. If you have to apply such a technique to MySQL, it would be better to switch to another database, e.g. Cassandra.

However, changing the database is a huge effort. Is there a way to solve the write bottleneck without changing the database? Yes, through caching once again.

Write through Cache
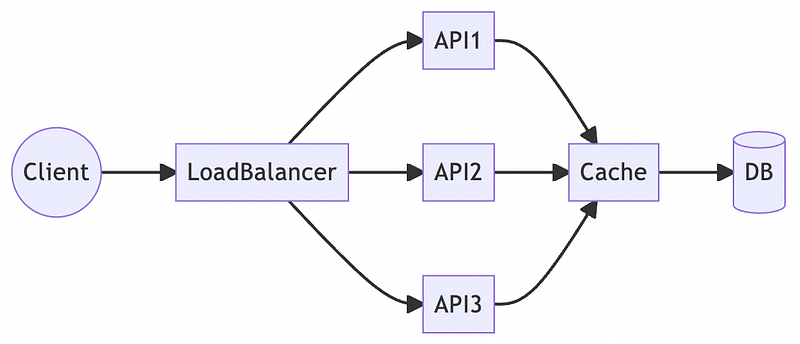
Before writing the data into the database by API, write all the data into the cache. After a period of time, the results of the cache are then written into the database in batches. By this way, a large number of write operations can be turned into a small number of batch operations, which can effectively reduce the load on the database.

The read operation can also be like read-aside cache which reads from the cache first and then the database, so that on the one hand we can get the first update and on the other hand we can reduce the load on the database read.

Write through cache is a completely different design pattern from master-master replication, which scales the database performance through architectural changes while keeping the original database. Although the application does not need to be modified by changing the database, writing through cache will also create additional complexity.

We’ve covered how the entire web service deals with heavy traffic, from scale-up to scale-out, from API to database, but the story doesn’t end here. We have overcome the traffic problem, but when the volume of data in the database is very large, the performance of the database, both in terms of reads and writes, is seriously affected. Given the large volume of data, even a few reads can take up a huge amount of resources, which leads to database performance problems.

Sharding

Since the amount of data is too large for a single database, it is sufficient to spread the data evenly across several database entities, which is the concept of sharding.
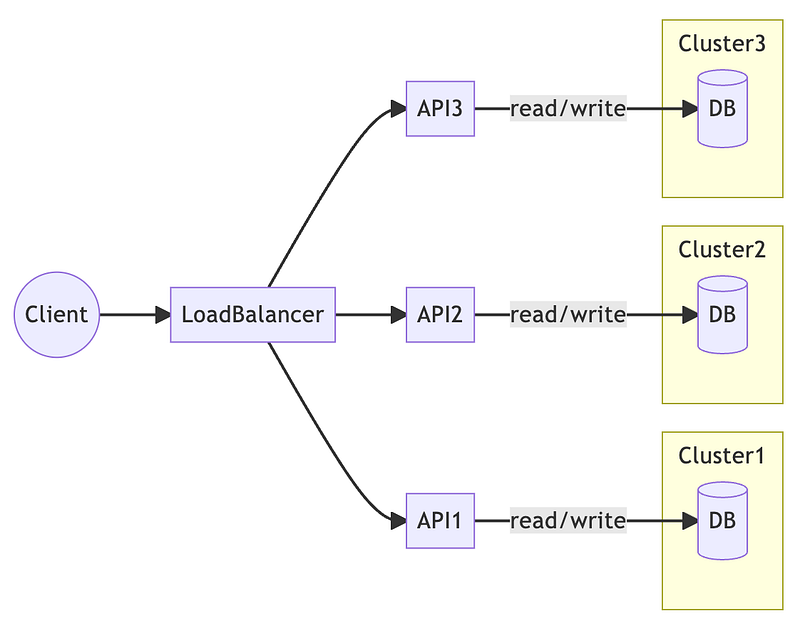
Although there is only one database in each of the above clusters, all three of them are actually database clusters, and the mentioned read-write split or master-master replication can be applied. Furthermore, even though the APIs correspond to a database cluster individually, it does not mean that the APIs can only access specific clusters. For example, API2 can also access Cluster3.

Sharding is the technique of dividing a large dataset into several smaller datasets. By using pre-defined indexes such as shard key (MongoDB) or partition key (Cassandra), the data is distributed to the corresponding database entities. Thus, for an application, accessing a specific data will be in a specific database entity, and if the data is spread evenly enough, then the load of individual database entity is 1/N, N being the number of clusters.

Nevertheless, if the data is not spread out enough and is overly concentrated in one database, the meaning of sharding is lost, which is called a hot spot, and this will not only cause the performance to drop, but also the cost of redundant database. As I mentioned earlier, the cost of a database is high, and it would be very wasteful to have a redundant database.

Once we have overcome the problem of scaling traffic and data volume, the next challenge is what to do when the task to be performed becomes large enough to affect the performance of the API and the database? The answer is to break up the task.

Messaging

When the tasks running by the API become large, the response time of the API will be significantly affected. To reduce the response time of the API for large tasks, the most common approach is to perform synchronous tasks asynchronously, and sometimes even divide the large tasks into several smaller ones.

The asynchronous approach has actually been mentioned in many of my previous articles, that is, the Event-Driven Architecture.
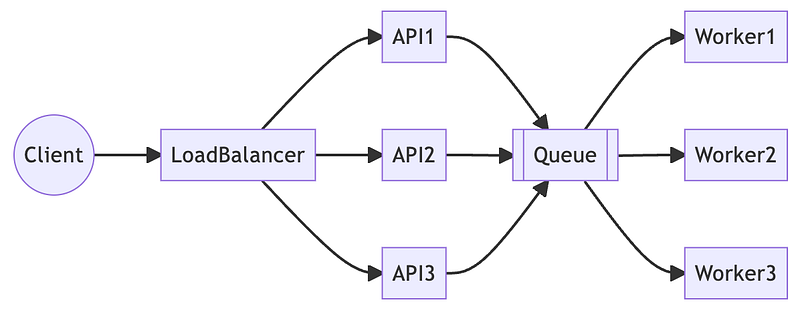
The API sends tasks to the message queue, which are executed by workers behind the queue. As the number of events grows, the number of workers can be scaled horizontally depending on the number of pending events.

The details of the event-driven architecture are listed below, so I won’t dive into them in this article.

Finally, when the project has been successful, the users are around the world. If the data center is located in the same place, then for areas that are physically far away, the delay will be noticeable, resulting in a decrease in user acceptance. So, how do we address the scalability of users?

Edge Computing

Edge means to arrange the system as close to the user as possible for a good user experience.
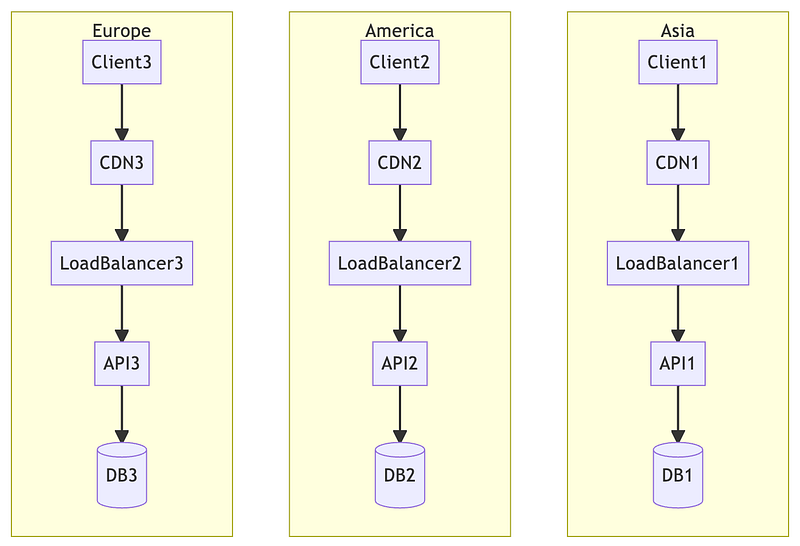
Therefore, for three distant regions, we can set up three different data centers to provide better efficiency for users in each region.

Nevertheless, when we need to perform data analysis, we will always need data from all three regions. From a data analysis perspective, we need one logically unified database, not three physically independent databases.

In other words, how to get the database as close to the user as possible and still have a unified entry point?

  • DB shards: This is a relatively simple approach to practice. Just use the region as the shard key and create database shards in each region. Then, there will be a unified entry point, which in the case of MongoDB is mongos.
  • DB master-master replication: master-master replication also allows different database entities to be placed in different regions, but because of the physical distance, the replication is not very efficient, so the synchronization rate is a potential problem.
  • Data ETL: Data is extracted from various databases and transformed and loaded into a unified data store. This is the most common way for data analysts to do this without changing the database structure of the original application, as well as to pre-process the data and even choose their own familiar data storage.

Conclusion

This article analyzes how to scale web services from various perspectives. From the beginning of the project, the API is horizontally scaled to handle the large number of incoming requests until the database becomes a bottleneck. To solve the database bottleneck, no simple horizontal scaling can be used, so techniques such as read-write splitting or caching are used to reduce the load on the database. However, if the dataset is very large, we still need to adopt sharding and other methods to separate the dataset. Finally, if the users are worldwide, it is necessary to establish different data centers to physically distribute the workload.

However, while this article is focused on explaining infrastructure-related topics, there is another kind of service scaling that is actually very important, and that is the scaling of feature requirements.

As a project moves towards success, more and more feature requests will be made, so how to quickly respond to feature scaling? The most common technology used nowadays is microservices, but microservices also have problems which must be faced, and in my previous article, I introduced what are the aspects of designing a microservice architecture that are worth considering.

This article serves as an internal training for my team members, because the target is junior engineers, so there is not too much detail on each topic. If you are interested in any of the topics, please let me know and I will analyze those techniques in depth.

Originally published on Medium

Solve Performance Bottleneck through CQRS

Previously, I have introduce how to shift from a monolith to CQRS in order to solve some problems. As the architecture gets bigger, the maintenance effort gets higher, so it is necessary to split the monolith into several execution units to reduce the development difficulty.

However, CQRS can be used in much more than that. In this article, we will introduce another pattern where CQRS can be applied, and this is the approach I use most often when solving performance bottlenecks.

Many-to-One Data Model

According to my previous introduction, we know CQRS can convert domain objects into several read models in order to extend functional requirements. Such a pattern is what I call a one-to-many transformation. From a single data source, various models for presentation are converted based on business logic.

But sometimes we need many-to-one transformation, and this usually results in performance bottlenecks.

Let’s take an e-commerce website as an example. Suppose we call only one API to pull back all the data when we open the homepage of the site.

/api/eshop/home

The purpose is to reduce the complexity of frontend development by having a single API for a single page, so that frontend developers can focus on rich presentation rather than data collection. This is common in small organizations or startups, in order to quickly produce publishable screens and simplify the communication process with the backend as much as possible.

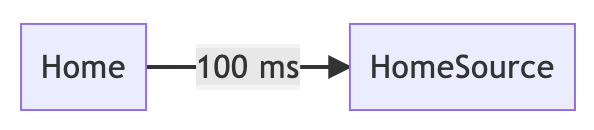
Continuing with our example, this homepage API would require order information, user information, recommendation lists, inventory categories, and so on. Whether these data come from microservices or different data stores, they face the problem that their load is different. The data sources with high load will cause higher latency.

According to the above diagram, the order is the most heavily loaded, so the response time is the longest, up to one second. In this case there is a “long-tail effect”, even if some data sources respond quickly, the entire home API time depends on the most heavily loaded data source. In this example, it is one second.

Start System Evolution

To solve the long-tail effect, we can pre-build the homepage data in an independent data source, in other words, the homepage API does not need to take time to collect the desired data from everywhere, just obtain all the desired data from a single place. Ideally, the data would already be assembled.

So the system will look like this.

This has the additional benefit of eliminating the time spent assembling and collating data, and the efficiency of a single data source, which can significantly reduce latency.

Nevertheless, the issue remains. Since this is a pre-built data source, who is responsible for updating it?

The most intuitive approach is that whatever domain service the user is operating, that domain service will update it. In the above example, when a user modifies order data, the order service not only modifies the original database, but also modifies the new database. The same will happen to other domain services.

Remember the problem we were trying to solve at the beginning? When operating on a busy system, the response time is obviously slow.

Since it’s a busy system, such a change is like pushing a new problem onto someone who is already busy. We all know that database modifications are complex and time-consuming.

Evolve into CQRS

Therefore, what we expect is when users are operating the original domain service, someone can help us to synchronize the new database in the background without much domain service effort.

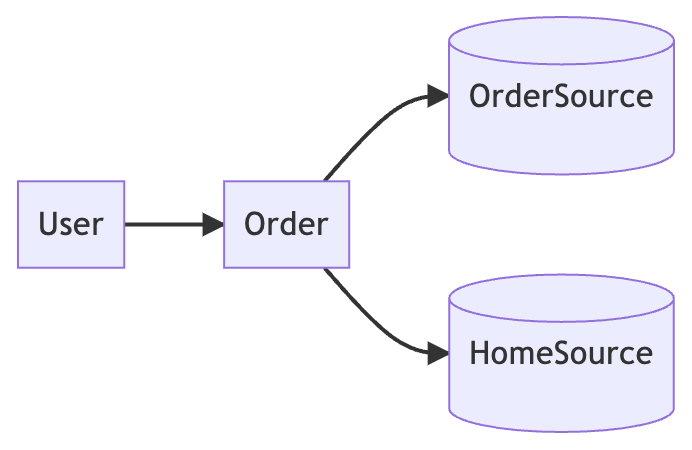
The final architecture will be similar to this. Basically, this is the pattern of CQRS.

According to the previous article, there are three ways to implement the eventual consistency of CQRS, depending on how immediately the new database must be updated. The following is the order from fast to slow, but the implementation details will not be described in this article.

  1. Background thread
  2. Message queue plus workers
  3. ETL

Finally, we solve the original problem we were trying to solve: long-tail effects. Not only do we not create too much overhead for the original domain services, but we also don’t introduce too much coupling.

Conclusion

You may ask, “Why not just write all the domain objects to a new database, HomeSource, instead of having a domain database (e.g. OrderSource) at the beginning? A typical example of such a practice is the Service Oriented Architecture.

If we do this, the problem is no longer the long-tail effect, but how to do the horizontal scaling of HomeSource. In the final architecture, most of the order functions are still done on the original data store, and only the data that needs to be presented on the homepage is transferred to the new data store in an asynchronous way.

If the data storage of all domain services is unified, the new unified data storage will be under more loading than the sum of the original domain storage. This requires more care and effort in database design, and creates a lot of data-level coupling. This is the main reason why the service-oriented architecture is becoming obsolete.

So far we have seen two scenarios of CQRS.

  1. Improving productivity for extended functional requirements.
  2. Solving performance bottlenecks.

In fact, CQRS only provides a methodology and does not limit the situations in which it can be applied. Perhaps there is a pattern around you that would be a good fit for a CQRS solution, please feel free to share it with me.

Originally published on Medium

Property-Based Testing Framework for Node

Understand how fast-check works with a practical example

The Pragmatic Programmer introduces a method of testing called property-based testing, in which an example is given in Python, using the framework hypothesis.

The usage of the hypothesis is very intuitive and simple and presents the concept of property-based testing perfectly. So I also wanted to find an equivalent alternative in Node. Two of them have high star ratings on Github, JSVerify with 1.6K stars and fast-check with 2.8K stars. So I took some time to study fast-check a little bit and try to get closer to my daily work.

This article is a recap, and a simple example to document the experience.

Why Property-Based Testing?

Before providing examples, let’s explain why we use property-based tests. In fact, I don’t like the term property-based. In my words, “extremely high-volume” testing.

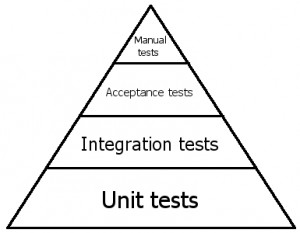
We all know that Test Pyramid is as follows.

And in my previous article, I mentioned what’s the difference between unit tests and integration tests. At the lower levels of the pyramid, more test cases are required.

Even so, it is difficult to generate a large number of test cases. We usually write corresponding tests based on known conditions or product specifications, sometimes we may remember to write boundary tests (sometimes not), and sometimes we may rely on simple random verification of functionality, e.g. faker.

However, in general, even if we try hard to come up with test cases, we cannot cover all scenarios, and we call this testing method example-based testing. This is because the test cases we come up with are basically extended from a certain example and cannot cover all the unknown contexts nor can we test all the boundary conditions.

At this point, we would like to have a framework automatically generate enough scenarios (reasonable scenarios or not) to verify the code we write, and the test cases we write only need to ensure their “properties” are correct. This is the origin of property-based testing.

Nevertheless

The reality is that integration testing is approximately the same as unit testing.

I have worked in many organizations, from large national enterprises to small startups. Whether I am a developer or a mentor, from past experience, unit testing is about as relevant as integration testing.

For most developers, it is not an easy task to properly divide unit testing and integration testing. To be able to split test cases entirely they need to have the skills of design patterns, dependency injection, dependency inversion, etc. to be able to do it well. Therefore, most test environments are based on a specific test environment, such as using docker-compose to generate a one-time database and test data and test on it.

The documents of fast-check is written based on the standard of unit test, and it seems that only the verification boolean is provided, that is, fc.assert, so I took some time to research to write a test case close to daily use.

Generally, I need several abilities.

  1. Be able to test async/await.
  2. Be able to verify more contexts, such as assertEqual.

fast-check Introduction

Before we start writing test cases, let’s have a look at the basic usage of fast-check.

First, let’s introduce the structure of fast-check.

  • Assertion (fc.assert)
  • Properties (fc.property or fc.asyncProperty)

The function of fc.assert is to verify that all the tests automatically generated by the properties are correct. The properties are needed to describe two important blocks.

  • Runner
  • Arbitraries

Runner is the context to be tested, i.e., the target. On the other hand, the arbitraries are the input parameters of the target, which are automatically generated by the properties, and all we have to do is to provide rules for them, e.g., only integers.

The following is a simple example.

1
2
3
4
5
fc.assert(  
fc.property(fc.integer(), fc.integer(), (i, j) => {
return i + j === add(i, j);
})
);

The two fc.integer() are arbitraries, and the later anonymous function is the runner, which takes two arguments i and j, corresponding to the previous arbitraries. We want to verify whether the function add really sums the two arguments correctly, so the result of add should be consistent with +.

Let’s review the two requirements we just mentioned.

  1. fast-check is able to test async/await, runner can be a promise, and fc.assert itself is also a promise.
  2. Although our test target is add, but a good integration with some conditions in the runner can make not only the effect of boolean.

fast-check Examples

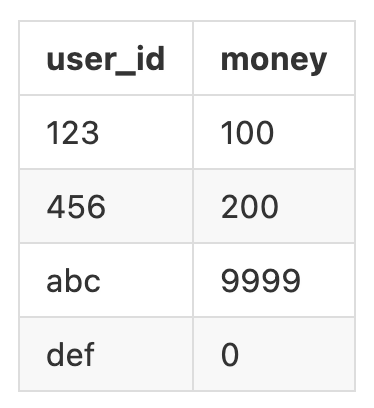
Now let’s come to a more practical example. Suppose I have a database table with money for each user.

There is a function async function getMoney(limit) which will sort money in ascending order and also determine how much money to return based on the parameters.

Now we want to test this black box.

Let me explain in brief.

  1. Just simply verify the function really works, there is no use of fast-check.
  2. Given an arbitrary integer, the length of the return result should be between 0 and 10, because we only created ten records in before.
  3. Given a range of integers, the length of the return should be equal to the given length.
  4. Verify the order of the whole array is indeed ascending. From this runner can be seen, even very complex conditions can be verified, but be careful not to make bugs in the test case resulting in the need for a test case of the test case.

If a problem is detected, fast-check will also tell you what kind of arbitraries it uses to detect the problem. For example,

Counterexample: [-1234567890]

This means the test case failed when i = -1234567890. It is possible the negative number is not handled correctly or the “large” negative number is not handled correctly. This is the time to write a real unit test (or integration test) and verify -1234567890 so that such a failed case can be used as a regression test afterward.

Conclusion

Ideally, when testing database behavior like this, we would use techniques such as dependency injection to isolate the physical database in order to improve testing performance. But as I said earlier, it is not easy to properly separate code from external dependencies depending on the experience and skill of the developer.

So in many organizations, we still see that most of the test cases have to rely on the physical database for testing. But I have to say this is incorrect.

In this article, I explain the usage of fast-check through a real-life example and how it is close to practice. Nevertheless, I hope we don’t have to face this again, at least after reading my previous article, let’s try to turn over those unreasonable test cases.

Originally published on Medium
Solve Phantom Read in MySQL

A solution for write skew when “creating” data

The combination of MySQL and its storage engine InnoDB is almost the most widely used relational database nowadays, and Repeatable Read is the most common in the isolation level.

However, compared to PostgreSQL, InnoDB has several problems that cannot be solved elegantly at the Repeatable Read level.

  1. Lost updates
  2. Phantom read

Lost updates in PostgreSQL can be completely solved without additional hacks. As for phantom reads, there are some small tricks that can be used, such as range types and other mechanisms.

Nevertheless, MySQL still has to be careful to identify the pitfalls and deal with them properly by developers to solve such problems. In my previous article, we introduced three ways to address lost updates. Those approaches provide a more flexible solution to lost updates and are suitable for a variety of scenarios.

In this article, we will further explore how to properly solve the write skew caused by phantom reads.

There are many types of scenes that result in phantom reads, but in general, they all have the following pattern.

  1. Search a specific range.
  2. Do something according to the results of the range (Create, Update, Delete).
  3. The operation will directly affect the original range results.

Suppose it is only an update or a delete, the most straightforward way to avoid write skew is to use an exclusive lock. If you use FOR UPDATE at the beginning of SELECT, then two concurrent transactions will be forced to go one after the other, thus effectively avoiding the write skew in the race condition.

However, in the case of a create, the solution is not so intuitive. Because there is no corresponding row to lock in SELECT, the row is created later. So how to solve it?

Meeting Room Booking System

Before introducing the solution, let’s use a practical example to describe the problem caused by phantom read.

There is a meeting room system that provides users to reserve a meeting room, and when the user has successfully reserved the meeting room, a new corresponding data will be added in the table as follows.

The above table records that user A reserved the meeting room 123 for one hour on 5/1 at 10 am.

The behavior of this system will be similar to the following pseudo-code.

1
2
3
4
5
6
7
8
count = `SELECT COUNT(*) FROM booking   
WHERE room_id = 123 AND
start_time < '2022-05-01 11:00' AND
end_time > '2022-05-01 10:00'`

if count == 0:
`INSERT INTO booking (user, room_id, start_time, end_time)
VALUES ('A', 123, '2022-05-01 10:00', '2022-05-01 11:00')`

When the user is sure that the meeting room is unoccupied for the corresponding time slot, then the user can insert an entry as a reservation and the next user will not have a time conflict. Doesn’t that seem nice?

The problem occurs when two users want to occupy the same time slot in the same meeting room simultaneously, and they can both pass the first SELECT validation, so they can both insert a reservation, and a conflict occurs. And such a situation can not be solved by adding a lock, because there is no row to lock at the beginning.

Solve by Uniqueness (Incomplete Solution)

Since there is no way to turn a simultaneous operation into a sequential operation through a lock, we let one of them simply fail. To do so we need to add some constraints, e.g. unique constraints, to the table.

One approach is to create a unique constraint index on the room_id, start_time columns, so that the second person trying to reserve the same time slot will fail.

The problem is solved if we restrict the use of each room to a maximum of one hour.

But if the meeting room can be booked for more than an hour, another problem arises.

  1. User A is reserved for 5/1 from 10am to 12pm
  2. User B is reserved for 5/1 from 11:00 to 12:00

When both User A and B are operating at the same time, this unique constraint obviously cannot be effective, and then the conflict around the meeting room remains.

Materialize Conflicts (Correct Solution)

To solve such phantom reads, the developer must use some tricks to reveal conflicts hidden under the same table.

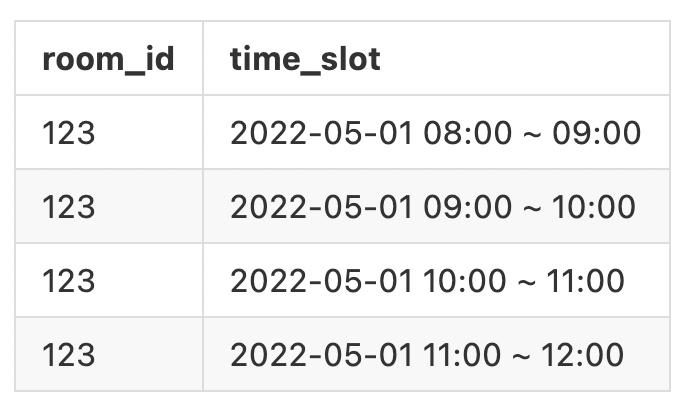
One way is to create a new table and pre-fill it with data to act as a coordinator for simultaneous operations. In the case of this meeting room system, we can create a table time_slots that lists all time slots in advance as follows.

When the meeting room is to be reserved, we not only execute SELECT on the original booking, but also SELECT on time_slots, and we can add FOR UPDATE because the data already exists. It is worth noting that the new SELECT FOR UPDATE is executed before the original SELECT.

In that case, when the expected time slots of two simultaneous users overlap, they will be blocked by the exclusive lock and become one after the other, and the latter will fail directly because it sees the result of the previous completion.

Conclusion

I have to say such a solution is difficult and not intuitive. However, in order not to sacrifice performance when using MySQL, the isolation level is not configured to be Serializable, which means complexity must be traded off for performance during execution.

It is a trade-off between complexity and performance. In fact, using FOR UPDATE to process synchronization in such a scenario does affect performance, and if booking is a table that may have phantom reads in all contexts, then making booking individually Serializable is a feasible solution.

When using a database, we must know the capabilities of the database and understand all the unsolvable situations of the database, so that we can know what kind of behaviors are potential risks when designing and developing.

In addition, how to properly address the risks is also an important topic. Although the use cases are not exactly the same for everyone, the patterns are similar, and learning how to solve each pattern will help you to deal with similar situations quickly in the future.

This article provides a solution for write skew when “creating” data, while the previous article is about solving write skew when “updating” data. These should cover most of the situations that you might encounter. If anyone has encountered other kinds of MySQL race conditions, please feel free to discuss them with me as well.

Originally published on Medium

Redis as a Lock! Are You Sure?

Is the lock you are talking about an exclusive lock or a barrier?

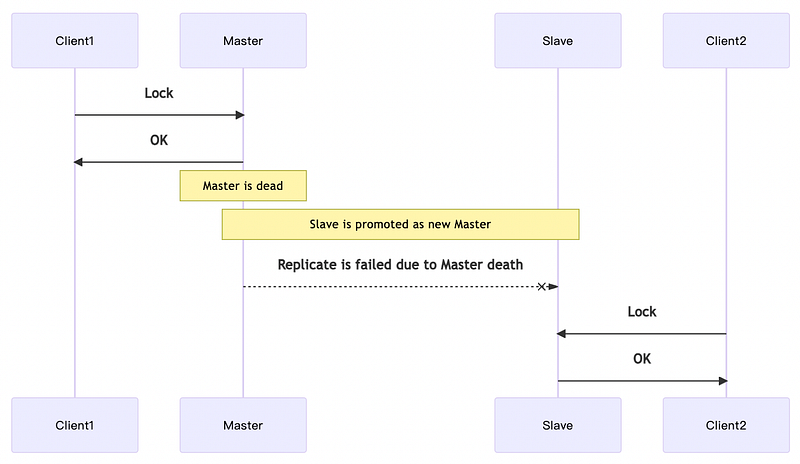
Redis is a storage that keeps data in memory, and we know anything in memory is unreliable. Furthermore, Redis’ data persistence is not as reliable as claimed. Therefore, it is very dangerous to use Redis as a lock to achieve some sort of synchronization.

This article, however, is not intended to focus only on Redis’ unreliability, but rather to further analyze whether those locks are being used correctly.

In fact, we often refer to two very different concepts as locks.

  • Exclusive lock: Used to control the access rights of a critical section, where only one person can be in the critical section at a time. A similar concept is the semaphore, which allows the maximum number of people in the critical section.
  • Barrier: Used to reduce the frequency of a specific action.

Nevertheless, these two concepts have completely different purposes and are implemented in totally different ways. However, usually, we do not carefully define the requirements and choose the correct approach, resulting in an abnormality.

Exclusive Lock

The purpose of an exclusive lock, also known as a mutex lock, is to control the simultaneous users of a critical section to only one.

Since it is a critical section, there are two actions, locking and releasing, entering while locking and leaving while releasing. This is often used to avoid racing conditions in databases, e.g. MySQL cannot avoid lost updates, so an additional exclusive lock is used as a synchronization mechanism for two simultaneous updates.

Based on the above description we can write a pseudo code.

1
2
3
4
while tryLock(forLongTime):  
sleep(veryShortTime)

doSomeThing()
1
releaseLock()

There are several worth noting points above.

  1. The tryLock method implies two actions: acquire the lock and lock it. If you can acquire the lock, you have to lock it immediately, otherwise the lock will be taken away by others, and the following critical section will be breached.
  2. The waiting time should be set very short, the objective is to be able to continue things as soon as possible, rather than spend a bunch of time waiting.
  3. However, the locking time should be very long to avoid the lock disappearing before things are done, resulting in invalidation of the critical section.
  4. After doing what needs to be done, the lock must be released immediately so that others can access the critical section immediately.

Again, the purpose of the exclusive lock is to control access to critical sections. If two actions occur at the same time, then both actions can be completed correctly, just one after another.

Barrier

The purpose of the barrier is to reduce the frequency of a certain action. For example, if you call a API twice in a row, and the second time the API responds with “Please try again later”, this is a typical barrier.

Since the purpose is to reduce the frequency, the timing of the blocking is important, depending on the feature requirements. For instance, if the product specification requires at least 5 seconds between APIs, then the locking time is 5 seconds. This is usually shorter than the locking time of an exclusive lock.

We also try to write pseudo code.

1
2
if tryLock(featureSpecTime):  
return False
1
return doSomeThing()

Compared with the exclusive lock, there is no unlock and wait, but the same tryLock is used, but the lock time is from the product requirements.

The barrier is to reduce the frequency, so if two actions happen at the same time, then one will succeed and the other will fail.

How about Redis?

Alright, we know all of this, so what does this matter to Redis? Yes, absolutely.

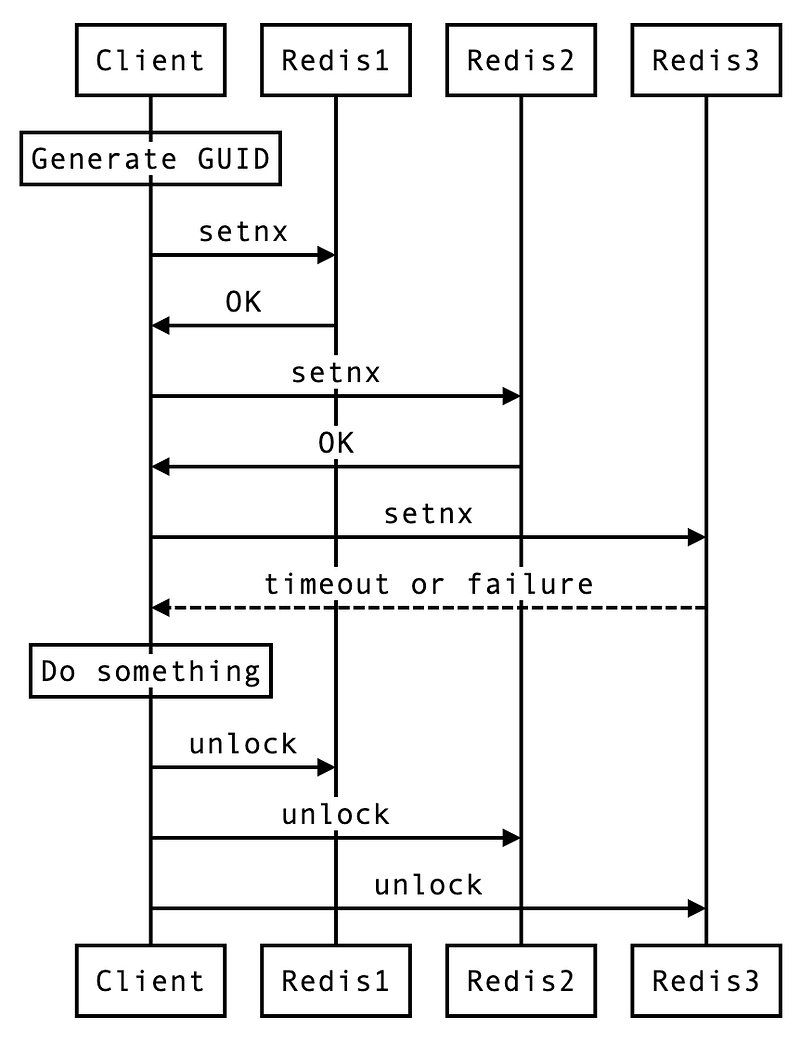
Redis is the one that is most often used to implement either exclusive locks or barriers, and tryLock, which is used on both sides, is a one-line command in Redis: SET someKey 1 EX someTime NX. Depending on whether the result is OK or nil, you can tell if the lock has been obtained. In terms of implementation, this is very simple.

However, as mentioned at the beginning of the article, Redis data is not reliable, and using Redis as an exclusive lock may cause critical sections to become invalid.

Redis can play a good role as a barrier, because a failure to block is at most an action that is done a few times more and does not affect the stability of the system, but as an exclusive lock, we must carefully consider the pros and cons.

For me, if I want to avoid MySQL lost updates, I always recommend using MySQL’s native FOR UPDATE, which is not difficult to implement and does not need to wait, and will not be invalid. Of course, to avoid MySQL lost updates, there are several approaches in addition to locking, which can be found in my previous article.

Conclusion

This article explains that there are actually two different meanings of what we commonly call locks, and although they both have a similar appearance, both the purpose and the details of their implementation are entirely different.

To summarize.

  • Exclusive lock: Two simultaneous actions will both succeed, but one after the other.
  • Barrier: Two simultaneous actions, only one of which will succeed.

When it comes to locks, make sure you know exactly which context you want to deal with and get it right. In my case, even if I had Redis in my system and I would use it, I would design my system as if Redis data did not exist, so that you would know if your system would handle it correctly when something unfortunate happened.

Originally published on Medium

The Mystery of MongoDB Indexing

Understand the ESR Rule and Index Intersection

I believe we are all familiar with MySQL’s indexing rules. Because it is built from a B+ tree, MySQL indexes have a leftmost match rule. In order for the query to match the index, the columns used in MySQL query syntax are arranged from left to right. For example:

1
SELECT * FROM table WHERE a = 1 AND b > 2 ORDER BY c;

The most efficient index for such a query is a compound index like (a, b, c). However, such an index cannot be applied to

1
SELECT * FROM table WHERE a = 1 ORDER BY c;

This is because it lacks the necessary b column.

This is the MySQL indexing rule, and in general, relational databases follow pretty much the same rule for implementation. However, there are subtle differences in MongoDB’s implementation with B-trees.

MongoDB ESR Rule

We will continue to use the query mentioned in the previous section as a demonstration.

1
db.table.find({a: 1, b: {$gt: 2}}).sort({c: 1})

Much the same as the MySQL query mentioned earlier, but with MongoDB’s MQL rewritten. However, the index that is valid for such a query is (a, c, b) instead of (a, b, c) as mentioned in the previous section.

This is because MongoDB’s compound indexes must follow the ESR (Equality, Sort, Range) rule. Hence, in the above example, b is used for range matching and c is used for sorting, so the correct index order is c before b.

MongoDB Index Intersection

In addition to the ESR rules, which are different from relational databases, MongoDB has another mystery: it can use multiple (let’s say 2) indexes in the same query, which is called index intersection.

Continue with the query in the previous section as an example.

1
db.table.find({a: 1, b: {$gt: 2}}).sort({c: 1})

To improve the query performance, we suggest to use (a, c, b) compound index, but in fact, we can achieve the same result with two indexes.

  1. b
  2. (a, c)

We create a single index b and a compound index (a, c), which can also improve the query performance.

Why do we use (a, c)? Because even index intersection must follow ESR rule, so we separate ES and R.

What is the advantage of this? The biggest advantage is that the composition of the index becomes more flexible. If only one index (a, c, b) is created, then if b is queried alone, there is no matching index to use, so an additional index of b must be created. As we all know, indexes are actually a cost, which will take up memory and affect writing efficiency. In other words, if a more compact index can be used to cover more complex query conditions, then such an index would be more valuable.

MongoDB ESR “Hidden” Rule

When using MySQL we use IN to do range queries, but IN is actually an equality in MySQL. That is to say, when the query is WHERE a IN (2, 3) is actually equivalent to WHERE a = 2 OR a = 3.

However, in MongoDB, it is not.

If you simply use a single column $in then it still has the same behavior as MySQL.

For example, find({a: {$in: [2, 3]}}) and find({$or: [{a: 2}, {a: 3}]}) are equivalent, and both belong to E of the ESR rule.

But if used with sort, then $in is treated as a range match, i.e. R. For instance:

1
find({a: {$in: [2, 3]}}).sort({b: 1})

Here a is treated as R, so to meet such a query, the index to be created should be (b, a) instead of (a, b).

Conclusion

If you only have experience with relational databases, it’s easy to get confused by feature-rich NoSQL databases, especially since the underlying MongoDB is actually a B-tree family similar to relational databases. However, there are still significant differences in the implementation details.

When creating MongoDB indexes, it is especially important to pay attention to ESR rule. Many users who have moved from MySQL can easily fall down on this rule without noticing it.

In fact, even indexes using (a, b, c) don’t cause problems when the data volume is small; MongoDB sorts in memory, but when the data volume grows to a certain size, MongoDB can’t load the entire dataset in memory and uses hard disk accesses. Then the performance will be very tragic.

Furthermore, the index intersection feature offers users more flexibility to create indexes and provides them with more diverse queries. However, it is also important to be aware of ESR rule when using index intersection in order not to lose more than you gain.

Originally published on Medium

Put on your software architecture hat

Last two weeks, there was a gathering of architects, in which we talked about e-commerce websites actually having some regular patterns, so if you want to quickly provide a high-level design, how would you do it?

This article is a record of that discussion, I will list our ideas based on my impressions, and then present the thinking of architects on this classic design pattern.

Define Basic Domain Services

Usually, for a startup system or architecture, I would recommend starting with a monolith. After constructing the MVP (minimum viable product), the architecture evolves depending on the functional and non-functional requirements to see whether it should be decomposed into microservices or the more popular Service-oriented architecture a few years ago.

But in any case, there will be a monolith as the basis for a quick launch and validation of the idea.

However, for an e-commerce site, there is no need for quick validation because the success of an e-commerce site depends on the products and exposure strategy rather than the features. Therefore, for e-commerce sites, it is more important to be able to solve the problems that will be encountered in the foreseeable future.

Here are a few practical examples.

With the rapid growth of users, the demand for user management will increase significantly, so it is necessary for user-related functions to become a separate service to facilitate fast iteration of the development cycle.

Inventory, as the number of users on the site rises, the product-related features will drive most of the traffic. Customers are always looking for the products they want on the site and viewing the inventory, so in order to handle the high volume of traffic, it must be able to scale horizontally on its own. Therefore, inventory will also become a standalone service.

Another core function of an e-commerce website is the purchase and order management. When a customer places an order, external services such as cash flow and logistics must be integrated behind the scenes, and new functions such as connecting different cash flows need to be implemented continuously. However, this development cycle is obviously different from user-related functions, and the need for testing and integration is completely different from the user services, that is, the order must also become a service.

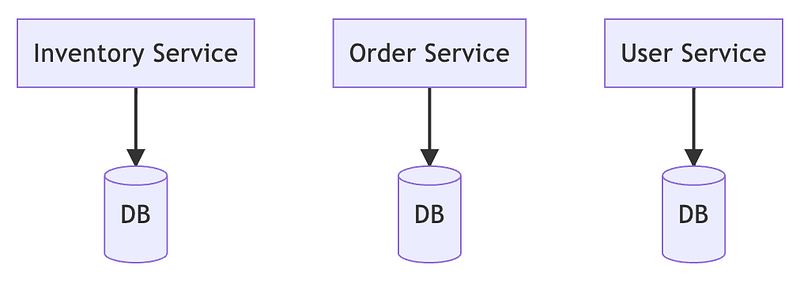
Finally, we will define basic domain services as follows.

Define Databases

In the previous section we mentioned that we have three independent services, User, Order and Inventory. Then we had to decide what database they should be using.

For a system that is just starting up, I always recommend using the most mature technology that the team is most familiar with, while taking into account the various use cases.

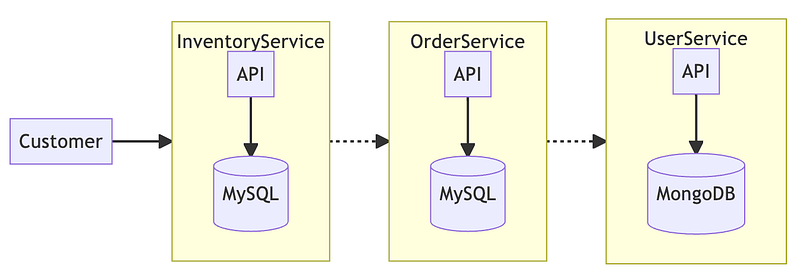
For this reason, I believe MySQL should be the best choice for services like Order Service and Inventory Service that require strong consistency. Although MySQL has always been criticized for its lack of horizontal scalability, there have been many new breakthroughs in recent years, and more and more distributed SQL is appearing. If the traffic of an e-commerce site rises to a bottleneck, then the pain of migrating from MySQL to distributed SQL will not be too much, after all, the applications barely need to be modified.

In the case of User Service, this is more interesting. User-related management functions usually do not have strong consistency requirements, and user information and other data structures are varied and plentiful. As a document-based database, MongoDB can support various kinds of rich data presentation and provide a lot of management convenience. Of course, you can also use MySQL for User Service, but you need to put a little more effort into data normalization.

Besides, if you use MongoDB to implement User Service, even if you have the need of strong consistency in the future, for example, if you want to give customers discount coupons, MongoDB can still provide enough strong consistency guarantee, since MongoDB also has transactions. However, it must be said that MongoDB transactions are not easy to code, which will increase the development effort.

Define Communications

Now we have three services in charge of their domain, but how do they communicate with each other? For instance, when a customer selects a product, then dispatches the order, billing and shipping, the three services must communicate with each other to complete the scenario.

From my point of view, I would recommend that these three services be asynchronous. Although the overall process must ensure consistency, which dramatically increases the implementation effort, only asynchronization can tolerate high availability and high scalability. Availability and scalability are mandatory non-functional requirements for running an e-commerce site.

For example, in the Black Friday promotion, there will be a large number of customers rushing to the website and placing a large number of orders, assuming that the three services communicate with each other synchronously, then the three services must scale at the same rate, which is obviously unreasonable.

In addition, when an order must be served by all three services, and any one of them fails temporarily or the network is temporarily down, the whole order will fail. In other words, only through asynchronous communication can we ensure the availability and scalability required for e-commerce sites.

At this point, we had a prototype of our system architecture.

However, there is one component that we haven’t decided yet, and that is what kind of queue system should be used for asynchronization. In my opinion, we should use Kafka. Why not use a pure message queue like RabbitMQ? One important reason is that, Kafka has higher throughput when it comes to handling large traffic from a promotion event.

Moreover, for behaviors like order and payment, we all know it is sequential. To preserve the message order while a large number of messages are flooding the queue, it is necessary to scale horizontally through Kafka’s consumer groups so that messages can be handled faster and in order at the same time.

Sketch Workflow

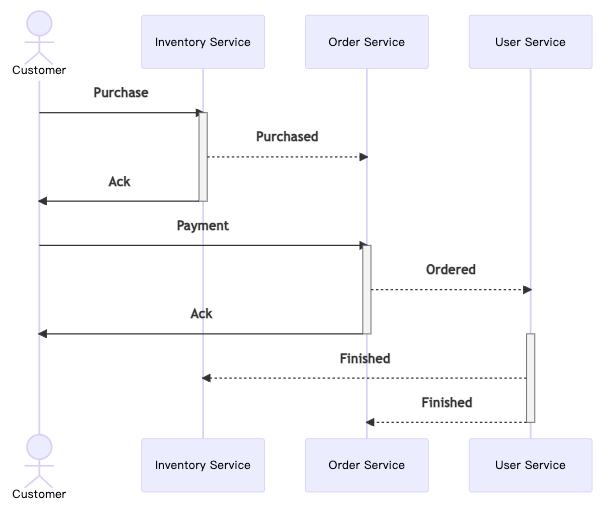
Once we have a simple system architecture, we begin to sketch out the entire order placement process.

At the beginning, the customer places an order with the inventory service, and the inventory service only handles inventory-related tasks, e.g., pre-deducting inventory. The purpose of reducing inventory before the payment is to avoid competition when a large number of users are consuming, and if the inventory is not actually reduced until the last stage, then there is a high risk that a consumer will buy air.

When the inventory service has finished processing, the order service is notified that it has taken over the entire transaction while informing the customer that the order has been placed. At this moment, only the order is established, and the payment must be redirected through the frontend so that the customer can properly communicate with the order service to proceed the billing.

When the payment is completed, the order service will notify the user service. User service can then proceed with user-related tasks, like coupon issuance or user level upgrade. Finally, the inventory service and the order service are informed that the transaction has been successfully completed.

Or if there is an error in the order service or user service, a message must be sent to inform the other participating services. Then the service that receives the notification can handle it accordingly, for example, the inventory service must add back the pre-reduced inventory.

But, Not Enough

Readers who have been subscribing to my articles should have seen this is a very typical distributed transaction, and the proper approach to distributed transaction is to always be resilient, i.e., resilient to the errors.

As I described in my previous article, to handle distributed transactions in an event-driven architecture, an arbiter (crontab) is desired. The crontab detects periodically which events have not been handled correctly and takes corresponding actions to repair them.

The specific details will not be explained again in this article. But we can know in addition to the three domain services, there is another service that monitors the entire workflow.

But, Still Not Enough

Because the entire transaction process is asynchronous, the user must be able to know exactly what the status of the order is, what stage it is at, and so on. Therefore, it is also necessary to have a service that subscribes to the messages sent by each service, and has its own database to record and store the status of all transactions.

This approach is also known as CQRS. The entire workflow is observed through a standalone cross-domain service, but unlike an arbiter, this observer does not actually participate in the workflow, nor does it make any kind of changes to the workflow.

The observer exists only to allow the customer to get a proper overview of the workflow.

Conclusion

E-commerce websites can be considered as the textbook of all backend architectures. All kinds of problems that backend engineers need to deal with will appear on e-commerce websites, but the books currently available on the market often only provide a monolithic solution, and focus on how to implement those functional requirements.

But as backend experts, we all know using a monolith to run an e-commerce site is ultimately a dead end. Unless the product is completely unsellable, it will sooner or later face the challenge of traffic and availability.

Although this article is a casual conversation among architects, it is actually a look at the challenges we encounter on a daily routine from a different perspective. Why does a startup e-commerce site need to have five services?

  • To add new features more quickly and to have independent integration and testing processes, microservices must be segmented into domains.
  • To have high availability and scalability, the coupling between domains must be reduced.
  • For better fault tolerance, a resilient error recovery mechanism must be established.
  • For a better user experience, a comprehensive presentation of the whole picture must be implemented.

Previously, I often mentioned the drawbacks of microservices, eg Original Sin of Microservices, Part 1 and Original Sin of Microservices, Part 2.

But this does not mean I totally reject microservices, instead I hope we can all face microservices with a correct attitude, not as the holy grail but also not as the devil.

The right trade-off is always the most important core concept of software architecture.

Originally published on Medium

Introduction to Unleash and LaunchDarkly to understand their capabilities

In the previous article, we introduced the timing and usage scenarios of feature toggles. In this article, we will pick two of the more well-known solutions, Unleash and LaunchDarkly, to provide a basic introduction and my experience.

Before I begin, let me briefly describe the essential requirements for a feature toggle solution must be.

  1. Easy-to-use website.
  2. Easy to integrate SDK.
  3. Ability to implement 4 types of feature toggles.
  • Release toggle: You can percentage rollout to achieve canary deployment.
  • Ops toggle: Similar to the release toggle, the percentage adjustment function is also required.
  • Experiment toggle: To be able to carry additional information within the toggle, not just true or false.
  • Permission toggle: When making toggle judgments, it is important to be able to use additional dynamic parameters such as user id.

Both Unleash and LaunchDarkly can satisfy these three criteria, and although there are some differences in capability, the basic operation of the feature toggle is not a problem at all.

Unleash

Unleash is a mature solution for feature toggle, providing not only an online paid solution but also a self-hosted open-source solution. Therefore, I believe it is very suitable for internal experiments in organizations, after all, it is free. If you have good results with feature toggles, then you can consider upgrading to Unleash’s enterprise solution or switching to another solution.

Unleash’s open-source solution is very simple in architecture, requiring only an API and a PostgreSQL. There is no cache in the system architecture, so you can understand that every time you get a feature toggle it is run directly on the database, but if you only apply Unleash to the backend environment and only use the server-side SDK, then this amount of usage is indeed not a big deal.

On the other hand, the SDK provided by Unleash uses a polling mechanism, asking for results every 15 seconds and storing the results in each instance’s memory. This also effectively reduces the frequency of actually touching the database, but at the price of taking up to 15 seconds for changes to take effect. From my point of view, 15 seconds is not an intolerable period, so it is completely acceptable.

It is also very simple to use, first initialize the Unleash instance, and then it will work properly. All the following examples use Node.js as a demonstration.

1
const unleash = require('unleash-client');
1
2
3
4
5
6
unleash.initialize({  
url: 'https://YOUR-API-URL',
appName: 'my-node-name',
environment: process.env.APP_ENV,
customHeaders: { Authorization: 'SOME-SECRET' },
});

The initialization process needs to set environment, but in an open-source solution, this parameter is irrelevant because the open-source solution only provides one set of environments. Ideally, it should be possible to generate a corresponding set of settings with various online environments, eg: staging and production.

In an open-source solution, the only way to distinguish between environments is by using the name of the toggle as follows.

1
2
const stgToggle = unleash.isEnabled('featureA-stg');  
const prodToggle = unleash.isEnabled('featureA-prod');

This can be quite useful when the number of toggles is small, but when the number of toggles becomes large, it can be challenging to manage.

How to use Unleash to make an experiment toggle? We can do this by using Unleash’s unleash.getVariant, which is additional information that can be attached to the feature toggle and is easily configured on the Unleash web page.

1
const variant = unleash.getVariant('featureA');

In addition, it is very simple to complete the permission toggle, just bring in the context when isEnabled.

1
2
3
4
5
const context = {  
userId: '123',
sessionId: '123123-123-123',
remoteAddress: '127.0.0.1',
};
1
const enabled = isEnabled('featureA', context);

Furthermore, Unleash offers multiple different deployment strategies.

  1. Standard: Every time, the result will be the same.
  2. Gradual rollout: It can be set to a specific ratio, so that the result of each time the toggle is asked is determined by chance.
  3. UserIDs: Use userId in the context to enable targets that satisfy a specific userId.
  4. IPs: Use sessionId in the context to enable targets that satisfy a specific sessionId.
  5. Hosts: Use remoteAddress in the context to enable targets that satisfy a specific remoteAddress.

Thus far in the introduction, we should be able to satisfy the essential use cases of feature toggles with Unleash. However, the functionality of Unleash is very simple in terms of toggling, and there are several challenges that are not easily overcome in the use of Unleash.

  1. There are only three special contexts that can be used for the deployment strategy, and there is only a judgment of equal or not, and there is no operator provided for either greater than or less than. If you need to implement custom strategy, you have to inherit the base class of SDK and implement it by yourself.
  2. Unleash supports the use of multiple policies on a single toggle, but the relationship between the policies is OR. For example, it is not possible to enable a toggle to a specific user in a specific location because the userId and sessionId cannot be AND.
  3. When choosing a gradual rollout, it can only set one specific rule. For instance, you cannot group by userId and have 40% of the users enabled, because you cannot mix multiple conditions. Otherwise, you can only use totally random distribution.

LaunchDarkly

LaunchDarkly is another common solution. It does not provide a free open source solution, in other words, it is only available as a paid commercial solution.

It is very similar to Unleash in use, and requires initialization at first.

1
const ld = require('launchdarkly-node-server-sdk');
1
const client = ld.init('YOUR_SDK_KEY');

Unlike Unleash, it does not need to set the environment parameters in the initialization, because the key has already defined in which environment. The next step is to pick up the corresponding feature toggles.

1
2
3
4
5
6
const user = {  
firstName: 'Bob',
lastName: 'Loblaw',
key: 'example-user-key',
};
const value = await client.variation('YOUR_FLAG_KEY', user, false);

Two things are worth noting here: LaunchDarkly’s user is equivalent to Unleash’s context, but LaunchDarkly’s user is more flexible; Unleash’s context is only available for those specific attributes that are predefined, but LaunchDarkly can use any attribute and only needs to be configure it on the admin page.

Another point is that Unleash splits the toggle and extra information into two methods, isEnabled and getVariant, but in the LaunchDarkly world, the toggle and extra information are one and the same. That is to say, the value you get through variation already contains the extra information. The value can be a boolean, an integer, a string, or JSON, depending on the setting.

As for the percentage rollout provided by Unleash, LaunchDarkly also provides it, and it is even more powerful. Not only setting a ratio, LaunchDarkly is a composite attribute toggle, so more than two possibilities can exist at the same time, so you can directly adjust the percentage of each possibility in the percentage setting.

In addition, LanuchDarkly provides a very powerful rules engine. Unlike Unleash’s monotonous deployment strategy, LauchDarkly can freely set rules for AND, OR, IN, and other matching operations. Moreover, during the percentage rollout, it can also mix percentages and various rules to achieve a very strong conditional matching.

Due to LaunchDarkly’s entirely freestyle user and powerful rule engine, basically, LaunchDarkly can implement any application scenario you want.

Conclusion

Currently, the toggle update relies on a polling mechanism, so it takes a while for the settings on the website to really reflect on the system behavior. The solution is also proposed in the new version of LaunchDarkly, which provides a streaming mechanism to get instant feedback. However, for the system, it must also consider whether the network environment can tolerate so many persistent connections. This is beyond the scope of this article, so I will not explain it further.

In fact, the feature toggle solution provides much more than just the toggle itself, how to do access control, audit log, and SSO and other additional features are equally important. However, different payment solutions provide different payment functions, and those functions have actually been detached from the demands of feature toggles, so this article does not introduce those additional functions of Unleash and LaunchDarkly.

In terms of feature toggling itself, Unleash provides a basic experimental environment in which you can build a feature toggling system in your organization with very little overhead. Unleash also provides all the fundamental features required for feature toggling. For an organization that is just starting up, Unleash provides a great experimental vehicle that can be used as a warm start.

Once the feature toggle is integrated into an organization’s development process, LaunchDarkly is a good choice for organizations that need to customize the use of the toggle for more situations. LaunchDarkly provides a simple and intuitive experience for setting and matching customization rules.

From my experience, it is sufficient for small organizations to use Unleash, and the self-hosted solution is simple but enough for most use cases. As long as there are no complex rules to match, there is no need to spend money on other commercial solutions, but if you are having more and more management needs with open source Unleash, then it is necessary to consider commercial solutions and evaluate them carefully. In my opinion, LaunchDarkly is also good.

Originally published on Medium

Introduction to Feature Toggling— Types, Use Cases, and Implementation

Know the many scenarios where feature toggles can be used and how to treat them properly

I have been using trunk-based development for some time to improve productivity in the team I supervise. In order to perform trunk-based development smoothly, feature toggle plays an important role in it, so I use this article to introduce feature toggles, what kinds of toggles are included and how to use them.

But before we get to that, let’s talk about a concept that is easily confused. What is the difference between feature toggle and configuration?

First, wherever a configuration is stored, such as a file, or a central storage system, such as Consul by HashiCorp, it is considered static. When the system is initialized, the entire configuration file is stored in each instance’s memory to reduce unnecessary I/O overhead. That is, if a setting is to be modified, the associated instance must be restarted in order to reload the setting into memory.

On the other hand, a feature toggle does not work this way; a feature toggle calls the management system each time to get the current settings for the instance or even the feature. Therefore, the feature toggle is more dynamic than the configuration.

Let’s use code as an example.

If it is a configuration file, it will look like the following.

1
2
3
4
5
const config = loadConfigFromSomewhere();  
function foo() {
if (config.featureA) doA();
else doB();
}

As for the feature toggle, it is a little different.

1
2
3
4
5
const connection = initFeatureToggle();  
function bar() {
if (connection.isEnabled("featureA")) doA();
else doB();
}

As you can see from the above example, the configuration is fixed after loadConfigFromSomewhere, and then the value is just taken from the variable. However, the feature toggle may get a different result each time when calling isEnabled, depending on the current environment.

What kinds of feature toggles are there?

There are four types of feature toggles.

  1. Release Toggles
  2. Ops Toggles
  3. Experiment Toggles
  4. Permission Toggles

There are two dimensions in the diagram, dynamism and longevity.

  • Dynamism said that the frequency of the toggle will be changed, the closer to the right side means the more frequently the toggle will be changed.
  • Longevity refers to how long the toggle will stay in the source code, the closer to the bottom the shorter the retention time.

The release toggle in the blue area is relatively static and is only used when a feature is released, and will be removed when the feature is stable. On the other hand, the toggles in the green area are relatively dynamic and may change according to various needs.

Release Toggles

Release toggle is the most commonly used form of toggle and is intended to control the impact scope of each release.

Assuming there is a new requirement for this release, the code for that new requirement should be fully encapsulated by the toggle for this release. At the moment of release, the default toggle should be off, in other words, the behavior of this release and the last release should be exactly the same.

When the release is successful, the toggle can be turned on gradually on demand. At first, it may be 1% of the calls will get turned on, then 5%, then 10% and so on. In this way, the functionality is gradually opened to 100%. Such an approach is also known as the canary release.

Alternatively, the toggle is turned on all the way at the beginning. Once any problem is encountered, the toggle is turned off completely to avoid a disaster affecting the entire system. The practice is known as blue-green deployment.

It is important to note that the life cycle of these release toggles should be just a short period of time. These toggles should be removed from the code as soon as it is determined that the functionality is stable. If you don’t do this, the code will be filled with more and more toggles, which in return will cause a maintenance effort.

Ops Toggles

Ops toggles are different from release toggles because release toggles are designed to react to each release, but ops toggles are designed to handle changes to the infrastructure. When the infrastructure has to be upgraded or migrated for some purpose, it can be managed through ops toggles.

For example, if a system starts with a distributed tracking system called Elastic APM and wants to replace it with jaeger for budget or maintenance reasons, then an ops toggle can be used to switch between the two systems. Until we are sure that jaeger can be operated correctly, the two systems will coexist, possibly with a half-monitoring ratio of 50-50. The ops toggle will remain in place until we are confident that we can replace the original system with jaeger, so the duration will be much longer than the release toggle.

Another example of using ops toggle is a manual circuit breaker. For a high throughput system, a rate limit algorithm is usually implemented, but once the traffic reaches a certain level, it is necessary to directly cut off the excess traffic to avoid impacting the whole system. It is ideal for the system to be able to adjust and recover itself, however, such a mechanism is highly complex and difficult to do well at the beginning, so ops toggle is a good choice.

This toggle will also exist for a long time until the developer has a way to implement an automatic mechanism.

Experiment Toggles

Experiment toggles, as the name suggests, are toggles that are used to perform experiments. When a feature has two different behaviors and we want to evaluate the effectiveness of these two behaviors, we use experiment toggles, and the process of experimentation is called A/B testing.

It operates a bit like a release toggle, but unlike a release toggle that allows old and new behaviors to coexist, an experiment toggle allows two new behaviors to coexist. It may even be possible to bring in more experimental parameters through experiment toggles to make the whole experimental process more flexible and efficient.

Yes, most of the feature toggles can carry additional parameters, not just true or false. Therefore, this can play the most accelerating role for the constantly changing experimental environment.

Just like other toggles, the experiment toggles should be removed from the code after the experiment is done and the results are confirmed.

Permission Toggles

This last one is the most complex applicable case. From the diagram, we can see that it is both dynamic and long-lived.

Then, what exactly is the existence of this toggle?

From my point of view, it has two scenarios, one is the system-wide access control and another is the product level access control.

System-wide access control means that there are certain functions or operations that are only available to specific users, thus we manage these restricted functions through permissions toggles. A little hard to imagine? I’ll provide a pseudo code.

1
2
3
4
5
6
function restrictedFunction() {  
const metadata = {userId, userLevel, userRole};
if (connection.isEabled("featureA", metadata))
doFunction();
else return;
}

From the above example, we can know that this specific function is only allowed for certain users, and the user must verify his Id, Level and Role to make sure he meets the eligibility criteria before the function is available, otherwise, it will be skipped.

Such a toggle seems to be very stable, right? In fact, it is not, the verification method may change, originally only Id and Level maybe required, until one day due to demand and add Role. So the rules of the toggle may change with requirements, and the usage context of the toggle may also change as requirements expand.

How to use feature toggles correctly?

We’ve already seen what the code looks like when using the feature toggle.

1
2
3
4
5
const connection = initFeatureToggle();  
function bar() {
if (connection.isEnabled("featureA")) doA();
else doB();
}

When more and more toggles are made, there will be more and more if-else in between, which actually violates most of the clean code principles. Therefore, you should be extra careful when using feature toggle and follow a few basic principles.

  1. Use only where needed.
  2. control the number of toggles.
  3. Toggles do not overlap with each other.
  4. Regularly clear the useless toggles.

In addition, the code of using toggles will eventually become as follows.

1
2
3
function bar() {  
doB();
}

Because of this, it is very important to be able to remove toggles easily. I recommend using the Factory Method and encapsulating the code with a feature toggle so that only the product inside the Factory Method is removed when removing toggles and not all the external callers are touched. Here is a simple demonstration.

1
2
3
4
5
6
7
8
function factory()  
{
if ( connection.isEnabled("featureA", metadata) ) {
return new NewHandler();
} else {
return new OrigHandler();
}
}
1
2
3
4
5
6
// qwer.js  
factory().doA();
// asdf.js
factory().doB();
// zxcv.js
factory().doC();

Wrapping the whole feature toggle judgment in the factory method, the external caller doesn’t need to know whether he gets a new or old handler. when removing the feature toggle in the future, we only needs to modify the factory method and drop the OrigHandler.

1
2
3
4
function factory()  
{
return new NewHandler();
}

As a result, whether it is qwer.js, asdf.js or zxcv.js do not need to change.

Conclusion

This time we talked about the many scenarios where feature toggles can be used and how to treat them properly, and you should know why trunk-based development needs feature toggles so much because new versions are released frequently and to avoid affecting the online environment. So all unstable modifications must have a mechanism to isolate them. Feature toggles are exactly such a role.

Another commonly mentioned use case in using feature toggles is that once a toggle is modified, it must immediately react to some online functionality. Such a requirement can be achieved through Observer Pattern, but I don’t recommend this kind of conjunction. After all, we know that these toggles will eventually be removed and they should not be involved in the whole domain model, instead, they play the role of coordinator, coordinating between people and systems.

In this article, we have only discussed the use of feature toggles and their considerations, without mentioning specific solutions. Next time I will introduce two famous providers of feature toggle, LaunchDarkly and Unleash, and provide some comments and guidelines based on my experience with them respectively.

Originally published on Medium
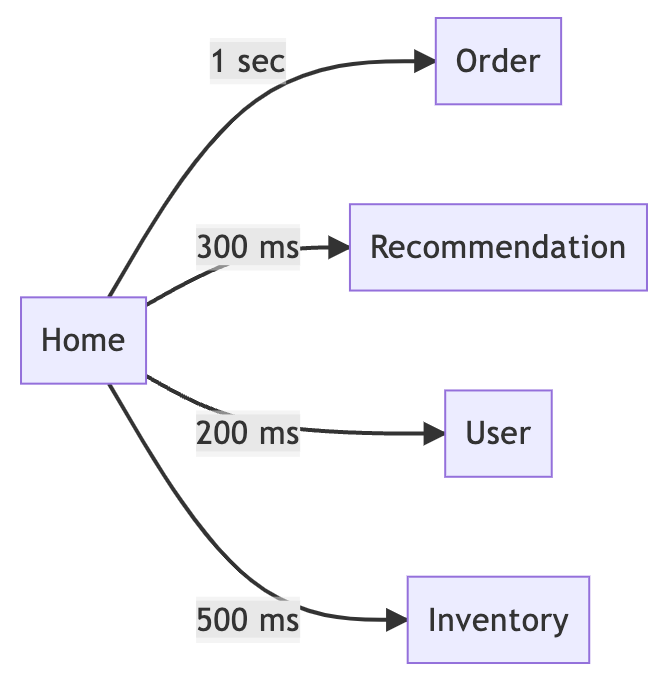
0%