<?xml version="1.0" encoding="utf-8"?>
<feed xmlns="http://www.w3.org/2005/Atom">
  <author>
    <name>CT Wu</name>
  </author>
  <generator uri="https://hexo.io/">Hexo</generator>
  <id>https://wirelessr.github.io/</id>
  <link href="https://wirelessr.github.io/" rel="alternate"/>
  <link href="https://wirelessr.github.io/atom.xml" rel="self"/>
  <rights>All rights reserved 2026, CT Wu</rights>
  <subtitle>Software Architect · Backend · Data Engineering</subtitle>
  <title>CT Wu</title>
  <updated>2026-07-19T17:31:01.000Z</updated>
  <entry>
    <author>
      <name>CT Wu</name>
    </author>
    <category term="AI" scheme="https://wirelessr.github.io/categories/AI/"/>
    <content>
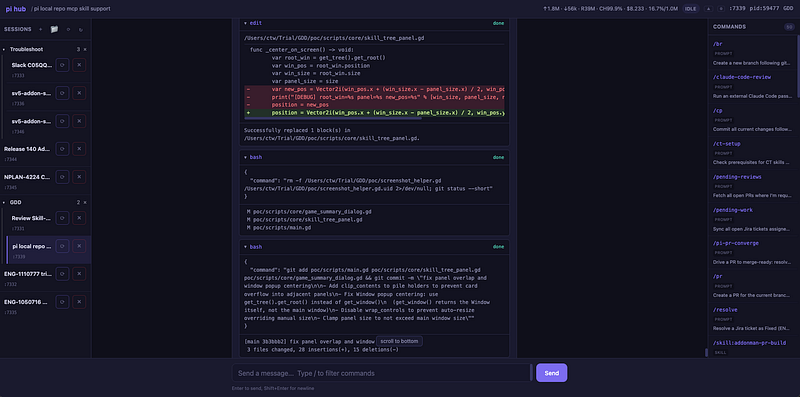
      <![CDATA[<h4 id="Master-settings-json-MCP-and-subagents-to-bring-Claude-Code’s-power-into-Pi"><a href="#Master-settings-json-MCP-and-subagents-to-bring-Claude-Code’s-power-into-Pi" class="headerlink" title="Master settings.json, MCP, and subagents to bring Claude Code’s power into Pi"></a>Master settings.json, MCP, and subagents to bring Claude Code’s power into Pi</h4><p><img src="https://cdn-images-1.medium.com/max/800/1*ynbjshQhr8Y92Ii08ZrCXg.png"></p><p>In my previous post, I talked about migrating from Claude Code to Pi. Since space was limited, I only covered the basics. In this article, I will explain the specific setup in detail.</p><p>First, let’s look at the global configuration layout.</p><figure class="highlight bash"><table><tr><td class="gutter"><pre><span class="line">1</span><br><span class="line">2</span><br><span class="line">3</span><br><span class="line">4</span><br><span class="line">5</span><br><span class="line">6</span><br><span class="line">7</span><br><span class="line">8</span><br><span class="line">9</span><br><span class="line">10</span><br></pre></td><td class="code"><pre><span class="line"><span class="built_in">ls</span> -al ~/.pi/agent  </span><br><span class="line">    608 Jul 18 16:49 .  </span><br><span class="line">     96 Jul  4 17:21 ..  </span><br><span class="line">     28 Jun 23 16:25 AGENTS.md -&gt; /Users/ctw/.claude/CLAUDE.md  </span><br><span class="line">   1856 Jul  6 18:05 APPEND_SYSTEM.md  </span><br><span class="line">     63 Jul  7 10:09 agents -&gt; /Users/ctw/Workdir/ctw-skills/plugins/ct/agents  </span><br><span class="line">    118 Jul 16 19:28 mcp.json  </span><br><span class="line">     27 Jun 25 15:42 prompts -&gt; /Users/ctw/.claude/commands  </span><br><span class="line">    546 Jul 17 14:47 settings.json  </span><br><span class="line">     63 Jul  7 10:15 skills -&gt; /Users/ctw/Workdir/ctw-skills/plugins/ct/pi-skills</span><br></pre></td></tr></table></figure><p>There is a core configuration file in here called <code>settings.json</code>.</p><figure class="highlight plaintext"><table><tr><td class="gutter"><pre><span class="line">1</span><br><span class="line">2</span><br><span class="line">3</span><br><span class="line">4</span><br><span class="line">5</span><br><span class="line">6</span><br><span class="line">7</span><br><span class="line">8</span><br><span class="line">9</span><br><span class="line">10</span><br><span class="line">11</span><br><span class="line">12</span><br></pre></td><td class="code"><pre><span class="line">&#123;  </span><br><span class="line">  &quot;skills&quot;: [  </span><br><span class="line">    &quot;~/.claude/skills&quot;  </span><br><span class="line">  ],  </span><br><span class="line">  &quot;packages&quot;: [  </span><br><span class="line">    &quot;npm:pi-mcp-adapter&quot;  </span><br><span class="line">  ],  </span><br><span class="line">  &quot;extensions&quot;: [  </span><br><span class="line">    &quot;/Users/ctw/.nvm/versions/node/v22.23.0/lib/node_modules/@earendil-works/pi-coding-agent/examples/extensions/subagent&quot;,  </span><br><span class="line">    &quot;/Users/ctw/.nvm/versions/node/v22.23.0/lib/node_modules/@earendil-works/pi-coding-agent/examples/extensions/permission-gate&quot;  </span><br><span class="line">  ]  </span><br><span class="line">&#125;</span><br></pre></td></tr></table></figure><p>This file defines where skills are inherited from and what plugins to install. Pi has very few core components. We need to customize most of it based on our needs. For example, MCP and subagents are the two most critical features, and they both run as plugins.</p><p>As we can see from the configuration, we can directly reuse most settings from Claude Code. However, a few interesting details are worth mentioning.</p><ol><li>Pi does not have commands. It only has prompts. In Claude Code, commands are actually just skills with <code>disable-model-invocable</code> enabled. But in Pi, there are only prompts, which are just plain text. The concept is basically the same, so I linked my commands folder directly to prompts.</li><li>I actually use two layers of skills. The first layer is inherited from Claude Code, which is defined in <code>settings.json</code>. The second layer consists of skills unique to Pi, placed in my Pi skills directory. I had to do this because Claude Code and Pi handle subagent logic are entirely different. Claude Code can spawn a subagent to do work using simple prompts. This approach does not work in Pi, so I had to write them differently.</li><li>The MCP configuration is also inherited from Claude Code, but the approach is slightly different. Pi can import settings directly from Claude Code and then override specific variables. I chose to override <code>idleTimeout</code> because the Pi MCP plugin has an idle timeout setting. This setting makes the Chrome MCP disconnect if it stays idle for a while. Reconnecting Chrome MCP requires manual confirmation every time, so I decided to disable the idle timeout entirely.</li></ol><figure class="highlight plaintext"><table><tr><td class="gutter"><pre><span class="line">1</span><br><span class="line">2</span><br><span class="line">3</span><br><span class="line">4</span><br><span class="line">5</span><br><span class="line">6</span><br><span class="line">7</span><br><span class="line">8</span><br><span class="line">9</span><br><span class="line">10</span><br></pre></td><td class="code"><pre><span class="line">&#123;  </span><br><span class="line">  &quot;imports&quot;: [  </span><br><span class="line">    &quot;claude-code&quot;  </span><br><span class="line">  ],  </span><br><span class="line">  &quot;mcpServers&quot;: &#123;  </span><br><span class="line">    &quot;chrome-devtools&quot;: &#123;  </span><br><span class="line">      &quot;idleTimeout&quot;: 0  </span><br><span class="line">    &#125;  </span><br><span class="line">  &#125;  </span><br><span class="line">&#125;</span><br></pre></td></tr></table></figure><p>Finally, we have <code>APPEND_SYSTEM.md</code>. As I mentioned last time, we can write system prompts in this file if we only want them applied to Pi and not Claude Code.</p><p>I defined two core behaviors in this file.</p><figure class="highlight plaintext"><table><tr><td class="gutter"><pre><span class="line">1</span><br><span class="line">2</span><br><span class="line">3</span><br><span class="line">4</span><br><span class="line">5</span><br></pre></td><td class="code"><pre><span class="line">## Image Reading  </span><br><span class="line">The default model cannot see images. When you need to read or understand an image (screenshot, error trace, UI mockup, diagram, chart, photo), delegate to the `vision` agent via `subagent`. Do NOT pass image files to `read` or refuse image tasks. Instead, delegate to `vision`.  </span><br><span class="line">  </span><br><span class="line">## General-Purpose Delegation  </span><br><span class="line">Use the `runner` agent via `subagent` for independent verification/recalculation, heavy batch work, or any well-specified self-contained job. Same tools as the main session, no conversation history, no specialty. Do NOT use it for PR review (`pr-reviewer-*`) or images (`vision`) because those have their own agents.</span><br></pre></td></tr></table></figure><p>The first one is vision. Since my default model does not support image recognition, I wrote a vision subagent. This allows the main session to ask for help whenever it encounters an image.</p><p>The second one is runner. Claude Code has a general-purpose subagent. Whenever the main session wants to do minor tasks, it calls the general-purpose subagent by default. I did something similar in Pi. I wrote a runner subagent so the main session has a helper ready to take over tasks when delegation is needed.</p><p>At this point, I have fully migrated Claude Code’s capabilities to Pi. As I mentioned before, I do not need over-the-top features. I only migrated what I considered essential.</p><p>Of course, there are still many details to fine-tune after the migration. A good example is the subagent-related skills I just mentioned. In Claude Code, we can create subagents through prompts, but all those skills need to be rewritten for Pi. For Pi, we must clearly define those subagents in the subagents directory.</p><p>Even though it is easy to let the agent rewrite them, there are still some minor issues to work out in practice. I kept fine-tuning my Pi-specific skills over time. Overall, the entire migration only took about half a day to a full day.</p><h3 id="Promoting-My-Side-Project"><a href="#Promoting-My-Side-Project" class="headerlink" title="Promoting My Side Project"></a>Promoting My Side Project</h3><p>When using Pi or Claude Code, I ran into a few persistent pain points.</p><ol><li>When I run multiple agent tasks across many terminal tabs, I need clear notifications. I need to know when a tab is done so I can take over. This is easy to do in Claude Code when using the Warp terminal because Warp has custom features for Claude Code. However, Warp is not going to build custom features for an open-source project like Pi.</li><li>While the subagent extension in Pi is feature-rich, it does not show the execution process. It only shows the final result. Claude Code has Agent Teams, which lets us see the details of each subagent, but Pi lacks this feature.</li><li>Claude Code has several remote control options. These include built-in solutions, which require a personal account and do not support API keys, and third-party options like Happy Coder. However, I have not been able to find a good remote control solution for Pi.</li><li>Warp supports tabs and groups, meaning we can group related sessions together. However, Warp groups do not support collapsing or expanding. When there are too many tabs, it is still hard to find what I need to focus on.</li><li>I need clear labels to know exactly what session is running in each tab. Warp allows us to name tabs and groups, but I still have to name them manually. Doing this for short-lived sessions feels highly inefficient. I believe session names should be generated automatically.</li></ol><p>To address these issues, I decided to develop a plugin myself. This is how my side project was born.</p><p>It has a few key features.</p><ol><li>It is a web-based service, so there is no need to install any mobile apps. Even though it is a local service, we can easily expose it and set up basic OAuth using tools like ngrok.</li><li>Since it is a web service, it supports parallel work across multiple devices. For example, I can manage session A on my computer browser while handling session B on my phone. We can even control the same session simultaneously from both a phone and a computer without any locking issues.</li><li>It has its own storage unit, so it can save session grouping details. It also supports automatic session naming, though this requires configuring an LLM API key.</li><li>I use this project every single day. I will keep updating and maintaining it regularly. It also has very high test coverage.</li></ol><p>Here is a preview of the main interface. I will add new features over time as I see fit. Contributions are always welcome.</p><p><img src="https://cdn-images-1.medium.com/max/800/0*InCFhvcj2c_d_TP2.png"></p><h3 id="Wrap-Up"><a href="#Wrap-Up" class="headerlink" title="Wrap Up"></a>Wrap Up</h3><p>I have used most GUI and CLI agent tools on the market. Right now, I am most satisfied with Pi. This is not because Pi is perfect or has everything. Quite the opposite, Pi is simple and focuses only on the core, while opening up plenty of APIs for third-party integration.</p><p>If we want a specific feature, we can almost always build an extension to solve it. For example, my side project basically gives Pi a full GUI interface, complete with remote control capabilities.</p><p>Pi’s stable yet open core is exactly what makes this so easy.</p><p>As for model capabilities, whether it is Opus 5, Fable 5, GPT-5.6, or GLM-5.2 (which I mainly use lately), they all have their pros and cons. I will not judge their performance too much here. But without a doubt, GLM-5.2 is currently the most cost-effective option for me.</p><blockquote><p>Originally published on <a href="https://medium.com/@lazypro/claude-code-to-pi-advanced-ai-agent-migration-guide-5125e7fa3cc4">Medium</a></p></blockquote>]]>
    </content>
    <id>https://wirelessr.github.io/AI/Claude-Code-to-Pi-Advanced-AI-Agent-Migration-Guide/20260719/</id>
    <link href="https://wirelessr.github.io/AI/Claude-Code-to-Pi-Advanced-AI-Agent-Migration-Guide/20260719/"/>
    <published>2026-07-19T17:31:01.000Z</published>
    <summary>
      <![CDATA[<h4 id="Master-settings-json-MCP-and-subagents-to-bring-Claude-Code’s-power-into-Pi"><a]]>
    </summary>
    <title>Claude Code to Pi: Advanced AI Agent Migration Guide</title>
    <updated>2026-07-19T17:31:01.000Z</updated>
  </entry>
  <entry>
    <author>
      <name>CT Wu</name>
    </author>
    <category term="AI" scheme="https://wirelessr.github.io/categories/AI/"/>
    <content>
      <![CDATA[<h4 id="How-I-migrated-to-Pi-GLM-5-2-and-quantified-the-performance-drop"><a href="#How-I-migrated-to-Pi-GLM-5-2-and-quantified-the-performance-drop" class="headerlink" title="How I migrated to Pi + GLM 5.2 and quantified the performance drop"></a>How I migrated to Pi + GLM 5.2 and quantified the performance drop</h4><p><img src="https://cdn-images-1.medium.com/max/800/1*VGZGOeNKfVI2h9HOV5O0Nw.png"></p><p>I recently migrated my AI toolchain again. The main reason was cost. My daily setup used to be Claude Code with Opus 4.7. Honestly, the cost was just too high. I did delegate specific tasks to cheaper subagents like Sonnet or Haiku. However, most of my usage still ended up on Opus.</p><p>Following a “recommendation” from our company, I was asked to try a new toolchain. This new setup combines Pi with GLM 5.2.</p><p>I have been using it for exactly a week now. I wanted to share my thoughts on the experience.</p><p>In the past, migrating toolchains lacked a solid way to measure success. We usually relied on gut feeling. If things seemed to work and conversations went smoothly, we assumed there was no rework. These are highly subjective evaluations. We always lacked quantitative metrics.</p><p>Because of this, I built a special framework for this migration. This framework analyzes all my Claude Code and Pi sessions. It also sets up a semantic evaluation standard.</p><p>I will skip the boring details. Building things in the AI era is incredibly easy. The real value lies in the concepts and the know-how.</p><p>Here is how my framework works. It parses all the session files from Claude Code and Pi. These are mostly JSONL files. Then, it extracts the dialogue from both the agent and myself.</p><p>The system pairs the agent’s response with my reply. I use this pair to perform a pure semantic analysis.</p><p>I only look at this single pair without extra context. I want the semantic analysis to be as simple as possible. This back and forth interaction is the easiest way to see what my response means. We do not need complex reasoning or extra interpretation. It is just straightforward semantic analysis.</p><p>I categorize these pairs into the following types:</p><ul><li><strong>fresh_task</strong>: This represents a new task with no related preceding assistant output.</li><li><strong>follow_up</strong>: This is a same task extension or supplement, not a correction.</li><li><strong>pushback_correction</strong>: The user is unhappy with the agent’s result and wants changes.</li><li><strong>steer_interrupt</strong>: This is a mid stream cut in. We infer this from the phrasing of both sources using an LLM. Examples include saying “wait,” “stop,” or “no, do X instead” while the agent is in the middle of a task. No offline ground truth signal exists in either format.</li><li><strong>acknowledge</strong>: The user is just acknowledging the message with no task intent.</li></ul><p>With this data, we can calculate the revision rate. This rate shows whether I was satisfied with the agent’s output. In other words, it measures first try acceptance.</p><p>Based on the first week of testing, here are the results:</p><ul><li>The revision rate for Claude Code was 17%.</li><li>The revision rate for Pi was 23%.</li></ul><p>The data shows that Pi is noticeably worse than Claude Code. This actually matches my gut feeling.</p><p>On the other side, the cost difference is massive. Pi costs only one fifth of Claude Code.</p><p>This is a huge gap. It is especially true for power users like me. Paying 20% of the cost to get 80% of the performance is an incredible return on investment.</p><h3 id="Migration-Details"><a href="#Migration-Details" class="headerlink" title="Migration Details"></a>Migration Details</h3><p>Now that we covered the background, let us look at some technical details. I have migrated AI toolchains many times. Over time, I built up a lot of experience moving between these tools. This migration took me less than half a day.</p><p>You can migrate Claude Code skills without any pain. Pi has built in migration tools for this. For Claude Code commands, I used symlinks to connect them to the prompts directory in Pi. I also mapped Claude.md directly to Pi’s AGENTS.md using a symlink.</p><p>I ran into two major issues related to my daily workflow. These were browser use and subagents. Neither feature is built into Pi. Fortunately, Pi offers official extensions that you can install directly. I used the official MCP extension to run the Chrome Dev MCP. I paired this with the subagent extension to build out the required capabilities.</p><p>There are a few things to note about subagents. First, because they run as extensions, Pi does not have built in discovery. You must place any subagent you need inside the agents directory. Then, you manually call them using prompts in the main session.</p><p>Porting the agents with symlinks is easy. However, manually calling agents is incredibly painful if you are used to Claude Code. To fix this, I used a built in Pi feature called <code>APPEND_SYSTEM.md</code> to extend Pi’s capabilities.</p><p>I mentioned that AGENTS.md maps to Claude.md. Since this is a symlink, I did not want to pollute Claude Code with subagent information. This is where <code>APPEND_SYSTEM.md</code> shines. It is a mechanism to expand the system prompt. It does not use a symlink. This allows me to add system prompts meant only for Pi.</p><p>Here is a concrete example.</p><figure class="highlight plaintext"><table><tr><td class="gutter"><pre><span class="line">1</span><br><span class="line">2</span><br><span class="line">3</span><br><span class="line">4</span><br><span class="line">5</span><br><span class="line">6</span><br><span class="line">7</span><br><span class="line">8</span><br><span class="line">9</span><br><span class="line">10</span><br><span class="line">11</span><br></pre></td><td class="code"><pre><span class="line"># pi only additions (not loaded by Claude Code)  </span><br><span class="line">  </span><br><span class="line">## Image Reading  </span><br><span class="line">The default model cannot see images.   </span><br><span class="line">When you need to read or understand an image (screenshot, error trace, UI mockup, diagram, chart, photo), delegate to the `vision` agent via `subagent`.   </span><br><span class="line">Do NOT pass image files to `read` or refuse image tasks. Instead, delegate them to `vision`.  </span><br><span class="line">  </span><br><span class="line">## General Purpose Delegation  </span><br><span class="line">Use the `runner` agent via `subagent` for independent verification or recalculation, heavy batch work, or any well specified self contained job.   </span><br><span class="line">Same tools as the main session, no conversation history, no specialty.   </span><br><span class="line">Do NOT use it for PR review (`pr-reviewer-*`) or images (`vision`), since those tasks have their own agents.</span><br></pre></td></tr></table></figure><p>With this setup, my Pi setup has the exact same subagent delegation capabilities as Claude Code.</p><p>Also, I mentioned the <code>vision</code> agent earlier. This helps make up for GLM 5.2’s limitations. Since it cannot process images directly, I needed to attach a subagent for image recognition. In practice, the experience is just like Claude Code. I paste an image, and the system still processes it. It simply delegates the task to an OCR capable model rather than doing it itself.</p><p>When we integrate all of this, Pi with GLM 5.2 easily competes with Claude Code with Opus 4.7. As for the fancy features in Claude Code, I never really used them anyway. I did not lose much.</p><h3 id="Wrap-Up"><a href="#Wrap-Up" class="headerlink" title="Wrap Up"></a>Wrap Up</h3><p>Claude Code and Opus are truly expensive. In this AI era, I believe most companies will look for ways to cut tool costs. Honestly, setting a hard cap on token budgets is a bad idea. It acts as a penalty for highly efficient power users who know how to leverage AI well.</p><p>The alternative is to find a replacement tool.</p><p>After a week of usage, Pi with GLM 5.2 does feel slightly worse. However, the gap is not too wide. You can interpret the revision rate difference of 24% versus 17% in a few ways.</p><p>By the way, these numbers come from my actual daily work. This was not a head to head comparison on the exact same tasks. I simply made a clean break at a specific point in time. I switched entirely from Claude Code to Pi. The comparison is based on my Claude Code performance before the switch versus my Pi performance during the first week after.</p><p>I applied a sliding window to my Claude Code sessions. The 17% rate is highly stable. Because of this, the comparison holds up well. I must add a disclaimer that this method is not academically rigorous.</p><blockquote><p>Originally published on <a href="https://medium.com/@lazypro/claude-code-to-pi-a-5x-cheaper-ai-toolchain-23081bebe114">Medium</a></p></blockquote>]]>
    </content>
    <id>https://wirelessr.github.io/AI/Claude-Code-to-Pi-A-5x-Cheaper-AI-Toolchain/20260628/</id>
    <link href="https://wirelessr.github.io/AI/Claude-Code-to-Pi-A-5x-Cheaper-AI-Toolchain/20260628/"/>
    <published>2026-06-28T17:21:01.000Z</published>
    <summary>
      <![CDATA[<h4 id="How-I-migrated-to-Pi-GLM-5-2-and-quantified-the-performance-drop"><a]]>
    </summary>
    <title>Claude Code to Pi: A 5x Cheaper AI Toolchain</title>
    <updated>2026-06-28T17:21:01.000Z</updated>
  </entry>
  <entry>
    <author>
      <name>CT Wu</name>
    </author>
    <category term="AI" scheme="https://wirelessr.github.io/categories/AI/"/>
    <content>
      <![CDATA[<h3 id="How-to-Fix-the-“AI-Vibe”-in-Tech-RCAs"><a href="#How-to-Fix-the-“AI-Vibe”-in-Tech-RCAs" class="headerlink" title="How to Fix the “AI Vibe” in Tech RCAs"></a>How to Fix the “AI Vibe” in Tech RCAs</h3><h4 id="Stop-letting-AI-hallucinate-incident-reports-Master-the-human-in-the-loop-RCA"><a href="#Stop-letting-AI-hallucinate-incident-reports-Master-the-human-in-the-loop-RCA" class="headerlink" title="Stop letting AI hallucinate incident reports. Master the human-in-the-loop RCA"></a>Stop letting AI hallucinate incident reports. Master the human-in-the-loop RCA</h4><p><img src="https://cdn-images-1.medium.com/max/800/1*7q7m1Lhf-0JsUHulCCCBJA.png"></p><p>Lately, I have been reading a lot of AI-generated RCAs and incident reports, and I noticed a glaring problem.</p><p>They scream AI.</p><p>I am not talking about the wording, tone, or structure. I do not really hide my own AI usage anyway, since almost everyone uses AI to write reports these days.</p><p>What I mean by “screaming AI” is the entire context — specifically, how the author connects the visible symptoms to the root cause. This makes it incredibly easy to spot who is actually driving the investigation. Most of the time, it is obvious that the AI is the driver.</p><p>AI outputs have a specific trait: they only scratch the surface, whether we are talking about code or reports.</p><p>Let me give you a few obvious examples.</p><p>We have all seen an AI review a module or a feature during a production incident and aggressively nitpick a bunch of issues. It then assigns severity levels to these problems like “critical” or “suggestion” with total confidence. But these issues always share a common flaw: a complete lack of domain knowledge.</p><p>The AI does not know the history or the original reasoning behind the code. It just attacks the surface-level flaws. Can it solve the problem? Sure. Are these actually the real issues? Usually, no.</p><p>It is the exact same story with incident reports. The AI sees a memory spike and immediately calls it a memory leak. It sees a CPU spike and calls it CPU saturation. Are these real problems? Yes. Did it find the root cause? Usually, no.</p><p>When we perform an RCA and see a memory spike, our very first goal must be to find the underlying trigger. What actually caused the memory to spike?</p><p>However, the AI’s first instinct is always to tell a story. It explains why the memory spiked by piecing together random details that look correct and feel like facts. The metrics and logs it pulls might indeed highlight the reality of the memory spike, and its narrative might perfectly explain the process. But is it the root cause? Usually, no.</p><p>This is exactly what I mean by that AI vibe. It writes beautifully and tells a great story, but it falls apart under scrutiny.</p><h3 id="So-How-Do-I-Do-It"><a href="#So-How-Do-I-Do-It" class="headerlink" title="So, How Do I Do It?"></a>So, How Do I Do It?</h3><p>I break it down into two parts: fundamentals and technical tactics.</p><p>The fundamentals refer to the mental model of using AI. This means using a specific methodology to control the AI and guide it toward the correct result. The technical tactics refer to how we can leverage AI tools to get a better outcome.</p><p>Honestly, neither requires you to be a domain expert. We just need to execute the right steps and provide accurate judgment.</p><h3 id="Fundamentals"><a href="#Fundamentals" class="headerlink" title="Fundamentals"></a>Fundamentals</h3><p>Let me start with the fundamentals. I often talk about “systems thinking.” This was the most critical skill back when software engineering was done entirely by hand, and it remains an indispensable mental framework today.</p><p>But this is not knowledge we can pick up overnight; it is an accumulation of experience.</p><p>Because of that, I only teach two tricks and one simple rule of thumb.</p><p>When we receive an AI output, no matter what it is, we must first ask two questions:</p><ol><li>Is this a guess, or is it a fact?</li><li>Is this a cause, or is it an effect?</li></ol><p>The first question forces the AI to track down available evidence, such as logs, metrics, design docs, or code. This stops the AI from making up stories and ensures it uses real evidence as its building blocks.</p><p>We need to pay extra attention and ask this question whenever the AI gives an answer that sounds absolutely certain. Many times, its answers are just extensions of various assumptions, yet it presents them as absolute facts.</p><p>The second question is even more interesting. When an AI sees a symptom, it immediately tries to explain it. But explaining a symptom offers limited help. Take a memory spike, for example. Once the AI starts explaining it, the conclusion is almost always to scale up or scale out. But we do not want to know if we have enough memory. We want to know the reason behind the spike. Was it a poorly handled socket? A memory leak? Inaccurate metrics? Or something else?</p><p>We do not need a story. We need an answer.</p><p>When we ask whether something is a cause or an effect, the AI realizes it has been focusing entirely on explaining the result instead of finding the cause. This gives us a chance to make it correct its course.</p><p>It is easy to see that these two questions do not require any domain knowledge. Yet, we can use them to make the AI start discovering the domain context on its own. Those are the two tricks.</p><p>Now, here is the rule of thumb.</p><p>Begin with the end in mind!</p><p>Once the AI realizes it needs to understand the cause, it might gather a ton of evidence. But then it might start overthinking or getting stuck in a dead end due to a lack of context or depth.</p><p>How do we pull it out?</p><p>Let us go back to the most fundamental method: drawing a decision tree.</p><p>What is the end? The symptoms and phenomena we see are the end. That is what the very end of the chain looks like. What is the beginning? These symptoms serve as the starting point of our decision tree.</p><p>We map out every single possibility that could lead to this result. This becomes our first layer of subtrees. Then, we look at how many options lie behind each possibility, which forms the second layer. We keep repeating this until we exhaust all possibilities. This process does not actually consume many tokens because telling stories is what AI does best.</p><p>Once we have the tree, we start pruning. We take all the evidence we gathered and eliminate the nodes on the tree that are impossible. Alternatively, we can have the AI gather evidence based on these specific nodes.</p><p>In the end, we are left with only a few possibilities. This time, the AI’s chain of thought is constrained by the tree, preventing it from wandering off while still allowing it to be creative.</p><p>This is what it means to begin with the end in mind.</p><h3 id="Technical-Tactics"><a href="#Technical-Tactics" class="headerlink" title="Technical Tactics"></a>Technical Tactics</h3><p>Once we have the right mental model, let us look at how we can make this process more stable and reliable from a technical standpoint.</p><p>I will use Claude Code as an example, but you can achieve similar results with almost any tool.</p><p>I mentioned those two tricks earlier, and their goal is simple: to make the agent understand that appearances can be deceiving. Beyond that, we can also use fixed workflows to make everything run smoother.</p><p>For instance, my favorite approach is to use the following prompt or skill right when the agent delivers a conclusion (or something that looks like one).</p><blockquote><p><em>Assemble an Agent Team of three agents and hold a workshop. Their context must only contain raw evidence, with absolutely no inferences. One agent will support your viewpoint but must find supporting arguments strictly from this raw evidence. Another agent will oppose your viewpoint and must also find counterevidence strictly from this raw evidence. The final agent will cross-reference the conclusions and evidence from both agents and deliver a report.</em></p></blockquote><p>Even though this approach leverages the Agent Team feature in Claude Code, these agents do not actually need to talk to each other. So even without an Agent Team feature, we can manually summon two opposing agents to give their conclusions, and then ask a third agent to cross-reference them.</p><p>This gives us an extra layer of defense before finalizing the conclusion. It allows us to check whether we or the agent fell into a bias due to self-suggestion.</p><h3 id="Wrap-Up"><a href="#Wrap-Up" class="headerlink" title="Wrap Up"></a>Wrap Up</h3><p>We must always remember that AI is an LLM. Every single word it speaks is based on probabilities and parameters, not facts. If it happens to state a fact, it is only because we constrained all the parameters enough to bring it close to reality.</p><p>“We cannot reach human-level intelligence by scaling up Auto-Regressive Large Language Models (LLMs). It’s a dead end… They don’t understand the physical world, they don’t have persistent memory, they cannot reason, and they cannot plan.” — Yann LeCun</p><p>This Turing Award winner points out that by relying solely on LLMs, we actually drift further away from AGI.</p><p>In this AI era, we must always remember the importance of keeping a human in the loop. The human is the driver. If we do not drive the investigation ourselves, the AI is just hallucinating.</p><p>Fortunately, using the fundamental and technical prompts mentioned above can make this task a lot less daunting. In fact, it actually makes it pretty simple.</p><blockquote><p>Originally published on <a href="https://medium.com/@lazypro/how-to-fix-the-ai-vibe-in-tech-rcas-ff041f119f69">Medium</a></p></blockquote>]]>
    </content>
    <id>https://wirelessr.github.io/AI/How-to-Fix-the-AI-Vibe-in-Tech-RCAs/20260607/</id>
    <link href="https://wirelessr.github.io/AI/How-to-Fix-the-AI-Vibe-in-Tech-RCAs/20260607/"/>
    <published>2026-06-07T17:06:00.000Z</published>
    <summary>
      <![CDATA[<h3 id="How-to-Fix-the-“AI-Vibe”-in-Tech-RCAs"><a href="#How-to-Fix-the-“AI-Vibe”-in-Tech-RCAs" class="headerlink" title="How to Fix the]]>
    </summary>
    <title>How to Fix the “AI Vibe” in Tech RCAs</title>
    <updated>2026-06-07T17:06:00.000Z</updated>
  </entry>
  <entry>
    <author>
      <name>CT Wu</name>
    </author>
    <category term="AI" scheme="https://wirelessr.github.io/categories/AI/"/>
    <content>
      <![CDATA[<h3 id="Stop-Using-Markdown-with-Claude-Code"><a href="#Stop-Using-Markdown-with-Claude-Code" class="headerlink" title="Stop Using Markdown with Claude Code"></a>Stop Using Markdown with Claude Code</h3><h4 id="Why-Confluence-beats-HTML-and-Markdown-for-human-AI-collaboration"><a href="#Why-Confluence-beats-HTML-and-Markdown-for-human-AI-collaboration" class="headerlink" title="Why Confluence beats HTML and Markdown for human-AI collaboration"></a>Why Confluence beats HTML and Markdown for human-AI collaboration</h4><p><img src="https://cdn-images-1.medium.com/max/800/1*-75ndQZpsvXMph_4-hquHA.png"></p><p>A recent article on the Anthropic blog sparked a massive debate.</p><p>The main idea is that using HTML is actually better than Markdown when collaborating with Claude Code.</p><p>And then the arguments started.</p><p>Supporters say Markdown looks terrible. By terrible, they mean it is both ugly to look at and hard to read, plus it lacks interactivity. On the flip side, critics argue that HTML burns through a ton of tokens and is just plain inefficient.</p><p>As for me, I do not really lean toward the Markdown camp, but I do not buy into the HTML argument either.</p><p>So let me break down the issues I ran into and how I solved them.</p><h3 id="The-Friction-in-Human-in-the-Loop-Workflow"><a href="#The-Friction-in-Human-in-the-Loop-Workflow" class="headerlink" title="The Friction in Human-in-the-Loop Workflow"></a>The Friction in Human-in-the-Loop Workflow</h3><p>If you follow my work, you probably know I am not the type to just let agents run wild and do whatever they want. I constantly talk with them and guide their direction to get the exact output I need. To me, an agent is an accelerator and an amplifier, not a clone or a proxy.</p><p>Because of this, I need to communicate and iterate with my agents all the time.</p><p>At first, I used Markdown just like everyone else. My reasons were pretty standard: it uses fewer tokens, it is efficient, and it is easy for humans to edit.</p><p>But I quickly realized that when an agent generates a massive Markdown file, I lose interest in reading it. There are two main reasons for this. First, it is just too raw, which causes serious reading fatigue. Second, and this is my biggest pain point, it is incredibly hard to interact with. If I want to ask a question about a specific line, I either have to write it directly into the Markdown, which makes a mess, or copy and paste it back into the chat window to keep the conversation going.</p><p>Neither approach is sustainable. This is especially true for copying and pasting. I believe most people use agents specifically because they hate copying and pasting. Yet, here we are, going right back to our old ways just to keep the discussion alive, only in reverse: copying the agent’s output back into the chat window.</p><p>So, using Markdown for these discussions genuinely caused a lot of friction for me.</p><p>Another major issue is that all the back-and-forth edits on a Markdown file never get recorded.</p><ul><li>What problem did we solve?</li><li>How did we solve it?</li><li>Why did we do it that way?</li></ul><p>This context quickly vanishes as the Markdown gets edited over and over, especially when the agent updates it autonomously. The whole discussion process is completely lost.</p><p>These two massive roadblocks made me give up on Markdown as a collaboration tool.</p><h3 id="The-Problems-with-HTML"><a href="#The-Problems-with-HTML" class="headerlink" title="The Problems with HTML"></a>The Problems with HTML</h3><p>I actually gave HTML a shot.</p><p>I tried this tactic way before that blog post came out, and honestly, the results were mediocre at best.</p><p>There is no doubt that agents are great at writing HTML. However, adding interactive elements, like a text box for feedback, makes communication way too complicated. You have to give the agent explicit prompt instructions on how to build that highly interactive HTML, and you also have to tell it how to handle the communication loop.</p><p>After all, HTML itself is stateless. Usually, you just end up writing a file to some directory. You then have to establish a strict contract with the agent regarding where that file lives and what it looks like.</p><p>Plus, HTML still does not solve the missing context problem. To keep that context, you have to design precise contracts for those interactions. That is just as hard as architecting a whole system from scratch.</p><h3 id="My-Solution"><a href="#My-Solution" class="headerlink" title="My Solution"></a>My Solution</h3><p>So, we need to solve the following problems:</p><ol><li>High interactivity</li><li>Context retention</li><li>A simple, highly reusable design</li></ol><p>Ultimately, I went with a very simple approach.</p><p>Since Markdown is hard to interact with, we just need to make it interactive.</p><p>All we have to do is send the Markdown into Confluence, and it instantly becomes an interactive page.</p><p>Confluence natively has every single feature we need:</p><ol><li>It looks clean and polished.</li><li>It allows for interaction, using both inline and footer comments.</li><li>It retains context because you can resolve comments without losing them.</li><li>It includes version control, and Confluence can even show diffs between versions.</li></ol><p>I already had a script that the agent could call to upload Markdown and turn it into a page anyway. In our organization, Confluence is the only place we publish RCAs and design docs.</p><p>I did not need to design anything new. I just called my predefined Confluence skill, and I solved all the pain points I mentioned earlier in one shot.</p><p>This was so much easier than trying to reinvent the wheel with HTML.</p><h3 id="The-One-Thing-I-Didn’t-Get"><a href="#The-One-Thing-I-Didn’t-Get" class="headerlink" title="The One Thing I Didn’t Get"></a>The One Thing I Didn’t Get</h3><p>HTML does have one feature that Confluence cannot naturally replicate.</p><p>It can handle interactions that go way beyond text. By that, I mean doing more than just leaving comments. For example, if I were a data analyst, I could embed sliders directly into the HTML to build a live report. Or, I could generate fancy trend charts that let users dynamically switch timeframes and parameters.</p><p>Confluence simply does not offer that level of interactivity.</p><p>But frankly, I do not need it, so I do not care. I just wanted a medium to collaborate with my agent. I was not looking for a presentation layer to show off to other people.</p><p>Using Confluence was more than enough to solve all my pain points.</p><blockquote><p>Originally published on <a href="https://medium.com/@lazypro/stop-using-markdown-with-claude-code-fd7c75d80b19">Medium</a></p></blockquote>]]>
    </content>
    <id>https://wirelessr.github.io/AI/Stop-Using-Markdown-with-Claude-Code/20260524/</id>
    <link href="https://wirelessr.github.io/AI/Stop-Using-Markdown-with-Claude-Code/20260524/"/>
    <published>2026-05-24T17:26:00.000Z</published>
    <summary>
      <![CDATA[<h3 id="Stop-Using-Markdown-with-Claude-Code"><a href="#Stop-Using-Markdown-with-Claude-Code" class="headerlink" title="Stop Using Markdown]]>
    </summary>
    <title>Stop Using Markdown with Claude Code</title>
    <updated>2026-05-24T17:26:00.000Z</updated>
  </entry>
  <entry>
    <author>
      <name>CT Wu</name>
    </author>
    <category term="Misc" scheme="https://wirelessr.github.io/categories/Misc/"/>
    <content>
      <![CDATA[<p>I think you might have misunderstood a few things. First of all, you don’t need that many requests to scrape data for a dashboard. You can use GraphQL to pull most of the data you need all at once, and then just do some filtering and analysis on the application side. Plus, a dashboard doesn’t need to update every second or minute—even hourly updates are a bit overkill because people don’t write code or open PRs that fast, and we don’t need to stare at the dashboard 24&#x2F;7.</p><p>So you might be over-engineering this.</p><blockquote><p>Originally published on <a href="https://medium.com/@lazypro/i-think-you-might-have-misunderstood-a-few-things-57568a383341">Medium</a></p></blockquote>]]>
    </content>
    <id>https://wirelessr.github.io/Misc/I-think-you-might-have-misunderstood-a-few-things/20260517/</id>
    <link href="https://wirelessr.github.io/Misc/I-think-you-might-have-misunderstood-a-few-things/20260517/"/>
    <published>2026-05-17T01:38:42.000Z</published>
    <summary>
      <![CDATA[<p>I think you might have misunderstood a few things. First of all, you don’t need that many requests to scrape data for a dashboard. You]]>
    </summary>
    <title>I think you might have misunderstood a few things.</title>
    <updated>2026-05-17T01:38:42.000Z</updated>
  </entry>
  <entry>
    <author>
      <name>CT Wu</name>
    </author>
    <category term="Development" scheme="https://wirelessr.github.io/categories/Development/"/>
    <content>
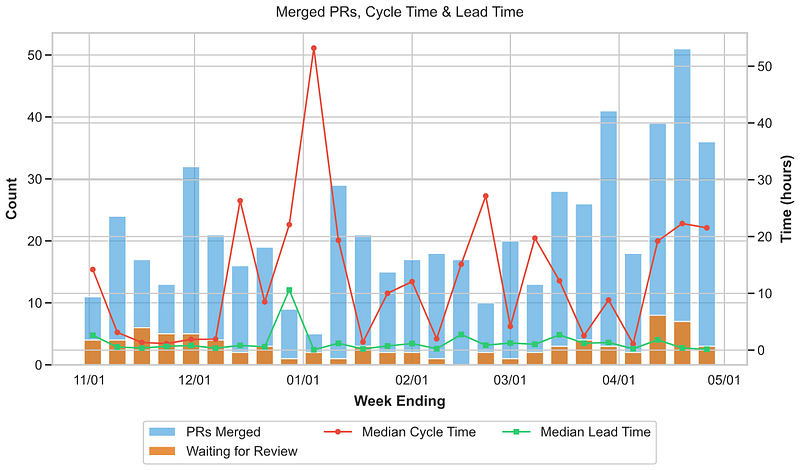
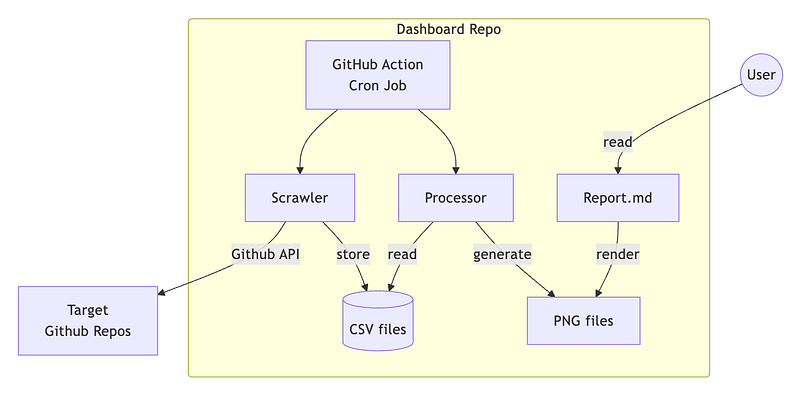
      <![CDATA[<h3 id="Build-Free-Web-Scrapers-with-GitHub-Actions"><a href="#Build-Free-Web-Scrapers-with-GitHub-Actions" class="headerlink" title="Build Free Web Scrapers with GitHub Actions"></a>Build Free Web Scrapers with GitHub Actions</h3><h4 id="Master-cost-free-web-scraping-and-automated-dashboards-using-GitHub-Actions"><a href="#Master-cost-free-web-scraping-and-automated-dashboards-using-GitHub-Actions" class="headerlink" title="Master cost-free web scraping and automated dashboards using GitHub Actions"></a>Master cost-free web scraping and automated dashboards using GitHub Actions</h4><p><img src="https://cdn-images-1.medium.com/max/800/1*07dxzy0xvnlDmCbUbFesVA.png"></p><p>In our daily lives, we often encounter scenarios that require cron jobs and lightweight web scrapers. For example, I might need to periodically scrape data from a rental property website. Or I might want to extract statistical data from certain sites to create a report. These are actually simple daily tasks. However, they need a stable and reliable execution environment.</p><p>This sounds like a simple need. But it is actually quite hard to achieve without a cloud server or if we want to keep costs at zero. After all, we do not want to leave our own computers running 24&#x2F;7 just to process extra tasks in the background. Not only does this consume a lot of electricity, but we also have to maintain a constant internet connection. On top of that, we need to store a massive amount of raw data.</p><p>So, is there a simple way for us to get a stable and reliable environment to run scripts periodically without spending extra money?</p><p>The answer is yes. In fact, I have been doing this a lot lately. The solution is to use GitHub Actions.</p><p>The great thing about GitHub Actions is that it provides a reliable runtime environment out of the box. It can continuously use cron jobs to run scripts on a schedule. At the same time, GitHub offers a massive amount of storage space. Most importantly, we do not have to pay anything at all when we use a public repository.</p><p>Here is an example. I regularly monitor our team members’ development progress to ensure the entire workflow runs smoothly without any bottlenecks.</p><p><img src="https://cdn-images-1.medium.com/max/800/0*8IzM3sfYialBhxSK.png"></p><p>For this specific example, I need a script to continuously scrape GitHub data. I also need to store that raw data. Furthermore, I need a dashboard to display this data and show how the team is operating. We typically use an AWS EC2 instance or a similar cloud server for this kind of requirement. However, I actually accomplished all of this by simply using a single GitHub repository.</p><p>The overall architecture looks like the following.</p><p><img src="https://cdn-images-1.medium.com/max/800/1*uUWFSzF3TEYwq9YLKlUdtQ.png"></p><p>Let us break down the core components first.</p><ul><li>GitHub Actions is the key to everything. It sets the cron rules to trigger the process periodically. Every time it triggers, it first runs the Scrawler to collect the targeted data. In my case, it fetches metrics from another set of GitHub repositories. Then, it saves the data into CSV files. Each CSV file uses the timestamp as its filename. We can also organize them into directories by year if necessary.</li><li>The Scrawler and Processor are relatively straightforward. The Scrawler simply fetches and stores the data. The Processor then converts this raw data into visual charts. I personally prefer using Python’s Matplotlib for this task. It generates various line charts as PNG files and saves them right back into the repository.</li><li>GitHub Actions will automatically commit and push these generated files at the end of its run. This creates a complete and self-sustaining loop.</li><li>How do we present the dashboard? We can prepare a Markdown template in advance to render and display the PNG charts. We just need the Processor to overwrite the exact same set of image files every single time. This makes the dashboard look like it is constantly updating.</li></ul><p>We have now built a highly cost-effective scraper. Both the computing resources and the storage are completely free.</p><p>GitHub Actions also comes with an added bonus. We can easily rerun the workflow when we encounter an error. This makes debugging very fast. It offers a massive maintainability advantage over a traditional cloud server.</p><p>In fact, I have already used this approach to build many scrapers for various purposes. Some examples include internal team dashboards and stock trading trackers. It becomes incredibly easy to mass-produce scrapers for different use cases once we have a solid template. I consider this a nice little bonus from my recent AI side projects.</p><blockquote><p>Originally published on <a href="https://medium.com/@lazypro/build-free-web-scrapers-with-github-actions-d5e70b9c1102">Medium</a></p></blockquote>]]>
    </content>
    <id>https://wirelessr.github.io/Development/Build-Free-Web-Scrapers-with-GitHub-Actions/20260510/</id>
    <link href="https://wirelessr.github.io/Development/Build-Free-Web-Scrapers-with-GitHub-Actions/20260510/"/>
    <published>2026-05-10T17:21:00.000Z</published>
    <summary>
      <![CDATA[<h3 id="Build-Free-Web-Scrapers-with-GitHub-Actions"><a href="#Build-Free-Web-Scrapers-with-GitHub-Actions" class="headerlink" title="Build]]>
    </summary>
    <title>Build Free Web Scrapers with GitHub Actions</title>
    <updated>2026-05-10T17:21:00.000Z</updated>
  </entry>
  <entry>
    <author>
      <name>CT Wu</name>
    </author>
    <category term="AI" scheme="https://wirelessr.github.io/categories/AI/"/>
    <content>
      <![CDATA[<p>Interesting, so we’ve evolved from the Agile Manifesto to the Agile Vibe Coding Manifesto.</p><p>Personally, I still do design, I just don’t call it a “spec” anymore. To me, design is a fundamental, a deliverable intended for humans to read and review, rather than a “specification” that obsesses over every tiny detail.</p><p>I feed this design to the AI and use vibe coding to help it understand the goals and details that need to be executed at each stage. This is way more efficient than an SDD, and it actually lowers the chances of hallucinations.</p><blockquote><p>Originally published on <a href="https://medium.com/@lazypro/interesting-so-weve-evolved-from-the-agile-manifesto-to-the-agile-vibe-coding-manifesto-a60a9e88ed44">Medium</a></p></blockquote>]]>
    </content>
    <id>https://wirelessr.github.io/AI/Interesting-so-weve-evolved-from-the-Agile-Manifesto-to-the-Agile-Vibe-Coding-Ma/20260321/</id>
    <link href="https://wirelessr.github.io/AI/Interesting-so-weve-evolved-from-the-Agile-Manifesto-to-the-Agile-Vibe-Coding-Ma/20260321/"/>
    <published>2026-03-21T06:10:28.000Z</published>
    <summary>
      <![CDATA[<p>Interesting, so we’ve evolved from the Agile Manifesto to the Agile Vibe Coding Manifesto.</p>
<p>Personally, I still do design, I just]]>
    </summary>
    <title>Interesting, so we've evolved from the Agile Manifesto to the Agile Vibe Coding Manifesto.</title>
    <updated>2026-03-21T06:10:28.000Z</updated>
  </entry>
  <entry>
    <author>
      <name>CT Wu</name>
    </author>
    <category term="Architecture" scheme="https://wirelessr.github.io/categories/Architecture/"/>
    <content>
      <![CDATA[<h4 id="Master-senior-engineering-hires-with-this-high-concurrency-RDBMS-challenge"><a href="#Master-senior-engineering-hires-with-this-high-concurrency-RDBMS-challenge" class="headerlink" title="Master senior engineering hires with this high-concurrency RDBMS challenge"></a>Master senior engineering hires with this high-concurrency RDBMS challenge</h4><p><img src="https://cdn-images-1.medium.com/max/800/1*CPBRK9b9BCHsqWbTdAQKyw.png"></p><p>I recently designed an interview question for our team’s hiring process. I put a lot of thought into it and hid some clever details inside. Without further ado, let’s take a look at the prompt.</p><blockquote><p>[Interview Prompt: Large-Scale Security Agent Status &amp; Event Tracking System]<br>We have an enterprise-grade security monitoring product. The system must ingest telemetry from 100,000 endpoint Security Agents deployed globally. The reported data includes “Endpoint Connection Status” (e.g., Online&#x2F;Offline) and “Security Events &#x2F; Alerts”.<br>Due to the massive fleet size and high-frequency reporting, the system experiences a write throughput of 100,000 RPS.<br>To evaluate your understanding of core database mechanics, you are strictly constrained to use a traditional RDBMS (PostgreSQL or MySQL) as the primary storage layer. You may not rely on NoSQL solutions (such as Redis or Elasticsearch) to bypass this constraint.<br>Please provide the following:  </p><ol><li>DB Schema Design: Detail your table structures, column data types, and Primary Keys.  </li><li>Index Design: Specify which indexes you would create and explain the reasoning behind your choices.  </li><li>SQL Queries: Write the exact SQL statements responsible for “Agents reporting data” (writes) and “Querying an Agent’s current status and events” (reads).</li></ol></blockquote><p>The beauty of this question lies in its hidden details. For example:</p><ol><li>It closely mirrors our actual product scenarios. This allows me to introduce our daily work and job requirements during the interview.</li><li>Depending on my guidance or the candidate’s approach, we can turn this into a system design question for senior roles. Alternatively, we can scale it down to a basic CRUD problem for mid-level positions.</li><li>It looks simple but contains many traps. It is very easy to make mistakes.</li></ol><p>Let’s walk through the details one by one. I will explain this from the perspective of interviewing a senior candidate.</p><h3 id="Level-1-CQRS"><a href="#Level-1-CQRS" class="headerlink" title="Level 1: CQRS"></a>Level 1: CQRS</h3><p>First, I expect the candidate to ask the most critical question. With such high RPS, what is the read-to-write ratio? I can tell them it is 1:100 or even higher. This is heavily write-bound.</p><p>When designing the database schema, we must optimize for writes. This means we need to design a separate data model specifically for reads.</p><p>How we design the read model leads to the second key question. What do the reports look like? After all, we need to customize the read model to handle this massive volume of data.</p><p>If we are building time-based aggregated reports, we might need to consider a sliding window design. If we are tracking recent events for individual agents, we could use a simple, lean table and implement data rotation to balance costs.</p><p>This is the first level. If the candidate fails this, I mentally lower the bar and switch to mid-level mode. Naturally, they will not secure a senior offer from me at that point.</p><h3 id="Level-2-Insert-or-Update"><a href="#Level-2-Insert-or-Update" class="headerlink" title="Level 2: Insert or Update"></a>Level 2: Insert or Update</h3><p>Usually, a candidate’s first reaction is to design an agent table. Each agent gets a row with a status field indicating online or offline.</p><p>This design is fine for small datasets. However, it carries severe risks at scale, such as lock contention. When a company has a massive fleet of agents and the network is unstable, online and offline events trigger constantly. If we update a single column, countless services might end up waiting for the same row lock at the same time. This creates massive backpressure and can crash the service.</p><p>Therefore, we should prioritize an append-only design pattern for the status table.</p><p>But this introduces another problem. How do we handle agent retries? For instance, an agent sends a request but does not receive a response due to network issues. The standard behavior is to retry. How do we guarantee idempotency? A common approach is for the agent to generate a GUID (like UUIDv4) for each request. The service then writes this field to the database to deduplicate entries.</p><h3 id="Level-3-Pagination"><a href="#Level-3-Pagination" class="headerlink" title="Level 3: Pagination"></a>Level 3: Pagination</h3><p>Whether we use CQRS or a single table for reads and writes, querying massive fact tables always requires pagination. We obviously cannot load all the data at once. So, how do we paginate?</p><p>I am sure many people immediately think of offset and limit. This is known as offset-based pagination. When the offset gets huge, the pressure on the database becomes immense. If a candidate can suggest keyset-based pagination here, they definitely earn bonus points.</p><p>What we need to do is design an auto-incrementing ID in the fact table. Every batch remembers the maximum ID of the current fetch. We then use that value as the starting point for the next batch. This method drastically reduces database pagination overhead.</p><p>If the candidate notices that this incrementing ID should be the primary key, that earns extra points too.</p><p>I have written an article about pagination before. Feel free to check it out if you are interested. I used several real-world examples to explain why we need to abandon offset. <a href="https://medium.com/starbugs/explaining-pagination-in-elasticsearch-3ac59656fdd2">Explaining Pagination in Elasticsearch</a></p><p>This also brings up another issue. Keyset-based pagination makes it impossible to jump to a specific page or get the total record count. What if the product requires those features? This is not a technical test question, but I want to leave it here for everyone to ponder.</p><h3 id="Level-4-Auto-increment"><a href="#Level-4-Auto-increment" class="headerlink" title="Level 4: Auto-increment"></a>Level 4: Auto-increment</h3><p>The previous level mentioned using an auto-incrementing ID as the primary key. The problem is that such massive tables will easily overflow a standard auto-increment integer. We have two options here.</p><p>The first option is to use a relatively large number space as the primary key. Timestamps are a good example. It is even better if the candidate knows about Snowflake IDs.</p><p>Timestamps solve most problems, but we do need to watch out for clock skew. However, clock skew does not cause major issues on this type of fact table.</p><p>The second option is to consider data partitioning or sharding. This leads us directly to the next level.</p><h3 id="Level-5-Shard-Key"><a href="#Level-5-Shard-Key" class="headerlink" title="Level 5: Shard Key"></a>Level 5: Shard Key</h3><p>Given our current setup with both a fact table and a dedicated read model, how would we shard the data?</p><p>There are two common approaches. One is to shard by tenant or even by agent. This is simple, intuitive, and effective. However, it creates hotspots. Shards belonging to large or highly active customers might not hold up for long.</p><p>I previously shared a classic formula for choosing a shard key. If you have not seen it, you can review it here. <a href="https://interviewnoodle.com/how-to-choose-a-mongodb-shard-key-e4063b636c26">How to Choose a MongoDB Shard Key</a></p><p>The other approach is to shard by time. This adds extra complexity to our queries. This is standard practice in data engineering, but backend engineers are usually not accustomed to it.</p><h3 id="Level-6-Index"><a href="#Level-6-Index" class="headerlink" title="Level 6: Index"></a>Level 6: Index</h3><p>How should we build indexes on the read table? The answer is simple. It completely depends on the specific product requirements. But what about the fact table?</p><p>The answer might be surprising. Do not use indexes. More accurately, do not build any extra indexes other than the primary key.</p><p>I actually already mentioned the reason. We are using keyset-based pagination. We only need the primary key as our query condition. We will not use any other queries.</p><p>Every added index on a fact table is an extra burden. This includes hardware costs and write performance penalties. The hardware burden happens because fact tables are massive, meaning the index will also consume a huge amount of disk space. On the other hand, writing data also involves updating the index B-tree, which slows down performance.</p><h3 id="Level-7-Hot-and-Cold-Data-Separation"><a href="#Level-7-Hot-and-Cold-Data-Separation" class="headerlink" title="Level 7: Hot and Cold Data Separation"></a>Level 7: Hot and Cold Data Separation</h3><p>No matter how we shard, infinitely growing data will eventually hit physical limits or budget constraints.</p><p>How do we implement hot and cold data separation? This steps a bit outside the realm of pure SQL. However, a candidate who can consider this level of architecture is definitely expert-tier.</p><p>Why do we need to think about this from the start? If we do not establish this premise early on, adding it later as a new requirement becomes exceptionally troublesome.</p><p>I wrote an article detailing my practical experience with hot and cold data separation. It took months to finally push it to production. I linked the article right here, and it is absolutely a great read. <a href="https://blog.stackademic.com/how-shopline-saves-40-space-in-main-database-9504a1eb2472">How SHOPLINE Saves 40% Space in Main Database</a></p><p>Therefore, it is best to factor this into the design right from the beginning.</p><h3 id="Wrap-Up"><a href="#Wrap-Up" class="headerlink" title="Wrap Up"></a>Wrap Up</h3><p>The clever part of this problem is its flexibility. We can adjust the scenario at any time based on the candidate’s answers. This allows us to evaluate every candidate as fairly as possible.</p><p>The biggest problem with system design interviews is the lack of objective standards. Carefully crafted questions like this let us clearly grade a candidate’s actual skills.</p><p>Practical validation has shown that this approach brings solid guidelines to otherwise chaotic system design interviews.</p><p>Besides that, we can always scale this question down into a coding interview. For instance, we can ask the candidate to design a pagination algorithm or a sliding window algorithm. We can set goals based on the desired difficulty while avoiding the trap of AI-generated answers. I find this type of question very interesting.</p><p>I will continue to try expanding my own question bank. I want to design even more useful and practical interview questions in the future.</p><blockquote><p>Originally published on <a href="https://medium.com/@lazypro/100k-rps-system-design-the-ultimate-interview-guide-613ab1d9eb8e">Medium</a></p></blockquote>]]>
    </content>
    <id>https://wirelessr.github.io/Architecture/100k-RPS-System-Design-The-Ultimate-Interview-Guide/20260315/</id>
    <link href="https://wirelessr.github.io/Architecture/100k-RPS-System-Design-The-Ultimate-Interview-Guide/20260315/"/>
    <published>2026-03-15T17:36:00.000Z</published>
    <summary>
      <![CDATA[<h4 id="Master-senior-engineering-hires-with-this-high-concurrency-RDBMS-challenge"><a]]>
    </summary>
    <title>100k RPS System Design: The Ultimate Interview Guide</title>
    <updated>2026-03-15T17:36:00.000Z</updated>
  </entry>
  <entry>
    <author>
      <name>CT Wu</name>
    </author>
    <category term="AI" scheme="https://wirelessr.github.io/categories/AI/"/>
    <content>
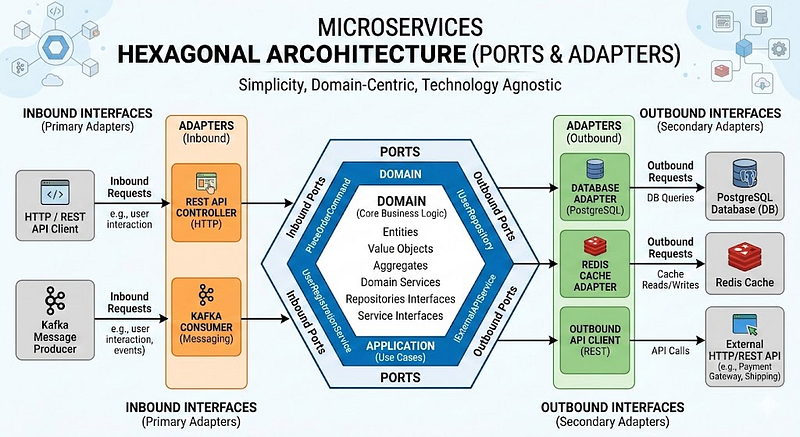
      <![CDATA[<h3 id="Hexagonal-Architecture-The-Best-AI-Vibe-Coding-Guide"><a href="#Hexagonal-Architecture-The-Best-AI-Vibe-Coding-Guide" class="headerlink" title="Hexagonal Architecture: The Best AI Vibe Coding Guide"></a>Hexagonal Architecture: The Best AI Vibe Coding Guide</h3><h4 id="Boost-review-efficiency-and-code-accuracy-using-layered-architecture-with-AI"><a href="#Boost-review-efficiency-and-code-accuracy-using-layered-architecture-with-AI" class="headerlink" title="Boost review efficiency and code accuracy using layered architecture with AI"></a>Boost review efficiency and code accuracy using layered architecture with AI</h4><p><img src="https://cdn-images-1.medium.com/max/800/1*7FKBYW4FcC-JTVxwOimVeg.png"></p><p>I finally found a development workflow that suits me best. It is highly efficient and ensures extremely high accuracy at the same time.</p><p>I think we can all agree on delegating the tedious task of coding to AI as much as possible. We humans just need to define what to do and verify the results. But I am not sure if we have noticed a problem. Humans eventually become the blocker in the whole process. AI writes code incredibly fast. We simply cannot do a complete code review. This usually results in an “always approve” situation.</p><p>This “always approve” habit is the exact reason why various bugs keep popping up. AI is great at writing code. However, it definitely does not guarantee zero mistakes.</p><p>So how can our review process keep up with the speed of AI? This is a question I have been thinking about lately.</p><p>Actually, the answer is already there. Long before AI came into the world, we already had a methodology to improve software maintainability. That methodology is layering.</p><p>Yes, layered architecture is nothing new. I have also written many articles about how to implement layered architecture and Domain-Driven Design (DDD). The most classic one is this article.</p><p>But in fact, I only favored basic layering in the past. I did not favor extreme layering strategies like hexagonal architecture. However, it is exactly the hexagonal architecture that can completely solve the current problem of inefficient reviews and excessive errors. Let us see why.</p><h3 id="Hexagonal-Architecture"><a href="#Hexagonal-Architecture" class="headerlink" title="Hexagonal Architecture"></a>Hexagonal Architecture</h3><p><img src="https://cdn-images-1.medium.com/max/800/0*pl4UBM-IJLe-X9iE.png"></p><p>This is a classic hexagonal architecture diagram. It has a few key points.</p><ol><li>Clear external dependencies. This includes the inbound interfaces (ports) flowing into the service and the outbound dependencies. All external dependencies have clear and well-defined interfaces to set the boundaries.</li><li>Every external dependency has a corresponding adapter for implementation. For instance, a Postgres has a database adapter. External API calls have REST adapters.</li><li>Inside the service, aside from boundary definitions, the rest is purely domain-specific business logic.</li></ol><p>I believe even those unfamiliar with clean architecture or DDD can easily see the strengths of hexagonal boundaries from this diagram.</p><p>But the main reason I did not promote hexagonal architecture in the past is the manual labor involved. All these layers, adapters, and boundaries require manual coding one by one. This involves a massive amount of coding effort just to describe specifications instead of actually solving problems.</p><p>Therefore, at that time, hexagonal architecture would ironically become another blocker. It was not a review blocker but a coding blocker.</p><p>Let me give a classic example from my own experience. I can build three APIs in Golang with about 600 to 1000 lines of code, excluding tests. But if I use hexagonal architecture, it takes about 3000 to 4000 lines of code. This means 4–5x more effort, or even more, just for coding.</p><h3 id="Vibe-Coding-Era"><a href="#Vibe-Coding-Era" class="headerlink" title="Vibe Coding Era"></a>Vibe Coding Era</h3><p>But times have changed now. Writing code is no longer the bottleneck. As long as we have clear and specific specifications, AI can easily generate thousands of lines of code.</p><p>That is right. Clear and specific specifications are exactly the strengths of hexagonal architecture. And the shortcomings of hexagonal architecture are perfectly covered by AI. They are a perfect match.</p><p>So what are the benefits of hexagonal architecture for us today? Let me explain using a concrete development workflow.</p><p>When we need to develop a complex microservice API, it will have many external dependencies. These include RPC between services, its own data storage, and even complex business logic.</p><p>We can manage all of these using the following development workflow. This is a specific example from a project I am currently working on. I strictly followed everything defined by hexagonal architecture.</p><p><strong>Phase 1: Domain and Ports</strong></p><ul><li>Details: Struct fields and interface method signatures.</li><li>Human Focus: Check if the design is correct and if anything is missing.</li></ul><p><strong>Phase 2: Repository</strong></p><ul><li>Details: SQL, SQLC, and mapping.</li><li>Human Focus: A quick glance is enough. Tests will catch errors.</li></ul><p><strong>Phase 3: Infrastructure</strong></p><ul><li>Details: HTTP adapter, middleware, and Wire.</li><li>Human Focus: A quick glance is enough. If it compiles, it is mostly fine.</li></ul><p><strong>Phase 4: Service Layer</strong></p><ul><li>Details: State machine, validation, and notification.</li><li>Human Focus: Read line by line to ensure business rules are correct.</li></ul><p><strong>Phase 5: Integration Test</strong></p><ul><li>Details: 16 DB tests.</li><li>Human Focus: Ensure important scenarios are covered.</li></ul><p>We can almost completely let AI write code for all phases. Each phase will correspond to a complete PR. This naturally includes a complete CI&#x2F;CD process.</p><p>We can see that the scope requiring my careful review is clearly defined. It only includes phase 1 and phase 4.</p><p>Once I deeply verify in phase 1 that the interfaces of every external dependency are defined correctly, the behavior of the entire microservice is basically solid. Then, I just need to verify the internal core business logic is correct. This keeps the quality of the entire microservice at a high level.</p><h3 id="Wrap-Up"><a href="#Wrap-Up" class="headerlink" title="Wrap Up"></a>Wrap Up</h3><p>Through the strict layering of hexagonal architecture, we can easily achieve separation of concerns. We only need to focus on where we must focus. For the rest, we can trust the power of AI.</p><p>This is the core reason why I am embracing hexagonal architecture again in this era.</p><p>When we have the correct interfaces, even if errors occur, they will not be disastrous. Moreover, reviewing interfaces is relatively easy for humans.</p><p>I have been running this workflow for a while now. Facts prove that it is highly effective. It can significantly boost overall productivity. After all, we always say humans are the bottleneck of AI. I am working hard to eliminate this blocker.</p><blockquote><p>Originally published on <a href="https://medium.com/@lazypro/hexagonal-architecture-the-best-ai-vibe-coding-guide-3ca8acad77d7">Medium</a></p></blockquote>]]>
    </content>
    <id>https://wirelessr.github.io/AI/Hexagonal-Architecture-The-Best-AI-Vibe-Coding-Guide/20260301/</id>
    <link href="https://wirelessr.github.io/AI/Hexagonal-Architecture-The-Best-AI-Vibe-Coding-Guide/20260301/"/>
    <published>2026-03-01T17:01:00.000Z</published>
    <summary>
      <![CDATA[<h3 id="Hexagonal-Architecture-The-Best-AI-Vibe-Coding-Guide"><a href="#Hexagonal-Architecture-The-Best-AI-Vibe-Coding-Guide"]]>
    </summary>
    <title>Hexagonal Architecture: The Best AI Vibe Coding Guide</title>
    <updated>2026-03-01T17:01:00.000Z</updated>
  </entry>
  <entry>
    <author>
      <name>CT Wu</name>
    </author>
    <category term="AI" scheme="https://wirelessr.github.io/categories/AI/"/>
    <content>
      <![CDATA[<h3 id="Claude-Code-vs-Copilot-My-2026-AI-Workflow"><a href="#Claude-Code-vs-Copilot-My-2026-AI-Workflow" class="headerlink" title="Claude Code vs Copilot: My 2026 AI Workflow"></a>Claude Code vs Copilot: My 2026 AI Workflow</h3><h4 id="How-to-adapt-to-the-unstoppable-AI-wave-and-new-agent-driven-workflows"><a href="#How-to-adapt-to-the-unstoppable-AI-wave-and-new-agent-driven-workflows" class="headerlink" title="How to adapt to the unstoppable AI wave and new agent-driven workflows"></a>How to adapt to the unstoppable AI wave and new agent-driven workflows</h4><p><img src="https://cdn-images-1.medium.com/max/800/1*WLRGkNiTsIDjidADS-AEqg.png"></p><p>My last article wrapped up at the end of 2025. This means I haven’t put out anything new for a few months.</p><p>I have a few direct and indirect reasons for this.</p><p><strong>Direct Reasons:</strong></p><ol><li>Winter is when I take long vacations for skiing and outdoor activities. The snow conditions are perfect in January and February.</li><li>I need to stay extra focused on work to make those long breaks happen.</li><li>I used to spend a lot of energy on Copilot. Now I am moving to Claude Code. It takes a lot of time to fine-tune the new workflow.</li></ol><p><strong>Indirect Reasons:</strong></p><ol><li>I noticed that fewer people read traditional or digital media in the AI era. This includes platforms like Medium.</li><li>Most new learning principles and methods are actually the same as before. Only the tools changed.</li><li>I can already delegate most tasks to agents. There isn’t much left to share.</li></ol><p>One major point to watch is media influence.</p><p>I used to work in e-commerce. I know how traditional operations work. This includes things like SEO, ads, and CRM. But AI is taking over the entry points for media. In the future, people might not even browse stores. AI will just place the orders directly. Traditional methods will not be very effective then.</p><p>This is happening on platforms like Medium too. To be honest, my month-over-month views on Medium are dropping fast. My revenue reflects this as well. This is a huge turning point for content creators. We must adapt to this new digital transformation. If we don’t, we will get left behind.</p><p>Another key point is tool integration. Every coding tool uses the same models now. The winner will be whoever can build a better workflow.</p><p>Let’s look at <strong>Skills</strong> as an example. Claude Code launched Skills to fix a major pain point with MCP. Usually, listing an agent’s abilities eats up a lot of context. Skills provides an index instead. The agent only reads the details when it actually needs a specific ability.</p><p>This concept is simple. I was already using Copilot this way before Skills even existed. I wrote my own Markdown files for common commands like <code>gh.md</code>, <code>jira.md</code>, and <code>confluence.md</code>. I told the agent about these files in the system prompt and to check those files when it needed details.</p><p>This gave the agent clear instructions for platforms like GitHub or Jira. This is exactly what Skills does. Claude Code just made it a built-in feature. Copilot recently added a similar Skills concept too. These are not groundbreaking features. They are just workflow integrations. But these tiny tweaks are what created the massive agent ecosystem we see today.</p><p>I didn’t feel a massive jump in quality when I moved from Copilot to Claude Code. Instead, the whole process just felt smoother. Take <strong>Hooks</strong> for example. I used to spend a lot of time tuning Copilot to get them right. Claude Code has them built-in. This makes everything much easier.</p><p>These are my takeaways from working and learning in 2026. I can’t put together a fully structured report yet. But I can say one thing for sure. This AI wave is unstoppable.</p><blockquote><p>Originally published on <a href="https://medium.com/@lazypro/claude-code-vs-copilot-my-2026-ai-workflow-718abf3e3e19">Medium</a></p></blockquote>]]>
    </content>
    <id>https://wirelessr.github.io/AI/Claude-Code-vs-Copilot-My-2026-AI-Workflow/20260215/</id>
    <link href="https://wirelessr.github.io/AI/Claude-Code-vs-Copilot-My-2026-AI-Workflow/20260215/"/>
    <published>2026-02-15T17:36:01.000Z</published>
    <summary>
      <![CDATA[<h3 id="Claude-Code-vs-Copilot-My-2026-AI-Workflow"><a href="#Claude-Code-vs-Copilot-My-2026-AI-Workflow" class="headerlink" title="Claude]]>
    </summary>
    <title>Claude Code vs Copilot: My 2026 AI Workflow</title>
    <updated>2026-02-15T17:36:01.000Z</updated>
  </entry>
  <entry>
    <author>
      <name>CT Wu</name>
    </author>
    <category term="Python" scheme="https://wirelessr.github.io/categories/Python/"/>
    <content>
      <![CDATA[<h3 id="Solving-Gevent-Pool-Issues-in-Flask-Apps"><a href="#Solving-Gevent-Pool-Issues-in-Flask-Apps" class="headerlink" title="Solving Gevent Pool Issues in Flask Apps"></a>Solving Gevent Pool Issues in Flask Apps</h3><h4 id="Learn-how-Keep-Alive-connections-can-drain-your-Gevent-pool-and-crash-pods"><a href="#Learn-how-Keep-Alive-connections-can-drain-your-Gevent-pool-and-crash-pods" class="headerlink" title="Learn how Keep-Alive connections can drain your Gevent pool and crash pods"></a>Learn how Keep-Alive connections can drain your Gevent pool and crash pods</h4><p><img src="https://cdn-images-1.medium.com/max/800/1*evEKFdcBcNrvRmhSkuOGAQ.png"></p><p>Recently, we have been troubleshooting a stubborn issue. Pods kept restarting for no apparent reason. The cause was liveness and readiness probe failures.</p><p>This sounds common, right? But here is the catch. We had already tuned our liveness and readiness probes to be as simple as possible. Like this:</p><figure class="highlight python"><table><tr><td class="gutter"><pre><span class="line">1</span><br><span class="line">2</span><br><span class="line">3</span><br></pre></td><td class="code"><pre><span class="line"><span class="meta">@app.route(<span class="params"><span class="string">&#x27;/health/check&#x27;</span></span>)  </span></span><br><span class="line"><span class="keyword">def</span> <span class="title function_">check</span>():  </span><br><span class="line">    <span class="keyword">return</span> <span class="string">&#x27;Hello, World!&#x27;</span></span><br></pre></td></tr></table></figure><p>It always returns HTTP 200 OK. Yes, always.</p><p>Even with this setup, we still saw liveness and readiness failures.</p><p>Before we dig into the problem, let’s look at the microservice’s infrastructure. First, it is a Flask application. However, we aren’t using Gunicorn for concurrency. We are using Gevent.</p><p>This means each pod is effectively a single-process Flask app. It uses coroutines, or “greenlets,” to handle each request. Now that we understand the setup, let’s analyze the root cause layer by layer.</p><h3 id="Question-1-Why-does-such-a-simple-health-check-fail"><a href="#Question-1-Why-does-such-a-simple-health-check-fail" class="headerlink" title="Question 1: Why does such a simple health check fail?"></a>Question 1: Why does such a simple health check fail?</h3><p>Logically, a “Hello World” response shouldn’t trigger errors or timeouts. So why did the health check fail?</p><p>We have to look at the design. To prevent resource exhaustion, we configured a Gevent pool. Whenever a request comes in, we grab a greenlet from the pool to handle it. If the pool is empty, we can’t handle any requests. Not even the simple ones.</p><p>Take a look at the graph below.</p><p><img src="https://cdn-images-1.medium.com/max/800/0*Yfj9PgwCnYaRuP7r.png"></p><p>The red line shows the number of pod restarts. The other lines show the remaining capacity of the Gevent pool, which keeps dropping. When the pool hits zero, the app can’t respond to health checks. This triggers a pod restart.</p><p>After the restart, the Gevent pool in the new pod becomes available again, and it can resume service.</p><h3 id="Question-2-Why-does-the-Gevent-pool-run-out"><a href="#Question-2-Why-does-the-Gevent-pool-run-out" class="headerlink" title="Question 2: Why does the Gevent pool run out?"></a>Question 2: Why does the Gevent pool run out?</h3><p>We know the immediate cause. Now we need to find out what is consuming the Gevent pool. We need to understand why we ran out of greenlets.</p><p>At first, we suspected high CPU usage. If the CPU spikes, every request takes longer to respond. This would mean each greenlet is occupied for more time.</p><p>Eventually, this creates a slow leak.</p><p><img src="https://cdn-images-1.medium.com/max/800/0*QrNrr79Mo2vR0ig0.png"></p><p>The overlay of the Gevent pool and CPU usage seemed to support this theory.</p><p>However, further analysis proved us wrong. Even when the CPU spiked, the peak usage never hit the full CPU request limit for the pod. We also didn’t see any signs of CPU throttling. So, this hypothesis didn’t hold up.</p><h3 id="Question-3-Is-it-a-Gevent-leak"><a href="#Question-3-Is-it-a-Gevent-leak" class="headerlink" title="Question 3: Is it a Gevent leak?"></a>Question 3: Is it a Gevent leak?</h3><p>To figure out what is holding onto the greenlets, we need to dump the current greenlet stack. Fortunately, Gevent provides a tool for this: <code>gevent.utils.print_run_info</code>.</p><p>We used this to analyze the dump and see what each greenlet was doing. We found a huge number of greenlets waiting on <code>read_requestline</code>.</p><p>Below is a breakdown of the code flow.</p><p><img src="https://cdn-images-1.medium.com/max/800/1*5iwuMoMU6B5S8GM1H9d1VA.png"></p><p>This is typical HTTP Keep-Alive behavior. If a client keeps the connection open but doesn’t send a request, the greenlet waits indefinitely.</p><p>Now we have our answer. The greenlets were being forced to stay alive because of the Keep-Alive setting. This eventually drained the Gevent pool.</p><h3 id="Question-4-Who-is-hogging-the-connections"><a href="#Question-4-Who-is-hogging-the-connections" class="headerlink" title="Question 4: Who is hogging the connections?"></a>Question 4: Who is hogging the connections?</h3><p>We have another way to prove that Keep-Alive is the culprit. We can use <code>netstat</code> to check the status of the TCP connections.</p><p>First, let’s verify if there really are persistent TCP connections.</p><figure class="highlight plaintext"><table><tr><td class="gutter"><pre><span class="line">1</span><br><span class="line">2</span><br></pre></td><td class="code"><pre><span class="line">$ netstat -tn | grep &#x27;:8080&#x27; | awk &#x27;&#123;print $6&#125;&#x27; | sort | uniq -c  </span><br><span class="line">    234 ESTABLISHED</span><br></pre></td></tr></table></figure><p>The results show 234 established connections.</p><p>But who established them? We can use <code>netstat</code> again to find out.</p><figure class="highlight plaintext"><table><tr><td class="gutter"><pre><span class="line">1</span><br><span class="line">2</span><br><span class="line">3</span><br><span class="line">4</span><br></pre></td><td class="code"><pre><span class="line">$ netstat -tn | grep ESTABLISHED | awk &#x27;&#123;print $5&#125;&#x27; | cut -d: -f1 | sort -u  </span><br><span class="line">172.24.1.100  </span><br><span class="line">172.24.1.101  </span><br><span class="line">...</span><br></pre></td></tr></table></figure><p>Now we know the source IPs. We can analyze who these sources are and figure out how to handle them.</p><h3 id="Wrap-Up"><a href="#Wrap-Up" class="headerlink" title="Wrap Up"></a>Wrap Up</h3><p>In fact, there are more questions to answer:</p><ul><li>Question 5: Who exactly is the source?</li><li>Question 6: Why do they open connections but not close them?</li></ul><p>However, these answers depend on the specific infrastructure environment. I won’t go deeper into those details in this article.</p><p>Still, this Root Cause Analysis process should apply to almost any web service. It is especially useful for Python services. By following the flow in this article, we don’t have to blindly suspect CPU or memory issues every time something goes wrong. We have the tools and methods to track down deeper problems.</p><p>Let’s call it a day.</p><blockquote><p>Originally published on <a href="https://medium.com/@lazypro/solving-gevent-pool-issues-in-flask-apps-290a46a488f2">Medium</a></p></blockquote>]]>
    </content>
    <id>https://wirelessr.github.io/Python/Solving-Gevent-Pool-Issues-in-Flask-Apps/20251228/</id>
    <link href="https://wirelessr.github.io/Python/Solving-Gevent-Pool-Issues-in-Flask-Apps/20251228/"/>
    <published>2025-12-28T17:48:29.000Z</published>
    <summary>
      <![CDATA[<h3 id="Solving-Gevent-Pool-Issues-in-Flask-Apps"><a href="#Solving-Gevent-Pool-Issues-in-Flask-Apps" class="headerlink" title="Solving]]>
    </summary>
    <title>Solving Gevent Pool Issues in Flask Apps</title>
    <updated>2025-12-28T17:48:29.000Z</updated>
  </entry>
  <entry>
    <author>
      <name>CT Wu</name>
    </author>
    <category term="AI" scheme="https://wirelessr.github.io/categories/AI/"/>
    <content>
      <![CDATA[<h3 id="Abandoning-SDD-My-New-AI-Coding-Workflow"><a href="#Abandoning-SDD-My-New-AI-Coding-Workflow" class="headerlink" title="Abandoning SDD: My New AI Coding Workflow"></a>Abandoning SDD: My New AI Coding Workflow</h3><h4 id="Discover-why-I-ditched-SDD-for-an-efficient-Vibe-Coding-workflow"><a href="#Discover-why-I-ditched-SDD-for-an-efficient-Vibe-Coding-workflow" class="headerlink" title="Discover why I ditched SDD for an efficient Vibe Coding workflow"></a>Discover why I ditched SDD for an efficient Vibe Coding workflow</h4><p><img src="https://cdn-images-1.medium.com/max/800/1*Ho7g9b29SwGNlOOp12xuKQ.png"></p><p>I recently made some major optimizations to the workflow I use for running development tasks with AI agents. I’ve completely abandoned SDD (Spec-driven Development) and shifted to pure vibe coding.</p><p>Even though I used to be a big believer in SDD, I’ve realized its limitations and the new problems it creates over the last few months. I’ll summarize the reasons for the switch and what we’ve found.</p><p>There is actually an article on Martin Fowler’s blog that analyzes SDD tools and processes in depth. I happened to switch my process before seeing that article. It turns out the content mirrored my feelings perfectly, so I highly recommend reading it.</p><p>Back to the main topic. Why give up SDD completely? Let me summarize it in one sentence.</p><blockquote><p>Using SDD for small changes is overkill. Big changes can’t be explained clearly. Even if the documentation is written perfectly, the Agent can’t fully absorb it. Eventually, the documentation and the code drift further apart.</p></blockquote><p>Let’s discuss each of these points in detail.</p><h3 id="Small-changes-are-unnecessary"><a href="#Small-changes-are-unnecessary" class="headerlink" title="Small changes are unnecessary"></a>Small changes are unnecessary</h3><p>The small changes we refer to here are usually things like receiving a bug report or a feature enhancement. This could be tweaking parameters or adjusting part of a flow.</p><p>When we need to execute this kind of small task, let’s take Kiro as an example. Would we use vibe mode or spec mode?</p><p>When I was a devout SDD believer, I always used spec mode. And what did that get us?</p><p>Three lines of code changed. Over three hundred lines of documents generated.</p><p>I don’t know if you’ve had experience using SDD tools, but even for these tiny tasks, their requirement documents still cover backward and forward compatibility, security assessments, performance reviews, and rollout plans.</p><p>Are you kidding? The time it takes to read the generated requirement document far exceeds the time it takes to just jump in and write the code myself.</p><h3 id="Big-changes-aren’t-explained-clearly"><a href="#Big-changes-aren’t-explained-clearly" class="headerlink" title="Big changes aren’t explained clearly"></a>Big changes aren’t explained clearly</h3><p>Big changes are the flip side of small changes.</p><p>When we need to make a change involving thousands of lines (allow me to use numbers for clarity), this scenario is usually where SDD is supposed to shine, right?</p><p>The reality is different. When we give a PRD directly to a spec mode agent, it can’t produce a complete, well-broken-down task list. It easily misses things. And when a massive list actually gets to the agent for implementation, it turns out to be something entirely different.</p><p>If we have to teach the agent to build a complete list through interaction and conversation, why not just grab the list and do it ourselves?</p><p>More importantly, the agent’s context window is limited. When action items aren’t small or precise enough, it will still implement things according to its own ideas, even with a complete design doc.</p><p>This turns into a situation where the agent writes bad specs, and we need to assist it in writing them. Then, once the agent has the specs, it doesn’t follow them well, so we have to supervise it. We basically end up becoming the maintainers of the specs ourselves, which adds a lot of extra effort.</p><h3 id="Agents-can’t-fully-absorb-even-clear-documentation"><a href="#Agents-can’t-fully-absorb-even-clear-documentation" class="headerlink" title="Agents can’t fully absorb even clear documentation"></a>Agents can’t fully absorb even clear documentation</h3><p>There are already many papers analyzing this. I’ve even done quite a few experiments and verifications myself.</p><p>You can refer to my articles and open-source projects for details.</p><p>Simply put, the agent won’t treat the design document as an absolute law. It only treats the design document as a guideline. Sometimes, it doesn’t even read the whole thing.</p><p>The result is that we spend a lot of time discussing a perfect design with the agent. But in the end, we still need to watch over the agent constantly to make sure it doesn’t go off track.</p><h3 id="Documentation-and-code-drift-apart"><a href="#Documentation-and-code-drift-apart" class="headerlink" title="Documentation and code drift apart"></a>Documentation and code drift apart</h3><p>This is the fate of software development. It applies to the past and the future.</p><p>Because documentation only increases and the codebase only gets bigger. No one can remember all the content in the documentation. And no one can update the relevant documents with every single change.</p><p>Whether it’s the Wiki and Confluence of the past or design docs written inside the codebase, they share the same fate. Eventually, they will no longer be consistent with the code.</p><p>The problem lies exactly here. When Wiki or Confluence is inconsistent, we humans might notice it or we might just ignore those documents. But the stuff you write in <code>.kiro/steering</code> gets pulled out and referenced by the agent repeatedly. If the document content is outdated, sadly, the agent’s changes will be a disaster.</p><h3 id="How-do-I-do-it-now"><a href="#How-do-I-do-it-now" class="headerlink" title="How do I do it now?"></a>How do I do it now?</h3><p>Having said so much about the downsides of SDD, how do we handle things now?</p><p>I believe thinking before coding is essential, whether we are using AI coding or not. Therefore, I still keep my past habits. I analyze and design the modifications I’m about to make. The difference is that in the past, we needed to know every aspect of the codebase to make a complete analysis. But now, collaborating with an Agent allows us to analyze the chain of changes and the scope of impact more efficiently.</p><p>Once I’ve run through the simulation in my head, I list all the items to be executed in my own notepad. Then, I tell the agent to execute them one by one using vibe mode.</p><p>Where is the difference? It lies in the granularity. The items in my notepad are precise down to which file, which module, or even which function. And I tell the agent exactly where to make what kind of changes with that same precision.</p><p>Why do we need to be so precise?</p><p>Because I found that AI’s taste in code is still worse than mine. The code it writes looks incredibly ugly to me personally. It has no aesthetic sense at all. So I tell it exactly what to do and how to do it.</p><p>We’ll find that vibe coding is really just a fancier auto-completion for me. But I think that’s enough. Facts have proven that this level of efficiency boost is sufficient.</p><h3 id="Wrap-Up"><a href="#Wrap-Up" class="headerlink" title="Wrap Up"></a>Wrap Up</h3><p>Why did I make this shift in workflow?</p><p>Thinking back, the straw that broke the camel’s back was that Claude loves writing documents for absolutely everything, big or small. Every document is long and tedious. It got to the point where reading them was painful, but not reading them felt wrong too.</p><p>Instead of torturing ourselves like this, let’s just ditch these intermediate documents. For me, they have no reference value.</p><p>The motivation driving me to slowly transition to this new workflow is something I’ve mentioned before. It’s simply that the code written by AI looks too ugly. It’s full of bad smells.</p><p>Rather than dealing with that, I’d really prefer to write it myself, or make the AI write it strictly according to what I say.</p><blockquote><p>Originally published on <a href="https://medium.com/@lazypro/abandoning-sdd-my-new-ai-coding-workflow-c3ac8627d8be">Medium</a></p></blockquote>]]>
    </content>
    <id>https://wirelessr.github.io/AI/Abandoning-SDD-My-New-AI-Coding-Workflow/20251214/</id>
    <link href="https://wirelessr.github.io/AI/Abandoning-SDD-My-New-AI-Coding-Workflow/20251214/"/>
    <published>2025-12-14T17:26:31.000Z</published>
    <summary>
      <![CDATA[<h3 id="Abandoning-SDD-My-New-AI-Coding-Workflow"><a href="#Abandoning-SDD-My-New-AI-Coding-Workflow" class="headerlink" title="Abandoning]]>
    </summary>
    <title>Abandoning SDD: My New AI Coding Workflow</title>
    <updated>2025-12-14T17:26:31.000Z</updated>
  </entry>
  <entry>
    <author>
      <name>CT Wu</name>
    </author>
    <category term="AI" scheme="https://wirelessr.github.io/categories/AI/"/>
    <content>
      <![CDATA[<h4 id="Traditional-silos-limit-the-productivity-gains-unlocked-by-AI-workflows"><a href="#Traditional-silos-limit-the-productivity-gains-unlocked-by-AI-workflows" class="headerlink" title="Traditional silos limit the productivity gains unlocked by AI workflows"></a>Traditional silos limit the productivity gains unlocked by AI workflows</h4><p><img src="https://cdn-images-1.medium.com/max/800/1*7qG9zKNBEDHoIZzefziDrQ.png"></p><p>As I mentioned in my previous article, I recently made a career shift. I moved from being a pure software architect to a hands-on staff role. This means I am now deeply involved in implementation.</p><p>I made this adjustment because there were things I wanted to verify. For instance, I wanted to see how much productivity an AI-powered workflow could unlock. The results proved that the efficiency gains are significant.</p><p>This led me to think about another question.</p><blockquote><p>Can traditional organizational structures still serve their purpose?</p></blockquote><p>The “traditional” structures I am referring to fall into two categories:</p><ol><li>Organizations divided by function, such as PM, ENG, QA, etc.</li><li>Organizations divided by Cross-functional teams. For example, a Scrum team has a PO, developers, and QA. This might seem new rather than traditional to some people. Nevertheless, I believe this is still a traditional setup from the era before AI entered our workflows.</li></ol><p>I raise this question because AI empowers us to increase productivity to a dramatic extent. However, the silos created by traditional organizational structures work against this boost.</p><p>There are many reasons for these silos. We have functional silos between roles. We have cognitive silos between different feature modules. And we have responsibility silos between departments. These boundaries used to seem natural. Now, AI breaks them down easily.</p><p>Let’s look at an example. We often used domain boundaries or microservice boundaries to split organizations. When Team A’s changes touched code owned by Team B, it required a lot of communication and coordination. Even development and deployment created dependencies.</p><p>Waiting is inevitable in this process. This constitutes waste.</p><p>But if this traditional organizational structure is broken, how should we define boundaries? Or simply put, how do we clarify responsibilities?</p><p>I don’t have the answer yet. I am still looking into it.</p><blockquote><p>Originally published on <a href="https://medium.com/@lazypro/is-ai-killing-traditional-org-structures-9f77b5cd7604">Medium</a></p></blockquote>]]>
    </content>
    <id>https://wirelessr.github.io/AI/Is-AI-Killing-Traditional-Org-Structures/20251130/</id>
    <link href="https://wirelessr.github.io/AI/Is-AI-Killing-Traditional-Org-Structures/20251130/"/>
    <published>2025-11-30T17:49:16.000Z</published>
    <summary>
      <![CDATA[<h4 id="Traditional-silos-limit-the-productivity-gains-unlocked-by-AI-workflows"><a]]>
    </summary>
    <title>Is AI Killing Traditional Org Structures?</title>
    <updated>2025-11-30T17:49:16.000Z</updated>
  </entry>
  <entry>
    <author>
      <name>CT Wu</name>
    </author>
    <category term="AI" scheme="https://wirelessr.github.io/categories/AI/"/>
    <content>
      <![CDATA[<h4 id="Why-I-switched-from-architect-to-developer-to-validate-Gen-AI-in-practice"><a href="#Why-I-switched-from-architect-to-developer-to-validate-Gen-AI-in-practice" class="headerlink" title="Why I switched from architect to developer to validate Gen AI in practice"></a>Why I switched from architect to developer to validate Gen AI in practice</h4><p><img src="https://cdn-images-1.medium.com/max/800/1*WLD41KFh7OhNWKXs3lXZ3Q.png"></p><p>In the software development track, you have a lot of options. The main choice is between heading down the architect path or focusing on the developer track.</p><p>I chose the architect path for the last few years. My work focused on research, software architecture transformation, and pilot planning. But recently, I switched back to a developer role. I still wear the architect hat sometimes, but I spend most of my time on feature development and troubleshooting.</p><p>A lot of people have asked me why I made this switch. I wanted to use this article to talk about the reasons behind it.</p><p>If you’ve been following me, you might have noticed I started covering Gen AI topics late last year. That’s also when I began seriously studying how to use AI to boost productivity.</p><p>However, in my previous role as a pure architect, I rarely worked on production code. This meant that even though I had all these theories, I could only test their real-world effectiveness on my side projects.</p><p>This presents a problem: theory and practice start to drift apart. It’s a common dilemma for many researchers.</p><p>Therefore, switching to a more hands-on role was a better choice. This way, I can actually validate whether my methodologies work in practice.</p><p>Over the past few months of doing this, I’ve found that Gen AI really does significantly boost my productivity in many areas.</p><p>I’ll list a few of the most obvious examples.</p><h3 id="Quickly-Onboarding-to-Brownfield-Projects"><a href="#Quickly-Onboarding-to-Brownfield-Projects" class="headerlink" title="Quickly Onboarding to Brownfield Projects"></a>Quickly Onboarding to Brownfield Projects</h3><p>I’ve briefly explained how I do this in a previous article. It mainly involves two tools: a Coding Agent and RAG.</p><p>I’m using very general terms here because everyone’s familiar tech stack is different. For my Coding Agent, I use Copilot. Of course, you can use Claude Code, Cursor, or any other tool.</p><p>And for RAG, I use NotebookLM.</p><p>My specific process is to create a Notebook for each feature. Inside each Notebook, I put the feature’s PRD, design document, technical support KBs, and code tracing.</p><p>The technical documents are pretty straightforward. But what is code tracing?</p><p>It’s a complete report I generate using my coding agent. It includes the full e2e flow for all of the feature’s entry points, the data flow, and all related data tables. Even the e2e flow is broken down in great detail, right down to the module, class, and function level.</p><p>With this material, the Notebook RAG can quickly answer almost any basic question about the project. It can even pinpoint the code locations involved in specific problems.</p><p>As a result, I didn’t need to spend much time getting up to speed on a large, unfamiliar project before I could start contributing.</p><h3 id="Efficient-Feature-Iteration"><a href="#Efficient-Feature-Iteration" class="headerlink" title="Efficient Feature Iteration"></a>Efficient Feature Iteration</h3><p>One of the most common scenarios for a developer is feature iteration.</p><p>If you think I’m going to say my coding agent lets me finish programming at lightning speed, you’re going to be disappointed.</p><p>I use AI in two ways in this scenario. First, I’ll write a very rough, quick, handwritten design document. Then, I use Gemini’s OCR capability to convert it into a fully formatted document.</p><p>Designing and developing a feature requires a lot of communication and discussion upfront. I use this method to quickly create discussion materials, meeting notes, and design docs. This really saves me a ton of time.</p><p>I can use pen and paper, which I’m most comfortable with, to turn my ideas into digital documents. This is the first major improvement.</p><p>Second, during the actual software development, I already have a complete design. This includes design patterns, API interfaces, and so on. The entire development process is broken down into small enough units. This makes it very easy for me to use AI for auto-complete.</p><p>As for why I don’t let the AI develop everything and only use it for minimal assistance, I explained that in detail in a <a href="https://medium.com/stackademic/vibe-coding-is-cooling-off-fast-bd1ea2aa4adb">previous article</a>. I won’t repeat it here.</p><h3 id="Various-Daily-Routines"><a href="#Various-Daily-Routines" class="headerlink" title="Various Daily Routines"></a>Various Daily Routines</h3><p>As a software engineer, I think tedious tasks take up a big part of the day. I’ve automated a large portion of this grunt work.</p><p>Let me give a few examples. I currently work across different time zones, so someone is basically working at all hours of the day.</p><ol><li>Waking up to hundreds of emails? My solution is not to read them. I have AI quickly categorize them. It leaves only the emails I truly need to know about and those that require action. It then provides a consolidated summary so I can see what I need to do at a glance.</li><li>What about all the recorded meetings I missed? I speed-watch them. I use AI to generate and embed captions in the video. This allows me to watch them at 2x or even 4x speed.</li><li>What about all the routine maintenance work? I use AI to generate small tools for me. I even build automated workflows to handle them. This prevents me from having to do so much manual work.</li></ol><p>I don’t use AI in a very generic way. It can’t do everything. But it’s more than enough to solve my specific pain points.</p><h3 id="Troubleshooting"><a href="#Troubleshooting" class="headerlink" title="Troubleshooting"></a>Troubleshooting</h3><p>Debugging. I believe this is the one thing all developers hate the most.</p><p>It’s the same for me. A big part of why it’s so annoying is that we have to guess based on various clues. After guessing, we still have to find evidence among those clues to prove it.</p><p>It is absolutely tedious and mundane work.</p><p>The worst part is digging for evidence in thousands, or even tens of thousands, of log lines. It’s never an easy job, especially when the logs are unstructured. Now, I’ve offloaded this painful task to AI. We used to need <code>grep</code>, <code>sed</code>, and <code>awk</code> to process logs just to find keywords and check a timeline.</p><p>Now, I just need to tell the AI my intent, what I’m looking for. It can take over this dirty work for me.</p><p>Once it finds the relevant logs based on my intent, the guessing starts. I figure it’s easier to have a group guess than to do it alone. So, I feed these logs to several agents and let them all guess. Then we compare their answers.</p><p>By combining all their hypotheses, I can go back and ask the AI to find evidence in that vast sea of logs.</p><p>All of this dirty work? I don’t have to do it myself anymore.</p><h3 id="Wrap-Up"><a href="#Wrap-Up" class="headerlink" title="Wrap Up"></a>Wrap Up</h3><p>What I’ve mentioned above should cover most of the different aspects a software engineer deals with.</p><p>How do you use AI to boost productivity?</p><p>I believe the answer is simple. Give it the annoying work you hate doing. Your productivity will naturally go up.</p><p>But there’s one thing to keep in mind. I’ve stressed this point repeatedly in the past: AI isn’t brilliant. It’s just a tool. We must be able to master the tool to get the job done right.</p><p>Especially, remember that AI makes mistakes in many situations. We have to review the critical parts repeatedly. For example, when I ask Gemini to turn my handwritten draft into a design document, I still need to manually fix many details. But this is still much faster than writing one from scratch.</p><p>As for how much productivity has improved with AI, I don’t have exact numbers. Software engineer time estimates are rarely accurate anyway. But my gut feeling is at least a 2x boost. What does that mean? A huge modification that used to take two months now only takes one.</p><blockquote><p>Originally published on <a href="https://medium.com/@lazypro/how-gen-ai-2x-my-developer-productivity-9738e22d3d68">Medium</a></p></blockquote>]]>
    </content>
    <id>https://wirelessr.github.io/AI/How-Gen-AI-2x-My-Developer-Productivity/20251109/</id>
    <link href="https://wirelessr.github.io/AI/How-Gen-AI-2x-My-Developer-Productivity/20251109/"/>
    <published>2025-11-09T18:06:05.000Z</published>
    <summary>
      <![CDATA[<h4 id="Why-I-switched-from-architect-to-developer-to-validate-Gen-AI-in-practice"><a]]>
    </summary>
    <title>How Gen AI 2x My Developer Productivity</title>
    <updated>2025-11-09T18:06:05.000Z</updated>
  </entry>
  <entry>
    <author>
      <name>CT Wu</name>
    </author>
    <category term="AI" scheme="https://wirelessr.github.io/categories/AI/"/>
    <content>
      <![CDATA[<h3 id="Vibe-Coding-is-Cooling-Off-Fast"><a href="#Vibe-Coding-is-Cooling-Off-Fast" class="headerlink" title="Vibe Coding is Cooling Off, Fast"></a>Vibe Coding is Cooling Off, Fast</h3><h4 id="AI-is-great-for-PoCs-but-fails-at-creating-maintainable-software"><a href="#AI-is-great-for-PoCs-but-fails-at-creating-maintainable-software" class="headerlink" title="AI is great for PoCs, but fails at creating maintainable software"></a>AI is great for PoCs, but fails at creating maintainable software</h4><p><img src="https://cdn-images-1.medium.com/max/800/1*BnB0HCqXINZ2n3rSgiD0VQ.png"></p><p>The title might sound a bit like clickbait, but even the guy who coined the term “vibe coding,” Andrej Karpathy, just pointed out that he hand-wrote his latest project. Whatever his reasons, the bottom line is: vibe coding just wasn’t good enough.</p><ul><li><strong>Feb 3, 2025:</strong> The term “<a href="https://x.com/karpathy/status/1886192184808149383" title="null">Vibe coding</a>” is born.</li><li><strong>Oct 13, 2025:</strong> Andrej Karpathy gives an <a href="https://x.com/karpathy/status/1977758204139331904" title="null">update</a> on vibe coding.</li></ul><p>That’s barely half a year. What the hell happened?</p><p>We were just celebrating how insanely capable Claude 4.5 and GPT-5 are, and suddenly the script flips?</p><p>Honestly, I’ve also been hitting the hard limits of vibe coding myself lately.</p><p>Let me provide a real-world example.</p><p>Let’s say we have a huge project and we need to introduce a behavior change. Whether it’s for A&#x2F;B testing or feature toggling, we’re essentially just wrapping the old code in an <code>if-else</code> block to introduce the new behavior, right?</p><p>That’s a bit abstract, so let’s look at some pseudo-code.</p><figure class="highlight plaintext"><table><tr><td class="gutter"><pre><span class="line">1</span><br><span class="line">2</span><br><span class="line">3</span><br><span class="line">4</span><br><span class="line">5</span><br><span class="line">6</span><br></pre></td><td class="code"><pre><span class="line">if is_enabled(&quot;feature A&quot;):  </span><br><span class="line">    # new behavior / new feature  </span><br><span class="line">    something_new()  </span><br><span class="line">else:  </span><br><span class="line">    # original codeflow  </span><br><span class="line">    something_old()</span><br></pre></td></tr></table></figure><p>Super easy to understand, right?</p><p>Now, when this feature is big enough, these <code>if-else</code> blocks are going to be scattered all over the codebase. What do we think an AI Agent will do?</p><p>Yes. Exactly. It’s going to slap an <code>if-else</code> on every single place that needs to change. So, what happens when the feature toggle rollout is complete and it’s time to clean up the codebase?</p><p>Right again. The Agent will just go back and rip out all those <code>if-else</code> statements. What’s the problem with that? If that <code>if-else</code> is spread across 100 different files, this “housekeeping” task is now touching 100 files. Would we feel safe pushing that change to production?</p><p>So, what’s the right way to do it?</p><p>I mentioned this in a <a href="https://medium.com/better-programming/feature-toggle-introduction-68d58f5c709" title="null">previous article on feature toggling</a>: the correct practice is to introduce the <strong>Factory Pattern</strong>.</p><p>The beauty of this is that after the code is refactored, the actual feature flag check is hidden inside the factory. When it’s time for cleanup, we only have to modify the factory. We don’t have to touch all the integration points.</p><p>Let’s look at a concrete example.</p><h3 id="The-Factory-Pattern-in-Practice"><a href="#The-Factory-Pattern-in-Practice" class="headerlink" title="The Factory Pattern in Practice"></a>The Factory Pattern in Practice</h3><p>Let’s say we have some business logic for getting user data. The old implementation queries the database directly. The new implementation uses a dedicated microservice. We need to migrate all the database queries to the new REST API.</p><figure class="highlight python"><table><tr><td class="gutter"><pre><span class="line">1</span><br><span class="line">2</span><br><span class="line">3</span><br><span class="line">4</span><br><span class="line">5</span><br><span class="line">6</span><br><span class="line">7</span><br><span class="line">8</span><br><span class="line">9</span><br></pre></td><td class="code"><pre><span class="line"><span class="keyword">def</span> <span class="title function_">get_user_profile</span>(<span class="params">customer_id: <span class="built_in">str</span>, email: <span class="built_in">str</span></span>):      </span><br><span class="line">    <span class="keyword">if</span> feature_flags.is_enabled(customer_id, <span class="string">&#x27;USE_NEW_USER_SERVICE_FF&#x27;</span>):  </span><br><span class="line">        <span class="comment"># If the flag is on, call the new API service  </span></span><br><span class="line">        user_data = call_new_api_service(email)  </span><br><span class="line">    <span class="keyword">else</span>:  </span><br><span class="line">        <span class="comment"># Otherwise, query the old database  </span></span><br><span class="line">        user_data = query_legacy_database(email)  </span><br><span class="line">          </span><br><span class="line">    <span class="keyword">return</span> user_data</span><br></pre></td></tr></table></figure><p>If we also have functions to get group info by <code>user_id</code> or other queries, we can imagine this <code>if-else</code> getting scattered everywhere.</p><p>This is where we bring in the Factory Pattern. It has three core components: an Interface, Concrete Implementations, and a Factory.</p><p>First, we define an abstract <code>UserProvider</code> interface. It defines the methods that all “user data providers” must have. This way, the calling code doesn’t need to care if the data is coming from a database or an API.</p><figure class="highlight python"><table><tr><td class="gutter"><pre><span class="line">1</span><br><span class="line">2</span><br><span class="line">3</span><br><span class="line">4</span><br><span class="line">5</span><br><span class="line">6</span><br><span class="line">7</span><br><span class="line">8</span><br><span class="line">9</span><br><span class="line">10</span><br><span class="line">11</span><br><span class="line">12</span><br><span class="line">13</span><br><span class="line">14</span><br><span class="line">15</span><br><span class="line">16</span><br><span class="line">17</span><br></pre></td><td class="code"><pre><span class="line"><span class="keyword">from</span> abc <span class="keyword">import</span> ABC, abstractmethod  </span><br><span class="line"><span class="keyword">from</span> typing <span class="keyword">import</span> <span class="type">Optional</span>, <span class="type">Dict</span>, <span class="type">List</span>, <span class="type">Tuple</span>  </span><br><span class="line">  </span><br><span class="line"><span class="keyword">class</span> <span class="title class_">UserProvider</span>(<span class="title class_ inherited__">ABC</span>):  </span><br><span class="line">    <span class="string">&quot;&quot;&quot;  </span></span><br><span class="line"><span class="string">    Abstract interface for a user data provider.  </span></span><br><span class="line"><span class="string">    Defines methods all concrete providers must implement.  </span></span><br><span class="line"><span class="string">    &quot;&quot;&quot;</span>  </span><br><span class="line"><span class="meta">    @abstractmethod  </span></span><br><span class="line">    <span class="keyword">def</span> <span class="title function_">get_user_by_email</span>(<span class="params">self, customer_id: <span class="built_in">str</span>, email: <span class="built_in">str</span></span>) -&gt; <span class="type">Optional</span>[<span class="type">Dict</span>]:  </span><br><span class="line">        <span class="string">&quot;&quot;&quot;Gets user data by Email&quot;&quot;&quot;</span>  </span><br><span class="line">        <span class="keyword">pass</span>  </span><br><span class="line">  </span><br><span class="line"><span class="meta">    @abstractmethod  </span></span><br><span class="line">    <span class="keyword">def</span> <span class="title function_">get_user_groups</span>(<span class="params">self, customer_id: <span class="built_in">str</span>, user_id: <span class="built_in">str</span></span>) -&gt; <span class="type">List</span>[<span class="built_in">str</span>]:  </span><br><span class="line">        <span class="string">&quot;&quot;&quot;Gets a list of groups for a user ID&quot;&quot;&quot;</span>  </span><br><span class="line">        <span class="keyword">pass</span></span><br></pre></td></tr></table></figure><p>Next, we create concrete classes for the old and new services, both of which implement the <code>UserProvider</code> interface.</p><p>The old database service:</p><figure class="highlight python"><table><tr><td class="gutter"><pre><span class="line">1</span><br><span class="line">2</span><br><span class="line">3</span><br><span class="line">4</span><br><span class="line">5</span><br><span class="line">6</span><br><span class="line">7</span><br><span class="line">8</span><br><span class="line">9</span><br><span class="line">10</span><br><span class="line">11</span><br><span class="line">12</span><br><span class="line">13</span><br><span class="line">14</span><br><span class="line">15</span><br></pre></td><td class="code"><pre><span class="line"><span class="keyword">class</span> <span class="title class_">OldDatabaseUserProvider</span>(<span class="title class_ inherited__">UserProvider</span>):  </span><br><span class="line">    <span class="string">&quot;&quot;&quot;  </span></span><br><span class="line"><span class="string">    Implementation for fetching user data from the legacy database.  </span></span><br><span class="line"><span class="string">    &quot;&quot;&quot;</span>  </span><br><span class="line">    <span class="keyword">def</span> <span class="title function_">get_user_by_email</span>(<span class="params">self, customer_id: <span class="built_in">str</span>, email: <span class="built_in">str</span></span>) -&gt; <span class="type">Optional</span>[<span class="type">Dict</span>]:  </span><br><span class="line">        <span class="built_in">print</span>(<span class="string">f&quot;--- (Legacy System) Querying DB for Email: <span class="subst">&#123;email&#125;</span> ---&quot;</span>)  </span><br><span class="line">        <span class="comment"># Simulate DB query...  </span></span><br><span class="line">        <span class="keyword">if</span> email == <span class="string">&quot;test@example.com&quot;</span>:  </span><br><span class="line">            <span class="keyword">return</span> &#123;<span class="string">&#x27;user_id&#x27;</span>: <span class="string">&#x27;db_123&#x27;</span>, <span class="string">&#x27;email&#x27;</span>: email, <span class="string">&#x27;name&#x27;</span>: <span class="string">&#x27;DB User&#x27;</span>&#125;  </span><br><span class="line">        <span class="keyword">return</span> <span class="literal">None</span>  </span><br><span class="line">  </span><br><span class="line">    <span class="keyword">def</span> <span class="title function_">get_user_groups</span>(<span class="params">self, customer_id: <span class="built_in">str</span>, user_id: <span class="built_in">str</span></span>) -&gt; <span class="type">List</span>[<span class="built_in">str</span>]:  </span><br><span class="line">        <span class="built_in">print</span>(<span class="string">f&quot;--- (Legacy System) Querying DB for User ID: <span class="subst">&#123;user_id&#125;</span>&#x27;s groups ---&quot;</span>)  </span><br><span class="line">        <span class="comment"># Simulate query...  </span></span><br><span class="line">        <span class="keyword">return</span> [<span class="string">&#x27;group_a_db&#x27;</span>, <span class="string">&#x27;group_b_db&#x27;</span>]</span><br></pre></td></tr></table></figure><p>The new API service:</p><figure class="highlight python"><table><tr><td class="gutter"><pre><span class="line">1</span><br><span class="line">2</span><br><span class="line">3</span><br><span class="line">4</span><br><span class="line">5</span><br><span class="line">6</span><br><span class="line">7</span><br><span class="line">8</span><br><span class="line">9</span><br><span class="line">10</span><br><span class="line">11</span><br><span class="line">12</span><br><span class="line">13</span><br><span class="line">14</span><br><span class="line">15</span><br></pre></td><td class="code"><pre><span class="line"><span class="keyword">class</span> <span class="title class_">NewAPIUserProvider</span>(<span class="title class_ inherited__">UserProvider</span>):  </span><br><span class="line">    <span class="string">&quot;&quot;&quot;  </span></span><br><span class="line"><span class="string">    Implementation for fetching user data from the new microservice API.  </span></span><br><span class="line"><span class="string">    &quot;&quot;&quot;</span>  </span><br><span class="line">    <span class="keyword">def</span> <span class="title function_">get_user_by_email</span>(<span class="params">self, customer_id: <span class="built_in">str</span>, email: <span class="built_in">str</span></span>) -&gt; <span class="type">Optional</span>[<span class="type">Dict</span>]:  </span><br><span class="line">        <span class="built_in">print</span>(<span class="string">f&quot;--- (New System) Calling API for Email: <span class="subst">&#123;email&#125;</span> ---&quot;</span>)  </span><br><span class="line">        <span class="comment"># Simulate API call...  </span></span><br><span class="line">        <span class="keyword">if</span> email == <span class="string">&quot;test@example.com&quot;</span>:  </span><br><span class="line">            <span class="keyword">return</span> &#123;<span class="string">&#x27;user_id&#x27;</span>: <span class="string">&#x27;api_xyz&#x27;</span>, <span class="string">&#x27;email&#x27;</span>: email, <span class="string">&#x27;name&#x27;</span>: <span class="string">&#x27;API User&#x27;</span>&#125;  </span><br><span class="line">        <span class="keyword">return</span> <span class="literal">None</span>  </span><br><span class="line">  </span><br><span class="line">    <span class="keyword">def</span> <span class="title function_">get_user_groups</span>(<span class="params">self, customer_id: <span class="built_in">str</span>, user_id: <span class="built_in">str</span></span>) -&gt; <span class="type">List</span>[<span class="built_in">str</span>]:  </span><br><span class="line">        <span class="built_in">print</span>(<span class="string">f&quot;--- (New System) Calling API for User ID: <span class="subst">&#123;user_id&#125;</span>&#x27;s groups ---&quot;</span>)  </span><br><span class="line">        <span class="comment"># Simulate API call...  </span></span><br><span class="line">        <span class="keyword">return</span> [<span class="string">&#x27;group_x_api&#x27;</span>, <span class="string">&#x27;group_y_api&#x27;</span>]</span><br></pre></td></tr></table></figure><p>Finally, we create a <code>UserProviderFactory</code>. Its only job is to decide which concrete <code>UserProvider</code> instance to return based on the given conditions (here, the <code>customer_id</code> and his feature flag).</p><figure class="highlight python"><table><tr><td class="gutter"><pre><span class="line">1</span><br><span class="line">2</span><br><span class="line">3</span><br><span class="line">4</span><br><span class="line">5</span><br><span class="line">6</span><br><span class="line">7</span><br><span class="line">8</span><br><span class="line">9</span><br><span class="line">10</span><br><span class="line">11</span><br><span class="line">12</span><br><span class="line">13</span><br><span class="line">14</span><br><span class="line">15</span><br><span class="line">16</span><br><span class="line">17</span><br><span class="line">18</span><br><span class="line">19</span><br></pre></td><td class="code"><pre><span class="line"><span class="keyword">class</span> <span class="title class_">UserProviderFactory</span>:  </span><br><span class="line">    <span class="keyword">def</span> <span class="title function_">__init__</span>(<span class="params">self</span>):  </span><br><span class="line">        <span class="comment"># Pre-build and cache the instances to avoid re-creation  </span></span><br><span class="line">        self._providers = &#123;  </span><br><span class="line">            <span class="string">&#x27;database&#x27;</span>: OldDatabaseUserProvider(),  </span><br><span class="line">            <span class="string">&#x27;api&#x27;</span>: NewAPIUserProvider()  </span><br><span class="line">        &#125;  </span><br><span class="line">      </span><br><span class="line">    <span class="keyword">def</span> <span class="title function_">get_provider</span>(<span class="params">self, customer_id: <span class="built_in">str</span></span>) -&gt; UserProvider:  </span><br><span class="line">        <span class="string">&quot;&quot;&quot;  </span></span><br><span class="line"><span class="string">        Decides which provider to return based on the feature flag.  </span></span><br><span class="line"><span class="string">        This is the core of the pattern, centralizing the &quot;decision logic&quot;.  </span></span><br><span class="line"><span class="string">        &quot;&quot;&quot;</span>  </span><br><span class="line">        <span class="keyword">if</span> feature_flags.is_enabled(customer_id, <span class="string">&#x27;USE_NEW_USER_SERVICE_FF&#x27;</span>):  </span><br><span class="line">            <span class="built_in">print</span>(<span class="string">&quot;Factory Decision: Using NewAPIUserProvider&quot;</span>)  </span><br><span class="line">            <span class="keyword">return</span> self._providers[<span class="string">&#x27;api&#x27;</span>]  </span><br><span class="line">        <span class="keyword">else</span>:  </span><br><span class="line">            <span class="built_in">print</span>(<span class="string">&quot;Factory Decision: Using OldDatabaseUserProvider&quot;</span>)  </span><br><span class="line">            <span class="keyword">return</span> self._providers[<span class="string">&#x27;database&#x27;</span>]</span><br></pre></td></tr></table></figure><p>Now, we’ve completely encapsulated the object creation and selection logic within the factory.</p><p>After implementing the factory, the business logic function that was full of <code>if-else</code> statements becomes way simpler.</p><p>The client code no longer needs to care about “which service to use” or “how to build the service object.” It just asks the factory for a usable <code>UserProvider</code>.</p><figure class="highlight plaintext"><table><tr><td class="gutter"><pre><span class="line">1</span><br><span class="line">2</span><br><span class="line">3</span><br><span class="line">4</span><br></pre></td><td class="code"><pre><span class="line">user_provider_factory = UserProviderFactory()  </span><br><span class="line">provider = user_provider_factory.get_provider(customer_id)  </span><br><span class="line">      </span><br><span class="line">user_data = provider.get_user_by_email(customer_id, email)</span><br></pre></td></tr></table></figure><p>In the future, when it’s time to clean up, we only need to touch the <code>feature_flags.is_enabled</code> line in the factory and delete the legacy <code>OldDatabaseUserProvider</code>. This ensures all client code is unaffected and dramatically shrinks the cleanup’s blast radius.</p><h3 id="Here’s-Another-Thing-the-Agent-Won’t-Tell-Us"><a href="#Here’s-Another-Thing-the-Agent-Won’t-Tell-Us" class="headerlink" title="Here’s Another Thing the Agent Won’t Tell Us"></a>Here’s Another Thing the Agent Won’t Tell Us</h3><p>Let’s do one more example.</p><p>Today’s AI agents are smart. They even write tests for their code. But if we actually look at the tests they write, we’ll find they are full of duplicated code, especially when they’re trying to cover a bunch of corner cases.</p><p>These kinds of unit tests are basically unmaintainable. A future logic change could instantly break a ton of test cases.</p><p>What’s the right way to do it? As I’ve explained in a <a href="https://www.google.com/search?q=https://medium.com/better-programming/how-to-make-example-based-testing-better-99dbfbbe5b8c" title="null">previous article</a>, we need to use <strong>table-driven testing</strong> to consolidate all the test cases.</p><p>A unit test follows the Arrange-Act-Assert (AAA) pattern. For different test cases, the only parts that really change are ‘Arrange’ (the inputs) and ‘Assert’ (the expected outputs). So, we can just build a table (an array) of all the cases and run them all through a single loop.</p><p>In fact, a lot of testing frameworks have-built in support for this. For example, <code>pytest</code> does this with <code>mark.parametrize</code>.</p><figure class="highlight python"><table><tr><td class="gutter"><pre><span class="line">1</span><br><span class="line">2</span><br><span class="line">3</span><br><span class="line">4</span><br><span class="line">5</span><br><span class="line">6</span><br><span class="line">7</span><br><span class="line">8</span><br><span class="line">9</span><br><span class="line">10</span><br><span class="line">11</span><br><span class="line">12</span><br><span class="line">13</span><br></pre></td><td class="code"><pre><span class="line"><span class="keyword">import</span> pytest  </span><br><span class="line">  </span><br><span class="line"><span class="meta">@pytest.mark.parametrize(<span class="params"><span class="string">&quot;expression,expected&quot;</span>,  </span></span></span><br><span class="line"><span class="params"><span class="meta">    [  </span></span></span><br><span class="line"><span class="params"><span class="meta">        (<span class="params"><span class="string">&quot;2 + 3&quot;</span>, <span class="number">5</span></span>),  </span></span></span><br><span class="line"><span class="params"><span class="meta">        (<span class="params"><span class="string">&quot;2 + 3 * 4&quot;</span>, <span class="number">14</span></span>),  </span></span></span><br><span class="line"><span class="params"><span class="meta">        (<span class="params"><span class="string">&quot;(2 + 3) * 4&quot;</span>, <span class="number">20</span></span>),  </span></span></span><br><span class="line"><span class="params"><span class="meta">        <span class="comment"># and so on  </span></span></span></span><br><span class="line"><span class="params"><span class="meta">    ]  </span></span></span><br><span class="line"><span class="params"><span class="meta"></span>)  </span></span><br><span class="line"><span class="keyword">def</span> <span class="title function_">test_calculator</span>(<span class="params">expression, expected</span>):  </span><br><span class="line">    ret = calculator(expression)  </span><br><span class="line">    <span class="keyword">assert</span> ret == expected</span><br></pre></td></tr></table></figure><p>The agent won’t tell us any of this.</p><p>Not unless we explicitly tell it: “I want us to implement the Factory Pattern” or “I want us to use table-driven testing.”</p><p>And this is the limit of vibe coding. I’ve spent a lot of time in the past discussing the practical details of vibe coding, and I was an early adopter of spec-driven development workflows.</p><p>But when I seriously review the AI’s output, I find that even with something as powerful as Claude 4.5, the code it produces is still full of redundancy. This redundant code might be correct, and it might even work, but over time, it will become completely unmaintainable.</p><p>Both humans and AI have a limited context window.</p><blockquote><p><em><strong>Ultimately, software development still comes back to good software engineering practices.</strong></em></p></blockquote><p>We need to discuss design patterns. We need to consider feature onboarding and all the other real-world architecture problems. Vibe coding is great for building a PoC (Proof of Concept) really fast. But a PoC is <strong>not</strong> an MVP. The moment we need to turn that PoC into a real product, we still have to rely on the experience and wisdom of a human software engineer to solve those real-world problems.</p><h3 id="Wrap-Up"><a href="#Wrap-Up" class="headerlink" title="Wrap Up"></a>Wrap Up</h3><p>We used two concrete examples to explain the limits of vibe coding: one with design patterns and one with table-driven testing.</p><p>We might be thinking, “Well, can’t we just define all these rules in the system instructions?” That’s… yes and no.</p><p>There are so many design patterns. If we don’t specify which one, can the AI really pick the right one? What we call “design patterns” are split into three major categories — Creational, Structural, and Behavioral — each with dozens of different patterns.</p><p>Remember, the AI has a limited context. In a massive codebase, it needs to identify the problem, break it down, and propose the right solution. I don’t need to tell us how hard that is.</p><p>And that’s just talking about the narrow definition of design patterns. That’s not even getting into Pattern-Oriented Software Architecture or all the higher-level architectural problems like microservices, event-driven architecture, etc.</p><p>These are not problems an AI can solve just by glancing at a codebase or reading a detailed spec.</p><p>Don’t get me wrong, I’m still going to use vibe coding. But for me, its value right now has been reduced to just a super-powered auto-complete.</p><p>To put it bluntly, the auto-complete that AI gives me is just a lot more flexible than the old-school, rule-based completion. But at the end of the day, that’s all it is.</p><h3 id="A-message-from-our-Founder"><a href="#A-message-from-our-Founder" class="headerlink" title="A message from our Founder"></a>A message from our Founder</h3><p><strong>Hey,</strong> <a href="https://linkedin.com/in/sunilsandhu"><strong>Sunil</strong></a> <strong>here.</strong> I wanted to take a moment to thank you for reading until the end and for being a part of this community.</p><p>Did you know that our team run these publications as a volunteer effort to over 3.5m monthly readers? <strong>We don’t receive any funding, we do this to support the community. ❤️</strong></p><p>If you want to show some love, please take a moment to <strong>follow me on</strong> <a href="https://linkedin.com/in/sunilsandhu"><strong>LinkedIn</strong></a><strong>,</strong> <a href="https://tiktok.com/@messyfounder"><strong>TikTok</strong></a>, <a href="https://instagram.com/sunilsandhu"><strong>Instagram</strong></a>. You can also subscribe to our <a href="https://newsletter.plainenglish.io/"><strong>weekly newsletter</strong></a>.</p><p>And before you go, don’t forget to <strong>clap</strong> and <strong>follow</strong> the writer️!</p><blockquote><p>Originally published on <a href="https://medium.com/@lazypro/vibe-coding-is-cooling-off-fast-bd1ea2aa4adb">Medium</a></p></blockquote>]]>
    </content>
    <id>https://wirelessr.github.io/AI/Vibe-Coding-is-Cooling-Off-Fast/20251026/</id>
    <link href="https://wirelessr.github.io/AI/Vibe-Coding-is-Cooling-Off-Fast/20251026/"/>
    <published>2025-10-26T17:14:33.000Z</published>
    <summary>
      <![CDATA[<h3 id="Vibe-Coding-is-Cooling-Off-Fast"><a href="#Vibe-Coding-is-Cooling-Off-Fast" class="headerlink" title="Vibe Coding is Cooling]]>
    </summary>
    <title>Vibe Coding is Cooling Off, Fast</title>
    <updated>2025-10-26T17:14:33.000Z</updated>
  </entry>
  <entry>
    <author>
      <name>CT Wu</name>
    </author>
    <category term="Development" scheme="https://wirelessr.github.io/categories/Development/"/>
    <content>
      <![CDATA[<h3 id="Python-DAG-Retries-Rollbacks-Parallel-Runs"><a href="#Python-DAG-Retries-Rollbacks-Parallel-Runs" class="headerlink" title="Python DAG: Retries, Rollbacks &amp; Parallel Runs"></a>Python DAG: Retries, Rollbacks &amp; Parallel Runs</h3><h4 id="Enhance-lightweight-DAG-with-robust-features-for-production-ready-workflows"><a href="#Enhance-lightweight-DAG-with-robust-features-for-production-ready-workflows" class="headerlink" title="Enhance lightweight DAG with robust features for production-ready workflows"></a>Enhance lightweight DAG with robust features for production-ready workflows</h4><p><img src="https://cdn-images-1.medium.com/max/800/1*4kEIO3ATDrkfzHSwtKE5FA.png"></p><p>The <a href="https://medium.com/stackademic/refactor-long-method-with-a-lightweight-dag-d5fda0ae2f04">previous article</a> stopped at building a lightweight DAG with the Command pattern. That alone already made long functions more approachable and easier to test. Over the past week I kept iterating on the idea, because real systems rarely end with a single happy-path runner.</p><p>Three concerns show up almost immediately in production code: transient failures, partial completion, and throughput. They translate nicely into three extensions on top of the original runner: <strong>retry</strong>, <strong>rollback</strong>, and <strong>parallel execution</strong>.</p><p>Before diving into the new capabilities, here is the baseline runner from last week that simply walks the graph in topological order:</p><figure class="highlight python"><table><tr><td class="gutter"><pre><span class="line">1</span><br><span class="line">2</span><br><span class="line">3</span><br><span class="line">4</span><br><span class="line">5</span><br><span class="line">6</span><br><span class="line">7</span><br><span class="line">8</span><br><span class="line">9</span><br><span class="line">10</span><br><span class="line">11</span><br><span class="line">12</span><br><span class="line">13</span><br></pre></td><td class="code"><pre><span class="line"><span class="keyword">from</span> graphlib <span class="keyword">import</span> TopologicalSorter  </span><br><span class="line">  </span><br><span class="line"><span class="keyword">class</span> <span class="title class_">DAGRunner</span>:  </span><br><span class="line">    <span class="keyword">def</span> <span class="title function_">__init__</span>(<span class="params">self, graph_definition: <span class="built_in">dict</span>, commands: <span class="built_in">dict</span></span>):  </span><br><span class="line">        self.ts = TopologicalSorter(graph_definition)  </span><br><span class="line">        self.commands = commands  </span><br><span class="line">  </span><br><span class="line">    <span class="keyword">def</span> <span class="title function_">run</span>(<span class="params">self</span>):  </span><br><span class="line">        context = &#123;&#125;  </span><br><span class="line">        self.ts.prepare()  </span><br><span class="line">        <span class="keyword">for</span> task_name <span class="keyword">in</span> self.ts.static_order():  </span><br><span class="line">            self.commands[task_name].execute(context)  </span><br><span class="line">        <span class="keyword">return</span> context</span><br></pre></td></tr></table></figure><p>This runner is the foundation for every extension in this article.</p><p>What matters here is that all three enhancements live inside the runner. The commands stay thin, the workflow definition stays declarative, and the abstraction keeps paying off. Let’s walk through each scenario.</p><h3 id="Handling-retries-without-polluting-business-logic"><a href="#Handling-retries-without-polluting-business-logic" class="headerlink" title="Handling retries without polluting business logic"></a>Handling retries without polluting business logic</h3><p>External integrations fail from time to time. The naive solution is to wrap every command in its own retry loop, but that instantly clutters the code we just spent effort to clean up. Moving retries into the runner keeps the commands focused while letting us tune policies centrally.</p><figure class="highlight python"><table><tr><td class="gutter"><pre><span class="line">1</span><br><span class="line">2</span><br><span class="line">3</span><br><span class="line">4</span><br><span class="line">5</span><br><span class="line">6</span><br><span class="line">7</span><br><span class="line">8</span><br><span class="line">9</span><br><span class="line">10</span><br><span class="line">11</span><br><span class="line">12</span><br><span class="line">13</span><br><span class="line">14</span><br><span class="line">15</span><br><span class="line">16</span><br><span class="line">17</span><br><span class="line">18</span><br><span class="line">19</span><br><span class="line">20</span><br><span class="line">21</span><br><span class="line">22</span><br><span class="line">23</span><br><span class="line">24</span><br><span class="line">25</span><br><span class="line">26</span><br><span class="line">27</span><br><span class="line">28</span><br></pre></td><td class="code"><pre><span class="line"><span class="keyword">import</span> time  </span><br><span class="line"><span class="keyword">from</span> graphlib <span class="keyword">import</span> TopologicalSorter  </span><br><span class="line">  </span><br><span class="line"><span class="keyword">class</span> <span class="title class_">DAGRunnerWithRetry</span>:  </span><br><span class="line">    <span class="keyword">def</span> <span class="title function_">__init__</span>(<span class="params">self, graph_definition: <span class="built_in">dict</span>, commands: <span class="built_in">dict</span>, *, max_retries: <span class="built_in">int</span> = <span class="number">3</span>, retry_delay: <span class="built_in">float</span> = <span class="number">1.0</span></span>):  </span><br><span class="line">        self.ts = TopologicalSorter(graph_definition)  </span><br><span class="line">        self.commands = commands  </span><br><span class="line">        self.max_retries = max_retries  </span><br><span class="line">        self.retry_delay = retry_delay  </span><br><span class="line">  </span><br><span class="line">    <span class="keyword">def</span> <span class="title function_">run</span>(<span class="params">self</span>):  </span><br><span class="line">        context = &#123;&#125;  </span><br><span class="line">        self.ts.prepare()  </span><br><span class="line">        <span class="keyword">for</span> task_name <span class="keyword">in</span> self.ts.static_order():  </span><br><span class="line">            command = self.commands[task_name]  </span><br><span class="line">            last_error = <span class="literal">None</span>  </span><br><span class="line">            <span class="keyword">for</span> attempt <span class="keyword">in</span> <span class="built_in">range</span>(<span class="number">1</span>, self.max_retries + <span class="number">1</span>):  </span><br><span class="line">                <span class="keyword">try</span>:  </span><br><span class="line">                    command.execute(context)  </span><br><span class="line">                    last_error = <span class="literal">None</span>  </span><br><span class="line">                    <span class="keyword">break</span>  </span><br><span class="line">                <span class="keyword">except</span> Exception <span class="keyword">as</span> exc:  </span><br><span class="line">                    last_error = exc  </span><br><span class="line">                    <span class="keyword">if</span> attempt &lt; self.max_retries:  </span><br><span class="line">                        time.sleep(self.retry_delay)  </span><br><span class="line">            <span class="keyword">if</span> last_error <span class="keyword">is</span> <span class="keyword">not</span> <span class="literal">None</span>:  </span><br><span class="line">                <span class="keyword">raise</span> last_error  </span><br><span class="line">        <span class="keyword">return</span> context</span><br></pre></td></tr></table></figure><p>The graph still decides the order, while the runner handles the repeated attempts. Any transient exception is retried in place; once the configured attempts are exhausted, the original error propagates.</p><h3 id="Rolling-back-after-a-failed-step"><a href="#Rolling-back-after-a-failed-step" class="headerlink" title="Rolling back after a failed step"></a>Rolling back after a failed step</h3><p>The next requirement is undoing work if a later step fails. The Command pattern already hinted at this with its symmetric interface, so introducing <code>undo</code> is a natural extension. The runner simply needs to record the successful commands and process them in reverse when an error bubbles up.</p><figure class="highlight python"><table><tr><td class="gutter"><pre><span class="line">1</span><br><span class="line">2</span><br><span class="line">3</span><br><span class="line">4</span><br><span class="line">5</span><br><span class="line">6</span><br><span class="line">7</span><br><span class="line">8</span><br><span class="line">9</span><br><span class="line">10</span><br><span class="line">11</span><br><span class="line">12</span><br><span class="line">13</span><br><span class="line">14</span><br><span class="line">15</span><br><span class="line">16</span><br><span class="line">17</span><br><span class="line">18</span><br><span class="line">19</span><br><span class="line">20</span><br><span class="line">21</span><br></pre></td><td class="code"><pre><span class="line"><span class="keyword">from</span> graphlib <span class="keyword">import</span> TopologicalSorter  </span><br><span class="line">  </span><br><span class="line"><span class="keyword">class</span> <span class="title class_">DAGRunnerWithRollback</span>:  </span><br><span class="line">    <span class="keyword">def</span> <span class="title function_">__init__</span>(<span class="params">self, graph_definition: <span class="built_in">dict</span>, commands: <span class="built_in">dict</span></span>):  </span><br><span class="line">        self.ts = TopologicalSorter(graph_definition)  </span><br><span class="line">        self.commands = commands  </span><br><span class="line">  </span><br><span class="line">    <span class="keyword">def</span> <span class="title function_">run</span>(<span class="params">self</span>):  </span><br><span class="line">        context = &#123;&#125;  </span><br><span class="line">        successful_commands = []  </span><br><span class="line">        <span class="keyword">try</span>:  </span><br><span class="line">            self.ts.prepare()  </span><br><span class="line">            <span class="keyword">for</span> task_name <span class="keyword">in</span> self.ts.static_order():  </span><br><span class="line">                command = self.commands[task_name]  </span><br><span class="line">                command.execute(context)  </span><br><span class="line">                successful_commands.append(command)  </span><br><span class="line">        <span class="keyword">except</span> Exception <span class="keyword">as</span> exc:  </span><br><span class="line">            <span class="keyword">for</span> command <span class="keyword">in</span> <span class="built_in">reversed</span>(successful_commands):  </span><br><span class="line">                command.undo(context)  </span><br><span class="line">            <span class="keyword">raise</span> exc  </span><br><span class="line">        <span class="keyword">return</span> context</span><br></pre></td></tr></table></figure><p>Each command now implements both <code>execute</code> and <code>undo</code>. When a later task fails, the runner cleans up previously completed work in last-in-first-out order, mirroring the graph execution.</p><h3 id="Unlocking-parallel-branches"><a href="#Unlocking-parallel-branches" class="headerlink" title="Unlocking parallel branches"></a>Unlocking parallel branches</h3><p>Many workflows contain independent branches that can safely run side by side once their prerequisites finish. The original runner executes nodes sequentially even when the graph exposes available concurrency. Switching to a thread pool allows the runner to schedule every ready node without rewriting the business logic.</p><figure class="highlight python"><table><tr><td class="gutter"><pre><span class="line">1</span><br><span class="line">2</span><br><span class="line">3</span><br><span class="line">4</span><br><span class="line">5</span><br><span class="line">6</span><br><span class="line">7</span><br><span class="line">8</span><br><span class="line">9</span><br><span class="line">10</span><br><span class="line">11</span><br><span class="line">12</span><br><span class="line">13</span><br><span class="line">14</span><br><span class="line">15</span><br><span class="line">16</span><br><span class="line">17</span><br><span class="line">18</span><br><span class="line">19</span><br><span class="line">20</span><br><span class="line">21</span><br><span class="line">22</span><br><span class="line">23</span><br><span class="line">24</span><br><span class="line">25</span><br><span class="line">26</span><br><span class="line">27</span><br></pre></td><td class="code"><pre><span class="line"><span class="keyword">from</span> concurrent.futures <span class="keyword">import</span> ThreadPoolExecutor, as_completed  </span><br><span class="line"><span class="keyword">from</span> graphlib <span class="keyword">import</span> TopologicalSorter  </span><br><span class="line">  </span><br><span class="line"><span class="keyword">class</span> <span class="title class_">DAGRunnerWithParallel</span>:  </span><br><span class="line">    <span class="keyword">def</span> <span class="title function_">__init__</span>(<span class="params">self, graph_definition: <span class="built_in">dict</span>, commands: <span class="built_in">dict</span></span>):  </span><br><span class="line">        self.ts = TopologicalSorter(graph_definition)  </span><br><span class="line">        self.commands = commands  </span><br><span class="line">  </span><br><span class="line">    <span class="keyword">def</span> <span class="title function_">run</span>(<span class="params">self</span>):  </span><br><span class="line">        context = &#123;&#125;  </span><br><span class="line">        self.ts.prepare()  </span><br><span class="line">        <span class="keyword">with</span> ThreadPoolExecutor() <span class="keyword">as</span> executor:  </span><br><span class="line">            futures = &#123;&#125;  </span><br><span class="line">            <span class="keyword">while</span> self.ts.is_active():  </span><br><span class="line">                <span class="keyword">for</span> task_name <span class="keyword">in</span> self.ts.get_ready():  </span><br><span class="line">                    command = self.commands[task_name]  </span><br><span class="line">                    futures[executor.submit(command.execute, context)] = task_name  </span><br><span class="line">                <span class="keyword">for</span> future <span class="keyword">in</span> as_completed(<span class="built_in">list</span>(futures)):  </span><br><span class="line">                    task_name = futures.pop(future)  </span><br><span class="line">                    <span class="keyword">try</span>:  </span><br><span class="line">                        future.result()  </span><br><span class="line">                        self.ts.done(task_name)  </span><br><span class="line">                    <span class="keyword">except</span> Exception:  </span><br><span class="line">                        <span class="keyword">for</span> pending <span class="keyword">in</span> futures:  </span><br><span class="line">                            pending.cancel()  </span><br><span class="line">                        <span class="keyword">raise</span>  </span><br><span class="line">        <span class="keyword">return</span> context</span><br></pre></td></tr></table></figure><p>The runner keeps asking the topological sorter for ready nodes, submits them to the executor, and marks each task as complete once the future finishes. If any parallel branch fails, the remaining futures are cancelled and the error is surfaced immediately.</p><h3 id="Wrap-Up"><a href="#Wrap-Up" class="headerlink" title="Wrap Up"></a>Wrap Up</h3><p>All three extensions reuse the same two abstractions introduced earlier: the DAG encodes dependency, and Command encapsulates each operation behind a stable interface. Because the runner owns orchestration, we can iteratively add capabilities such as retry strategies, rollback semantics, and parallel scheduling without rewriting domain logic.</p><p>That’s the real payoff of the abstraction. Once the seams are in place, new requirements stay localized, the codebase remains comprehensible, and future experiments can continue to build on the same foundation.</p><h3 id="A-message-from-our-Founder"><a href="#A-message-from-our-Founder" class="headerlink" title="A message from our Founder"></a>A message from our Founder</h3><p><strong>Hey,</strong> <a href="https://linkedin.com/in/sunilsandhu"><strong>Sunil</strong></a> <strong>here.</strong> I wanted to take a moment to thank you for reading until the end and for being a part of this community.</p><p>Did you know that our team run these publications as a volunteer effort to over 3.5m monthly readers? <strong>We don’t receive any funding, we do this to support the community. ❤️</strong></p><p>If you want to show some love, please take a moment to <strong>follow me on</strong> <a href="https://linkedin.com/in/sunilsandhu"><strong>LinkedIn</strong></a><strong>,</strong> <a href="https://tiktok.com/@messyfounder"><strong>TikTok</strong></a>, <a href="https://instagram.com/sunilsandhu"><strong>Instagram</strong></a>. You can also subscribe to our <a href="https://newsletter.plainenglish.io/"><strong>weekly newsletter</strong></a>.</p><p>And before you go, don’t forget to <strong>clap</strong> and <strong>follow</strong> the writer️!</p><blockquote><p>Originally published on <a href="https://medium.com/@lazypro/python-dag-retries-rollbacks-parallel-runs-5a5362353ea5">Medium</a></p></blockquote>]]>
    </content>
    <id>https://wirelessr.github.io/Development/Python-DAG-Retries-Rollbacks-Parallel-Runs/20251005/</id>
    <link href="https://wirelessr.github.io/Development/Python-DAG-Retries-Rollbacks-Parallel-Runs/20251005/"/>
    <published>2025-10-05T17:37:53.000Z</published>
    <summary>
      <![CDATA[<h3 id="Python-DAG-Retries-Rollbacks-Parallel-Runs"><a href="#Python-DAG-Retries-Rollbacks-Parallel-Runs" class="headerlink" title="Python]]>
    </summary>
    <title>
      <![CDATA[Python DAG: Retries, Rollbacks & Parallel Runs]]>
    </title>
    <updated>2025-10-05T17:37:53.000Z</updated>
  </entry>
  <entry>
    <author>
      <name>CT Wu</name>
    </author>
    <category term="Architecture" scheme="https://wirelessr.github.io/categories/Architecture/"/>
    <content>
      <![CDATA[<h4 id="Tame-complex-workflows-and-simplify-testing-with-the-Command-design-pattern"><a href="#Tame-complex-workflows-and-simplify-testing-with-the-Command-design-pattern" class="headerlink" title="Tame complex workflows and simplify testing with the Command design pattern"></a>Tame complex workflows and simplify testing with the Command design pattern</h4><p><img src="https://cdn-images-1.medium.com/max/800/1*tcU611MD19oGjo6esmgANA.png"></p><p>Reviewing some legacy code lately has given me a headache.</p><p>The main issue is one massive function crammed with every piece of logic spread out flat inside it. I have to say, this is what I consider the worst kind of “code smell.”</p><p>You might ask, “But this function works fine, so what’s wrong with it?”</p><p>If it were a static function with no further iterations needed, that’d be fine. But if this function still requires iterations, or worse, isn’t even stable yet with a bunch of process bugs still needing fixing, then it’s absolutely terrible.</p><p>Modifying the flow of a massive function is challenging, whether adding conditional checks or introducing new steps. First, developers must understand every existing process to grasp the context and make changes.</p><p>After spending tremendous effort to understand the function and complete the modification, the next problem is how to test it.</p><p>If it’s a massive function, I believe its unit tests are likely filled with various mocks. Once part of the logic is modified, the worst-case is that all unit tests fail. Moreover, these failures aren’t due to test scenario issues, but simply because the mocks no longer work.</p><p>The book Refactoring also ranks Long Methods very high among code smells.</p><p>To sum up, a massive function causes numerous problems. So, are there any effective approaches to mitigate this?</p><h3 id="Abstraction"><a href="#Abstraction" class="headerlink" title="Abstraction"></a>Abstraction</h3><p>Software development is essentially a series of abstraction processes.</p><p>Therefore, the most common approach to solving the Long Method problem is to encapsulate each process node into a sub-method. Through effective naming of these sub-methods, we can more easily understand the original complete workflow.</p><p>Each sub-method also facilitates unit testing. By ensuring each sub-method functions correctly, the overall behavior remains correct as long as the flow is accurate.</p><p>Abstracting a massive function resolves the first issue: maintainability. New team members can grasp the flow faster and continue development.</p><p>However, sub-methods alone cannot solve every problem.</p><p>For example, in the following example we break down a complex <code>handle_order</code> into a clear, step-by-step process, making it easy for anyone taking over to understand it.</p><figure class="highlight python"><table><tr><td class="gutter"><pre><span class="line">1</span><br><span class="line">2</span><br><span class="line">3</span><br><span class="line">4</span><br><span class="line">5</span><br><span class="line">6</span><br><span class="line">7</span><br><span class="line">8</span><br><span class="line">9</span><br></pre></td><td class="code"><pre><span class="line"><span class="keyword">def</span> <span class="title function_">handle_order</span>(<span class="params">order_data</span>):   </span><br><span class="line">    ok = validateOrder(order_data)  </span><br><span class="line">    <span class="keyword">if</span> <span class="keyword">not</span> ok: <span class="keyword">raise</span> ValidateException()  </span><br><span class="line">  </span><br><span class="line">    ok = processPayment(order_data)  </span><br><span class="line">    <span class="keyword">if</span> <span class="keyword">not</span> ok: <span class="keyword">raise</span> ProcessException()  </span><br><span class="line">      </span><br><span class="line">    ok = sendNotification(order_data)  </span><br><span class="line">    <span class="keyword">if</span> <span class="keyword">not</span> ok: <span class="keyword">raise</span> NotificationException()</span><br></pre></td></tr></table></figure><p>Now, we want to add a new process, which is when the order amount exceeds 1000, we need to incorporate an approval step.</p><figure class="highlight python"><table><tr><td class="gutter"><pre><span class="line">1</span><br><span class="line">2</span><br><span class="line">3</span><br><span class="line">4</span><br><span class="line">5</span><br><span class="line">6</span><br><span class="line">7</span><br><span class="line">8</span><br><span class="line">9</span><br><span class="line">10</span><br><span class="line">11</span><br><span class="line">12</span><br><span class="line">13</span><br></pre></td><td class="code"><pre><span class="line"><span class="keyword">def</span> <span class="title function_">handle_order</span>(<span class="params">order_data</span>):   </span><br><span class="line">    ok = validateOrder(order_data)  </span><br><span class="line">    <span class="keyword">if</span> <span class="keyword">not</span> ok: <span class="keyword">raise</span> ValidateException()  </span><br><span class="line">  </span><br><span class="line">    ok = processPayment(order_data)  </span><br><span class="line">    <span class="keyword">if</span> <span class="keyword">not</span> ok: <span class="keyword">raise</span> ProcessException()  </span><br><span class="line">      </span><br><span class="line">    <span class="keyword">if</span> order_data[<span class="string">&#x27;amount&#x27;</span>] &gt; <span class="number">1000</span>:  </span><br><span class="line">        ok = approval(order_data)  </span><br><span class="line">        <span class="keyword">if</span> <span class="keyword">not</span> ok: <span class="keyword">raise</span> ApprovalException()  </span><br><span class="line">      </span><br><span class="line">    ok = sendNotification(order_data)  </span><br><span class="line">    <span class="keyword">if</span> <span class="keyword">not</span> ok: <span class="keyword">raise</span> NotificationException()</span><br></pre></td></tr></table></figure><p>Looks fine, right?</p><p>My first thought is it looks a bit tricky to write tests for.</p><p>Let’s write a classic Python test case to demonstrate the underlying logic behind testing.</p><figure class="highlight plaintext"><table><tr><td class="gutter"><pre><span class="line">1</span><br><span class="line">2</span><br><span class="line">3</span><br><span class="line">4</span><br><span class="line">5</span><br><span class="line">6</span><br><span class="line">7</span><br><span class="line">8</span><br><span class="line">9</span><br><span class="line">10</span><br><span class="line">11</span><br><span class="line">12</span><br><span class="line">13</span><br><span class="line">14</span><br><span class="line">15</span><br><span class="line">16</span><br><span class="line">17</span><br><span class="line">18</span><br><span class="line">19</span><br><span class="line">20</span><br><span class="line">21</span><br><span class="line">22</span><br><span class="line">23</span><br></pre></td><td class="code"><pre><span class="line">@patch(&#x27;orders.sendNotification&#x27;)  </span><br><span class="line">@patch(&#x27;orders.approval&#x27;)  </span><br><span class="line">@patch(&#x27;orders.processPayment&#x27;)  </span><br><span class="line">@patch(&#x27;orders.validateOrder&#x27;)  </span><br><span class="line">def test_approval_is_called_when_amount_is_high(self, mock_validate, mock_payment, mock_approval, mock_notification):  </span><br><span class="line">    # 1. Arrange  </span><br><span class="line">    mock_validate.return_value = True  </span><br><span class="line">    mock_payment.return_value = True  </span><br><span class="line">    mock_approval.return_value = True  </span><br><span class="line">    mock_notification.return_value = True  </span><br><span class="line">  </span><br><span class="line">    order_data = &#123;&#x27;amount&#x27;: 1500, &#x27;user_id&#x27;: &#x27;U123&#x27;&#125;  </span><br><span class="line">  </span><br><span class="line">    # 2. Act  </span><br><span class="line">    handle_order(order_data)  </span><br><span class="line">  </span><br><span class="line">    # 3. Assert  </span><br><span class="line">    mock_validate.assert_called_once()  </span><br><span class="line">    mock_payment.assert_called_once()  </span><br><span class="line">    mock_notification.assert_called_once()  </span><br><span class="line">      </span><br><span class="line">    # Core assert  </span><br><span class="line">    mock_approval.assert_called_once()</span><br></pre></td></tr></table></figure><p>This test presents several challenges for me.</p><ol><li>An overwhelming number of mocks, making them extremely difficult to manage</li><li>The use of <code>assert_called_once</code> to validate logic feels counterintuitive</li><li>When if-else conditions multiply, such test cases become highly confusing.</li></ol><p>Therefore, simply extracting sub-methods is insufficient for achieving a high level of abstraction.</p><h3 id="Where’s-the-problem"><a href="#Where’s-the-problem" class="headerlink" title="Where’s the problem?"></a>Where’s the problem?</h3><p>I believe most software development or refactoring actually stops at the previous step. Then layers upon layers get stacked between sub-methods, and eventually spaghetti code emerges.</p><p>Because we haven’t achieved true abstraction.</p><blockquote><p><em>The purpose of abstraction is not to be vague, but to create a new semantic level in which one can be absolutely precise. — Edsger Dijkstra</em></p></blockquote><p>We only handled the syntax but not the semantics.</p><p>If it were me, I would do it this way.</p><p>First, we abstract these tasks to be executed into individual tasks.</p><p>So we would have an abstract list (A, B, C, D), which is the ultimate expression of abstraction.</p><figure class="highlight plaintext"><table><tr><td class="gutter"><pre><span class="line">1</span><br><span class="line">2</span><br><span class="line">3</span><br><span class="line">4</span><br><span class="line">5</span><br><span class="line">6</span><br></pre></td><td class="code"><pre><span class="line">commands = &#123;  </span><br><span class="line">    &#x27;A&#x27;: validateOrder,  </span><br><span class="line">    &#x27;B&#x27;: processPayment,  </span><br><span class="line">    &#x27;C&#x27;: approval,  </span><br><span class="line">    &#x27;D&#x27;: sendNotification,  </span><br><span class="line">&#125;</span><br></pre></td></tr></table></figure><p>We’ve transformed the entire handle order process into the following two types.</p><ol><li>A -&gt; B -&gt; D</li><li>A -&gt; B -&gt; C -&gt; D</li></ol><p>This essentially forms a directed acyclic graph (DAG).</p><p>Consequently, our subsequent tasks involve DAG operations, where any workflow modification simply adds a node or an edge. Our validation no longer needs to focus on what each node does; we only need to verify that the DAG matches our expectations.</p><p>In other words, we are comparing whether <code>assert(workflow == “A -&gt; B -&gt; C -&gt; D”)</code> holds true under specific conditions.</p><h3 id="Command-Design-Pattern"><a href="#Command-Design-Pattern" class="headerlink" title="Command Design Pattern"></a>Command Design Pattern</h3><p>We have now abstracted the process into a DAG, but this is still insufficient.</p><p>For each node, its interface is not standardized, so we cannot treat all nodes equally. Therefore, we need to introduce a common interface for these nodes. In design patterns, there is one that fits this scenario perfectly, called Command.</p><p>Since these nodes are essentially operations, using Command also satisfies the semantic requirements.</p><figure class="highlight python"><table><tr><td class="gutter"><pre><span class="line">1</span><br><span class="line">2</span><br><span class="line">3</span><br><span class="line">4</span><br><span class="line">5</span><br><span class="line">6</span><br><span class="line">7</span><br><span class="line">8</span><br><span class="line">9</span><br><span class="line">10</span><br><span class="line">11</span><br><span class="line">12</span><br><span class="line">13</span><br><span class="line">14</span><br><span class="line">15</span><br><span class="line">16</span><br><span class="line">17</span><br><span class="line">18</span><br><span class="line">19</span><br><span class="line">20</span><br><span class="line">21</span><br><span class="line">22</span><br><span class="line">23</span><br></pre></td><td class="code"><pre><span class="line"><span class="keyword">class</span> <span class="title class_">OrderProcessingReceiver</span>:  </span><br><span class="line">    <span class="keyword">def</span> <span class="title function_">validate_order</span>(<span class="params">self, context</span>): <span class="built_in">print</span>(<span class="string">&quot;Step A: validate order&quot;</span>)  </span><br><span class="line">    <span class="keyword">def</span> <span class="title function_">process_payment</span>(<span class="params">self, context</span>): <span class="built_in">print</span>(<span class="string">&quot;Step B: process payment&quot;</span>)  </span><br><span class="line">    <span class="keyword">def</span> <span class="title function_">manual_approval</span>(<span class="params">self, context</span>): <span class="built_in">print</span>(<span class="string">&quot;Step C: approval&quot;</span>)  </span><br><span class="line">    <span class="keyword">def</span> <span class="title function_">send_notification</span>(<span class="params">self, context</span>): <span class="built_in">print</span>(<span class="string">&quot;Step D: send notification&quot;</span>)  </span><br><span class="line">  </span><br><span class="line"><span class="keyword">class</span> <span class="title class_">Command</span>(<span class="title class_ inherited__">ABC</span>):  </span><br><span class="line">    <span class="keyword">def</span> <span class="title function_">__init__</span>(<span class="params">self, receiver</span>): self._receiver = receiver  </span><br><span class="line">      </span><br><span class="line"><span class="meta">    @abstractmethod  </span></span><br><span class="line">    <span class="keyword">def</span> <span class="title function_">execute</span>(<span class="params">self, context</span>): <span class="keyword">pass</span>  </span><br><span class="line">  </span><br><span class="line"><span class="keyword">class</span> <span class="title class_">ValidateOrderCommand</span>(<span class="title class_ inherited__">Command</span>):  </span><br><span class="line">    <span class="keyword">def</span> <span class="title function_">execute</span>(<span class="params">self, context</span>): self._receiver.validate_order(context)  </span><br><span class="line">      </span><br><span class="line"><span class="keyword">class</span> <span class="title class_">ProcessPaymentCommand</span>(<span class="title class_ inherited__">Command</span>):  </span><br><span class="line">    <span class="keyword">def</span> <span class="title function_">execute</span>(<span class="params">self, context</span>): self._receiver.process_payment(context)  </span><br><span class="line">      </span><br><span class="line"><span class="keyword">class</span> <span class="title class_">ManualApprovalCommand</span>(<span class="title class_ inherited__">Command</span>):  </span><br><span class="line">    <span class="keyword">def</span> <span class="title function_">execute</span>(<span class="params">self, context</span>): self._receiver.manual_approval(context)  </span><br><span class="line">      </span><br><span class="line"><span class="keyword">class</span> <span class="title class_">SendNotificationCommand</span>(<span class="title class_ inherited__">Command</span>):  </span><br><span class="line">    <span class="keyword">def</span> <span class="title function_">execute</span>(<span class="params">self, context</span>): self._receiver.send_notification(context)</span><br></pre></td></tr></table></figure><p>We consolidated all logic under a single class, <code>OrderProcessingReceiver</code>, to prevent workflow logic from being scattered across multiple locations.</p><p>Next, we defined the standard Command interface method <code>execute</code>. With this Command, we can create the operation classes for the four nodes on the DAG, which will later be converted into nodes A, B, C, and D.</p><h3 id="DAG-Builder"><a href="#DAG-Builder" class="headerlink" title="DAG Builder"></a>DAG Builder</h3><p>Once we have our operations, we proceed to create the DAG.</p><p>First, we need methods to create nodes and edges. In fact, Python 3.9 and later includes a built-in library <code>graphlib</code> that already handles this. We don’t need to reinvent the wheel ourselves.</p><p>However, the data structures used by <code>graphlib</code> are a bit ugly, and I’m not particularly comfortable with them.</p><pre><code class="highlight mermaid">graph = &#123;      &#x27;A&#x27;: set(),      &#x27;B&#x27;: &#123;&#x27;A&#x27;&#125;,      &#x27;C&#x27;: &#123;&#x27;B&#x27;&#125;,      &#x27;D&#x27;: &#123;&#x27;C&#x27;&#125;  &#125;</code></pre><p>The DAG generated by the graph above would be A -&gt; B -&gt; C -&gt; D. However, you may notice that this definition reverses the order of the DAG, which I personally find counterintuitive. Therefore, I referenced <a href="https://airflow.apache.org/">Airflow</a>’s notation and made some modifications.</p><figure class="highlight python"><table><tr><td class="gutter"><pre><span class="line">1</span><br><span class="line">2</span><br><span class="line">3</span><br><span class="line">4</span><br><span class="line">5</span><br><span class="line">6</span><br><span class="line">7</span><br><span class="line">8</span><br><span class="line">9</span><br><span class="line">10</span><br><span class="line">11</span><br><span class="line">12</span><br><span class="line">13</span><br><span class="line">14</span><br><span class="line">15</span><br><span class="line">16</span><br><span class="line">17</span><br><span class="line">18</span><br><span class="line">19</span><br><span class="line">20</span><br></pre></td><td class="code"><pre><span class="line"><span class="keyword">class</span> <span class="title class_">DAGBuilder</span>:  </span><br><span class="line">    <span class="keyword">def</span> <span class="title function_">__init__</span>(<span class="params">self</span>):   </span><br><span class="line">        self.graph, self._nodes = &#123;&#125;, &#123;&#125;  </span><br><span class="line">      </span><br><span class="line">    <span class="keyword">def</span> <span class="title function_">task</span>(<span class="params">self, name</span>):  </span><br><span class="line">        <span class="keyword">if</span> name <span class="keyword">not</span> <span class="keyword">in</span> self._nodes:  </span><br><span class="line">            self.graph.setdefault(name, <span class="built_in">set</span>())  </span><br><span class="line">            self._nodes[name] = self._Node(self, name)  </span><br><span class="line">        <span class="keyword">return</span> self._nodes[name]  </span><br><span class="line">      </span><br><span class="line">    <span class="keyword">def</span> <span class="title function_">build</span>(<span class="params">self</span>):   </span><br><span class="line">        <span class="keyword">return</span> self.graph  </span><br><span class="line">      </span><br><span class="line">    <span class="keyword">class</span> <span class="title class_">_Node</span>:  </span><br><span class="line">        <span class="keyword">def</span> <span class="title function_">__init__</span>(<span class="params">self, builder, name</span>):   </span><br><span class="line">            self.builder, self.name = builder, name  </span><br><span class="line">              </span><br><span class="line">        <span class="keyword">def</span> <span class="title function_">__rshift__</span>(<span class="params">self, other</span>):  </span><br><span class="line">            self.builder.graph[other.name].add(self.name)  </span><br><span class="line">            <span class="keyword">return</span> other</span><br></pre></td></tr></table></figure><p>Within the node, I overrode <code>__rshift__</code>. This is purely to make the edges in the entire DAG resemble Airflow’s style. Using it is essentially syntactic sugar.</p><p>By combining our original example with this <code>DAGBuilder</code>, we can now implement a workflow that generates a DAG.</p><figure class="highlight python"><table><tr><td class="gutter"><pre><span class="line">1</span><br><span class="line">2</span><br><span class="line">3</span><br><span class="line">4</span><br><span class="line">5</span><br><span class="line">6</span><br><span class="line">7</span><br><span class="line">8</span><br><span class="line">9</span><br><span class="line">10</span><br><span class="line">11</span><br><span class="line">12</span><br><span class="line">13</span><br><span class="line">14</span><br><span class="line">15</span><br></pre></td><td class="code"><pre><span class="line"><span class="keyword">def</span> <span class="title function_">create_workflow_blueprint</span>(<span class="params">order_data: <span class="built_in">dict</span></span>) -&gt; <span class="built_in">dict</span>:  </span><br><span class="line">    builder = DAGBuilder()  </span><br><span class="line">    task_a = builder.task(<span class="string">&#x27;A&#x27;</span>)  </span><br><span class="line">    task_b = builder.task(<span class="string">&#x27;B&#x27;</span>)  </span><br><span class="line">    task_c = builder.task(<span class="string">&#x27;C&#x27;</span>)  </span><br><span class="line">    task_d = builder.task(<span class="string">&#x27;D&#x27;</span>)  </span><br><span class="line">  </span><br><span class="line">    task_a &gt;&gt; task_b  </span><br><span class="line">    <span class="keyword">if</span> order_data[<span class="string">&#x27;amount&#x27;</span>] &gt; <span class="number">1000</span>:  </span><br><span class="line">        task_b &gt;&gt; task_c  </span><br><span class="line">        task_c &gt;&gt; task_d  </span><br><span class="line">    <span class="keyword">else</span>:  </span><br><span class="line">        task_b &gt;&gt; task_d  </span><br><span class="line">          </span><br><span class="line">    <span class="keyword">return</span> builder.build()</span><br></pre></td></tr></table></figure><p>At this point, we can abstract the entire process into a unified notation. But we need to execute this workflow, right?</p><p>So let’s continue.</p><h3 id="DAG-Runner"><a href="#DAG-Runner" class="headerlink" title="DAG Runner"></a>DAG Runner</h3><p>We have previously performed numerous abstractions.</p><ol><li>Abstracting the workflow into a DAG</li><li>Abstracting operations into Commands</li></ol><p>Now, we will combine these two to transform this DAG into an executable sequence of Commands.</p><figure class="highlight python"><table><tr><td class="gutter"><pre><span class="line">1</span><br><span class="line">2</span><br><span class="line">3</span><br><span class="line">4</span><br><span class="line">5</span><br><span class="line">6</span><br><span class="line">7</span><br><span class="line">8</span><br><span class="line">9</span><br><span class="line">10</span><br><span class="line">11</span><br><span class="line">12</span><br><span class="line">13</span><br></pre></td><td class="code"><pre><span class="line"><span class="keyword">from</span> graphlib <span class="keyword">import</span> TopologicalSorter  </span><br><span class="line">  </span><br><span class="line"><span class="keyword">class</span> <span class="title class_">DAGRunner</span>:  </span><br><span class="line">    <span class="keyword">def</span> <span class="title function_">__init__</span>(<span class="params">self, graph_definition, commands</span>):  </span><br><span class="line">        self.ts = TopologicalSorter(graph_definition)  </span><br><span class="line">        self.commands = commands  </span><br><span class="line">          </span><br><span class="line">    <span class="keyword">def</span> <span class="title function_">run</span>(<span class="params">self</span>):  </span><br><span class="line">        context = &#123;&#125;  </span><br><span class="line">        self.ts.prepare()  </span><br><span class="line">        <span class="keyword">for</span> task_name <span class="keyword">in</span> self.ts.static_order():  </span><br><span class="line">            self.commands[task_name].execute(context)  </span><br><span class="line">        <span class="keyword">return</span> context</span><br></pre></td></tr></table></figure><p>This runner doesn’t do anything special. It simply takes the DAG we just generated and our defined commands, feeds them in, and executes them in order using the <code>TopologicalSorter</code>.</p><p>The <code>TopologicalSorter</code> correctly extracts the node that should be executed at any given moment based on the DAG’s content, then finds the corresponding operation in the command list and executes it.</p><p>Finally, let’s see what <code>handle_order</code> will look like.</p><figure class="highlight python"><table><tr><td class="gutter"><pre><span class="line">1</span><br><span class="line">2</span><br><span class="line">3</span><br><span class="line">4</span><br><span class="line">5</span><br><span class="line">6</span><br><span class="line">7</span><br><span class="line">8</span><br><span class="line">9</span><br><span class="line">10</span><br><span class="line">11</span><br><span class="line">12</span><br><span class="line">13</span><br></pre></td><td class="code"><pre><span class="line"><span class="keyword">def</span> <span class="title function_">handle_order</span>(<span class="params">order_data</span>):  </span><br><span class="line">    graph_def = create_workflow_blueprint(order_data)  </span><br><span class="line">      </span><br><span class="line">    receiver = OrderProcessingReceiver()  </span><br><span class="line">    commands = &#123;  </span><br><span class="line">        <span class="string">&#x27;A&#x27;</span>: ValidateOrderCommand(receiver),  </span><br><span class="line">        <span class="string">&#x27;B&#x27;</span>: ProcessPaymentCommand(receiver),  </span><br><span class="line">        <span class="string">&#x27;C&#x27;</span>: ManualApprovalCommand(receiver),   </span><br><span class="line">        <span class="string">&#x27;D&#x27;</span>: SendNotificationCommand(receiver),  </span><br><span class="line">    &#125;  </span><br><span class="line">      </span><br><span class="line">    runner = DAGRunner(graph_def, commands)  </span><br><span class="line">    runner.run()</span><br></pre></td></tr></table></figure><h3 id="Conclusion"><a href="#Conclusion" class="headerlink" title="Conclusion"></a>Conclusion</h3><p>From the final <code>handle_order</code> method, we can see that when abstraction is taken to its extreme, the main program contains no “impurities.” All workflow logic is defined in <code>create_workflow_blueprint</code>, while all operations reside in <code>OrderProcessingReceiver</code>.</p><p>When writing tests, unit tests only need to focus on the internal implementation of each Command, ensuring each Command is correct. Integration tests become even simpler, requiring only verification that <code>create_workflow_blueprint</code> produces the expected DAG.</p><p>For example.</p><figure class="highlight python"><table><tr><td class="gutter"><pre><span class="line">1</span><br><span class="line">2</span><br><span class="line">3</span><br><span class="line">4</span><br><span class="line">5</span><br><span class="line">6</span><br><span class="line">7</span><br><span class="line">8</span><br><span class="line">9</span><br><span class="line">10</span><br><span class="line">11</span><br><span class="line">12</span><br><span class="line">13</span><br><span class="line">14</span><br><span class="line">15</span><br><span class="line">16</span><br></pre></td><td class="code"><pre><span class="line"><span class="keyword">def</span> <span class="title function_">test_blueprint_for_high_value_order</span>():  </span><br><span class="line">    <span class="comment"># Arrange  </span></span><br><span class="line">    high_value_order = &#123;<span class="string">&#x27;amount&#x27;</span>: <span class="number">1500</span>, <span class="string">&#x27;customer_id&#x27;</span>: <span class="string">&#x27;vip-001&#x27;</span>&#125;  </span><br><span class="line">      </span><br><span class="line">    expected_blueprint = &#123;  </span><br><span class="line">        <span class="string">&#x27;A&#x27;</span>: <span class="built_in">set</span>(),  </span><br><span class="line">        <span class="string">&#x27;B&#x27;</span>: &#123;<span class="string">&#x27;A&#x27;</span>&#125;,  </span><br><span class="line">        <span class="string">&#x27;C&#x27;</span>: &#123;<span class="string">&#x27;B&#x27;</span>&#125;,  </span><br><span class="line">        <span class="string">&#x27;D&#x27;</span>: &#123;<span class="string">&#x27;C&#x27;</span>&#125;  </span><br><span class="line">    &#125;  </span><br><span class="line">      </span><br><span class="line">    <span class="comment"># Act  </span></span><br><span class="line">    actual_blueprint = create_workflow_blueprint(high_value_order)  </span><br><span class="line">      </span><br><span class="line">    <span class="comment"># Assert  </span></span><br><span class="line">    <span class="keyword">assert</span> actual_blueprint == expected_blueprint</span><br></pre></td></tr></table></figure><p>Compared to our initial test full of mock objects, this test is straightforward and easy to understand, and it’s also easier to maintain. That’s the power of abstraction.</p><p>Besides making the process easier to understand and tests easier to write, what other benefits does this kind of abstraction offer?</p><p>Of course it does, and plenty of them.</p><p>When we abstract each operation, all operations become equivalent to the <code>DAGRunner</code>. This allows us to add more functionality to the <code>DAGRunner</code>. For example, we can make each operation retry-capable. Without this abstraction layer, adding retry functionality would require modifying every sub-method individually.</p><p>Moreover, we can even implement rollback using the Command pattern. If you’re familiar with the Command pattern, you’ll notice that besides the required <code>execute</code> interface, we can also introduce a <code>redo</code> method. This allows <code>DAGRunner</code> to perform a sequential rollback after a Command fails.</p><p>Furthermore, we can introduce additional parallel processing. Let’s use the following DAG as an example.</p><p><img src="https://cdn-images-1.medium.com/max/800/1*D7MHu7huriH_BBP-kYjgTQ.png"></p><p>After task A completes, tasks B and C can run concurrently until both finish, at which point task D is processed. This mechanism can also be implemented within <code>DAGRunner</code>.</p><p>Since today’s article is already quite large, I can save these follow-up points for the next article if needed.</p><p>Let’s call it a day.</p><h3 id="A-message-from-our-Founder"><a href="#A-message-from-our-Founder" class="headerlink" title="A message from our Founder"></a>A message from our Founder</h3><p><strong>Hey,</strong> <a href="https://linkedin.com/in/sunilsandhu"><strong>Sunil</strong></a> <strong>here.</strong> I wanted to take a moment to thank you for reading until the end and for being a part of this community.</p><p>Did you know that our team run these publications as a volunteer effort to over 3.5m monthly readers? <strong>We don’t receive any funding, we do this to support the community. ❤️</strong></p><p>If you want to show some love, please take a moment to <strong>follow me on</strong> <a href="https://linkedin.com/in/sunilsandhu"><strong>LinkedIn</strong></a><strong>,</strong> <a href="https://tiktok.com/@messyfounder"><strong>TikTok</strong></a>, <a href="https://instagram.com/sunilsandhu"><strong>Instagram</strong></a>. You can also subscribe to our <a href="https://newsletter.plainenglish.io/"><strong>weekly newsletter</strong></a>.</p><p>And before you go, don’t forget to <strong>clap</strong> and <strong>follow</strong> the writer️!</p><blockquote><p>Originally published on <a href="https://medium.com/@lazypro/refactor-long-method-with-a-lightweight-dag-d5fda0ae2f04">Medium</a></p></blockquote>]]>
    </content>
    <id>https://wirelessr.github.io/Architecture/Refactor-Long-Method-with-a-Lightweight-DAG/20250928/</id>
    <link href="https://wirelessr.github.io/Architecture/Refactor-Long-Method-with-a-Lightweight-DAG/20250928/"/>
    <published>2025-09-28T16:18:03.000Z</published>
    <summary>
      <![CDATA[<h4 id="Tame-complex-workflows-and-simplify-testing-with-the-Command-design-pattern"><a]]>
    </summary>
    <title>Refactor Long Method with a Lightweight DAG</title>
    <updated>2025-09-28T16:18:03.000Z</updated>
  </entry>
  <entry>
    <author>
      <name>CT Wu</name>
    </author>
    <category term="Testing" scheme="https://wirelessr.github.io/categories/Testing/"/>
    <content>
      <![CDATA[<h3 id="Boost-Microservice-Testing-with-DNS-Hijack"><a href="#Boost-Microservice-Testing-with-DNS-Hijack" class="headerlink" title="Boost Microservice Testing with DNS Hijack"></a>Boost Microservice Testing with DNS Hijack</h3><h4 id="Use-DNS-spoofing-to-create-mock-services-for-easier-local-integration-tests"><a href="#Use-DNS-spoofing-to-create-mock-services-for-easier-local-integration-tests" class="headerlink" title="Use DNS spoofing to create mock services for easier local integration tests"></a>Use DNS spoofing to create mock services for easier local integration tests</h4><p><img src="https://cdn-images-1.medium.com/max/800/1*WF64EocB0XZdwP69aEugBQ.png"></p><p>When developing and testing microservices, we often encounter a common challenge, that is, the functionality of microservices heavily relies on external services. This makes it difficult to conduct functional testing in a closed environment or even a local environment.</p><p>Here is a classic example.</p><p><img src="https://cdn-images-1.medium.com/max/800/1*uK9V8bl-0uGQeF70tx9S7A.png"></p><p>This microservice has numerous dependencies, some being internal databases and others external web services. When doing integration testing, especially when running locally, we encounter a serious problem, most tests either fail or become difficult to execute.</p><p>There are several common challenging scenarios.</p><ol><li>HTTP requests time out because the external service is unavailable, causing subsequent calls to fail.</li><li>HTTP requests are processed correctly without timeouts, but return unexpected results, such as a 404 Not Found error.</li><li>HTTP requests are received by the corresponding service but cause side effects.</li></ol><p>This scenario makes development and testing extremely difficult. Without a real environment to validate the correctness of our own services, the entire correctness is constrained by those external dependencies.</p><p>Is there a solution?</p><p>Well, we can use DNS Hijack.</p><h3 id="DNS-Hijack"><a href="#DNS-Hijack" class="headerlink" title="DNS Hijack"></a>DNS Hijack</h3><p>DNS Hijack is a common cyberattack that redirects our network connections to unexpected destinations, potentially causing harm.</p><p>The most classic example occurs when using public Wi-Fi, where the DNS server is hijacked to a malicious DNS. When you visit specific websites, your connection is redirected to phishing sites. This leads you to unknowingly enter your credentials, resulting in credential leakage.</p><p>However, DNS Hijack can also be a highly useful tool, particularly during integration testing in development environments, where it significantly boosts development and testing efficiency.</p><p>Let’s continue using the example above to illustrate.</p><p><img src="https://cdn-images-1.medium.com/max/800/1*_ciaNQC_pGnM69z8deJx2w.png"></p><p>For the microservices we’re developing, it remains completely unaware. Everything proceeds as usual, continuing to request services A, B, and C. However, these services have actually been hijacked and redirected to a mock service.</p><p>This mock service is highly customizable, capable of consistently returning a 200 OK status or even generating different responses based on the service path and payload.</p><p>As a result, microservices can complete various integration tests without being interfered with or even noticing any changes.</p><h3 id="How-to"><a href="#How-to" class="headerlink" title="How-to"></a>How-to</h3><p>To implement this functionality, two core components are required. One is a DNS server capable of performing spoofing, and the other is a mock service that can handle various requests.</p><blockquote><p><em>I am not teaching you how to perform DNS hijacking. Please exercise caution when deciding where to use this.</em></p></blockquote><p>The final solution is available in this GitHub Repo.</p><p>Let’s quickly understand this project.</p><p>It has three <a href="https://github.com/wirelessr/dep-hijack-mock/blob/main/docker-compose.yml">components</a>.</p><ol><li>The <code>app</code> plays the role of the original service. It demonstrates a non-intrusive implementation, so the <code>app</code> can be replaced with any service.</li><li><code>dns-proxy</code> is the project’s core component. It redirects all “unknown” hosts to <code>mock-server</code>. The emphasis on “unknown” is crucial because, in microservice integration testing scenarios, we still need microservices to correctly access databases and other essential dependencies.</li><li><code>mock-server</code> is another core component. It responds with a 200 OK to “any” HTTP request. The emphasis on “any” means it can handle requests regardless of the port.</li></ol><p>The entire process is straightforward. The app first sends a hostname query to the DNS proxy to obtain the IP address. Since this is merely a proxy, the DNS proxy then queries the actual DNS server for the IP.</p><p>If the DNS server recognizes the hostname, it returns the real IP address; otherwise, the query fails. When the DNS proxy fails to obtain the IP, it returns the IP address of the mock server to the app.</p><p><img src="https://cdn-images-1.medium.com/max/800/1*5TNYmwh8ojr3Cn0NljrOJg.png"></p><p>Although it’s non-intrusive for the app, we did make a minor modification to it. However, this change is at the infrastructure layer, not at the code level.</p><p>The key to achieving DNS hijacking lies in manually specifying the app’s DNS server and configuring it as a DNS proxy. Details can be found in the <code>docker-compose.yml</code> file.</p><figure class="highlight yaml"><table><tr><td class="gutter"><pre><span class="line">1</span><br><span class="line">2</span><br><span class="line">3</span><br><span class="line">4</span><br><span class="line">5</span><br><span class="line">6</span><br><span class="line">7</span><br><span class="line">8</span><br></pre></td><td class="code"><pre><span class="line"><span class="attr">app:</span>  </span><br><span class="line">  <span class="attr">image:</span> <span class="string">nginx:alpine</span>  <span class="comment"># Placeholder - will be replaced with actual application image  </span></span><br><span class="line">  <span class="attr">container_name:</span> <span class="string">dns-hijack-app</span>  </span><br><span class="line">  <span class="attr">networks:</span>  </span><br><span class="line">    <span class="attr">dns-hijack-net:</span>  </span><br><span class="line">      <span class="attr">ipv4_address:</span> <span class="number">172.19</span><span class="number">.0</span><span class="number">.10</span>  </span><br><span class="line">  <span class="attr">dns:</span>  </span><br><span class="line">    <span class="bullet">-</span> <span class="number">172.19</span><span class="number">.0</span><span class="number">.20</span>  <span class="comment"># Use DNS proxy as primary DNS server</span></span><br></pre></td></tr></table></figure><p>When using public Wi-Fi, this DNS server is assigned by the DHCP server, which is precisely why public Wi-Fi poses such risks.</p><p>The process above details how a DNS proxy operates. Now let’s examine the mock server.</p><p>The mock server functions relatively simply, it’s essentially a basic HTTP server that always returns a 200 OK response. Despite this, its core functionality lies in the <a href="https://github.com/wirelessr/dep-hijack-mock/blob/main/mock-server/start-with-port-forwarding.sh">startup script</a>. Within this script, we use a series of <code>iptables</code> <code>nat</code> rules to redirect any destination port to port 8080, which the mock server is listening on.</p><p>This enables the mock server to handle any destination. In other words, when the application initiates requests to external services, whether <code>abc.test:1234</code> or <code>def.svc:5678</code>, they ultimately reach port 8080 on the mock server.</p><h3 id="Integration-Details"><a href="#Integration-Details" class="headerlink" title="Integration Details"></a>Integration Details</h3><p>Since we’re using a DNS proxy without overriding the original DNS server, the network access that was originally available to the app remains completely unaffected.</p><p>I tested numerous target combinations in my end-to-end tests, including hosts within the VPN (<code>internal-db.company.example</code>). If you run the e2e tests directly, they will likely fail. The primary reason is that if your network segment cannot access <code>internal-db.company.example</code>, requests will be redirected to the mock server, which is inconsistent with my test assertions.</p><p>Therefore, you can modify the e2e validation conditions to better align with your use case.</p><p>Additionally, while I mentioned in <a href="http://readme.md/">README.md</a> that swapping the app image allows testing any service, sometimes we already have a complex Docker Compose script where such changes are difficult. That’s okay, as there’s an even simpler approach.</p><p>Simply add <code>include</code> to the original microservice’s test script and manually configure <code>dns</code> and <code>networks</code>.</p><figure class="highlight plaintext"><table><tr><td class="gutter"><pre><span class="line">1</span><br><span class="line">2</span><br><span class="line">3</span><br><span class="line">4</span><br><span class="line">5</span><br><span class="line">6</span><br><span class="line">7</span><br><span class="line">8</span><br><span class="line">9</span><br><span class="line">10</span><br><span class="line">11</span><br></pre></td><td class="code"><pre><span class="line">include:  </span><br><span class="line">  - &lt;dep-hijack-mock folder&gt;/docker-compose.yml  </span><br><span class="line">  </span><br><span class="line">services:  </span><br><span class="line">  orig_svc:  </span><br><span class="line">    image: orig_image  </span><br><span class="line">    networks:  </span><br><span class="line">      dns-hijack-net:  </span><br><span class="line">        ipv4_address: 172.19.0.25  </span><br><span class="line">    dns:  </span><br><span class="line">      - 172.19.0.20</span><br></pre></td></tr></table></figure><p>If the service was originally running on a VM or physical machine, it’s straightforward, just edit <code>/etc/resolv.conf</code>. Essentially, you need to specify the DNS server to point to the DNS proxy.</p><h3 id="Wrap-Up"><a href="#Wrap-Up" class="headerlink" title="Wrap Up"></a>Wrap Up</h3><p>Although this article explains DNS Hijack, our use case is development and testing within our local environment. Within our controllable scope, redirecting DNS to our required mock server is the fastest and most effective approach.</p><p>In this project, it’s evident that the mock server I’m using currently has minimal functionality. It simply responds with a 200 OK to all requests. However, we can expand the mock server’s capabilities to better suit integration testing scenarios.</p><p>For example, when the app expects <code>/v1/user/info</code> to return JSON data containing a test user, we can configure the mock server to customize responses based on this path. This depends entirely on what we aim to validate in integration testing and which workflows we wish to replicate.</p><p>Any cyberattack is essentially a double-edged sword. On one hand, we need to understand its underlying principles to avoid being compromised. On the other hand, we can leverage its mechanisms to achieve remarkable results.</p><p>I hope this project brings some fresh insights.</p><h3 id="A-message-from-our-Founder"><a href="#A-message-from-our-Founder" class="headerlink" title="A message from our Founder"></a>A message from our Founder</h3><p><strong>Hey,</strong> <a href="https://linkedin.com/in/sunilsandhu"><strong>Sunil</strong></a> <strong>here.</strong> I wanted to take a moment to thank you for reading until the end and for being a part of this community.</p><p>Did you know that our team run these publications as a volunteer effort to over 3.5m monthly readers? <strong>We don’t receive any funding, we do this to support the community. ❤️</strong></p><p>If you want to show some love, please take a moment to <strong>follow me on</strong> <a href="https://linkedin.com/in/sunilsandhu"><strong>LinkedIn</strong></a><strong>,</strong> <a href="https://tiktok.com/@messyfounder"><strong>TikTok</strong></a>, <a href="https://instagram.com/sunilsandhu"><strong>Instagram</strong></a>. You can also subscribe to our <a href="https://newsletter.plainenglish.io/"><strong>weekly newsletter</strong></a>.</p><p>And before you go, don’t forget to <strong>clap</strong> and <strong>follow</strong> the writer️!</p><blockquote><p>Originally published on <a href="https://medium.com/@lazypro/boost-microservice-testing-with-dns-hijack-61d655748e92">Medium</a></p></blockquote>]]>
    </content>
    <id>https://wirelessr.github.io/Testing/Boost-Microservice-Testing-with-DNS-Hijack/20250914/</id>
    <link href="https://wirelessr.github.io/Testing/Boost-Microservice-Testing-with-DNS-Hijack/20250914/"/>
    <published>2025-09-14T16:43:55.000Z</published>
    <summary>
      <![CDATA[<h3 id="Boost-Microservice-Testing-with-DNS-Hijack"><a href="#Boost-Microservice-Testing-with-DNS-Hijack" class="headerlink" title="Boost]]>
    </summary>
    <title>Boost Microservice Testing with DNS Hijack</title>
    <updated>2025-09-14T16:43:55.000Z</updated>
  </entry>
  <entry>
    <author>
      <name>CT Wu</name>
    </author>
    <category term="AI" scheme="https://wirelessr.github.io/categories/AI/"/>
    <content>
      <![CDATA[<h3 id="Kiro-Workflow-for-Copilot-Claude-More"><a href="#Kiro-Workflow-for-Copilot-Claude-More" class="headerlink" title="Kiro Workflow for Copilot, Claude &amp; More"></a>Kiro Workflow for Copilot, Claude &amp; More</h3><h4 id="Implement-spec-driven-development-for-AI-agents-like-Copilot-Claude-and-more"><a href="#Implement-spec-driven-development-for-AI-agents-like-Copilot-Claude-and-more" class="headerlink" title="Implement spec-driven development for AI agents like Copilot, Claude, and more"></a>Implement spec-driven development for AI agents like Copilot, Claude, and more</h4><p><img src="https://cdn-images-1.medium.com/max/800/1*rUoga17Uf0eF6_BN8EyKEg.png"></p><p>Last week we introduced how an agent <a href="https://medium.com/stackademic/ai-agents-for-complex-codebase-analysis-eef748fe6dfd">understands a codebase</a> and built an actual <a href="https://github.com/wirelessr/codebase-analyzer-agent">codebase agent</a> to demonstrate the underlying mechanism.</p><p>During this process, we highlighted some current limitations of Kiro. For instance, even with a detailed <code>design.md</code> file, Kiro frequently deviates from the plan during execution, producing results that diverge significantly from the intended design.</p><p>The root cause lies in Kiro’s execution process, where it uses <code>design.md</code> as context but fails to fully read the entire file. This issue becomes particularly serious when steering content is extensive, as the agent tends to protect its context window. Consequently, it may only read the first few lines of a file and consider it fully processed.</p><p>This means when Kiro executes plans, we still need to constantly remind it to deviate from the design. Not only does this waste a lot of vibe request quotas, but it also lowers overall development efficiency. After all, we need to review every detail more carefully.</p><p>The problem is that Kiro is a closed-source product, so we can’t fine-tune its prompts. We’re left watching this cycle repeat over and over. So I wondered if there’s a way to use prompts to make tools like Copilot or Claude Code perform Kiro-like workflows while still allowing adjustment of each execution detail.</p><p>After actually trying it out, it turns out to work.</p><p>Although this project is written in Copilot’s format, it can be applied to any agent, including Claude Code. However, since I’m using Copilot, I’ll demonstrate using its actual workflow.</p><p>Installation is straightforward, simply place these prompt files in the project directory or a global prompts folder to use them directly in Copilot’s chat window.</p><p>All prompt files are thoroughly explained in the <code>README.md</code>. This article will focus on how to use them.</p><h3 id="Copilot-Spec-driven-Development"><a href="#Copilot-Spec-driven-Development" class="headerlink" title="Copilot Spec-driven Development"></a>Copilot Spec-driven Development</h3><p>At first, just like Kiro’s spec mode, we need to ask Copilot to create a spec directory and convert our requirements into an EARS specification document.</p><blockquote><p><code>/createSpec</code> <em>I want to build a web service with OAuth authentication, integrating Google OAuth and requiring a database to store user information.</em></p></blockquote><p>By running the <code>/createSpec</code> command with these requirements, the Agent begins preparing the <code>requirements.md</code> file. If there are materials under <code>.kiro/steering</code> that provide behavioral guidelines for the Agent, it will also reference those contents.</p><p>Throughout the requirements creation process, we can continuously interact with the Agent to refine the details of the entire requirements document.</p><p>Here’s an interesting observation, I’ve noticed Kiro tends to over-engineer things, adding some obsessive details. So I used system instructions to make our Agent more pragmatic like Linus Torvalds, adhering to the KISS (Keep It Simple, Stupid) principle.</p><p>Once we have the <code>requirements.md</code> file, we move on to the design phase.</p><blockquote><p><code>/design</code> <em>I approve the requirements document. Let’s begin the design phase.</em></p></blockquote><p>The design phase requires no prompting, as demonstrated by Kiro. We only need to approve <code>requirements.md</code>, after which the Agent will autonomously initiate the design process. Of course, the Agent will still reference steering documents for design guidance, and we can continue to fine-tune the process throughout.</p><p>Upon completing the design, the Agent will generate the corresponding <code>design.md</code> file, enabling us to proceed to the next step, the planning phase.</p><blockquote><p><code>/createTask</code> <em>I approve the design document. Let’s begin planning.</em></p></blockquote><p>Here, explicit approval is still required; otherwise, the Agent will not proceed.</p><p>After this phase is complete, we will have the three most critical specifications: <code>requirements.md</code>, <code>design.md</code>, and <code>tasks.md</code>. Interestingly, these outputs follow Kiro’s rules exactly. Therefore, switching back to Kiro to execute tasks from this stage is no problem at all.</p><p>After approving <code>tasks.md</code>, the final step is to enter the execution phase.</p><blockquote><p><code>/executeTask</code> <em>task1</em></p></blockquote><p>You can explicitly specify which task to start with, or omit the task number altogether. In that case, the Agent will attempt to begin with the first uncompleted task.</p><p>This workflow finishes once the entire <code>tasks.md</code> file is marked as complete. We can see this is basically identical to Kiro’s process.</p><h3 id="Wrap-Up"><a href="#Wrap-Up" class="headerlink" title="Wrap Up"></a>Wrap Up</h3><p>In these prompts, I explicitly state that all documents must be thoroughly reviewed before proceeding. However, the preceding steps don’t need to be so meticulous, as humans will collaborate with the Agent to co-create those specification documents.</p><p>However, <code>/executeTask</code> operates in headless execution mode, so we absolutely must ensure the Agent understands its purpose. Therefore, within the <code>executeTask</code> prompt, I not only require it to thoroughly review all files but also demand it summarize each one. Only by asking for summaries can we enforce sufficient rigor to ensure the Agent genuinely reads everything carefully.</p><p>This insight emerged during my implementation of the codebase agent. The greatest advantage of this workflow is that we can achieve results comparable to Kiro, or even better. Using tools we’re familiar with (and have paid for), we can customize prompts to meet specific needs. Just as I required the agent to thoroughly read files, there’s lots of room for adjustment, allowing us to fully unleash our creativity.</p><p>If you have any good ideas, feel free to contribute to my project. Currently, I’ve tailored the prompts based on my own habits and needs, but you might have even more insights to share.</p><blockquote><p>Originally published on <a href="https://medium.com/@lazypro/kiro-workflow-for-copilot-claude-more-5fce620ab52b">Medium</a></p></blockquote>]]>
    </content>
    <id>https://wirelessr.github.io/AI/Kiro-Workflow-for-Copilot-Claude-More/20250907/</id>
    <link href="https://wirelessr.github.io/AI/Kiro-Workflow-for-Copilot-Claude-More/20250907/"/>
    <published>2025-09-07T17:16:04.000Z</published>
    <summary>
      <![CDATA[<h3 id="Kiro-Workflow-for-Copilot-Claude-More"><a href="#Kiro-Workflow-for-Copilot-Claude-More" class="headerlink" title="Kiro Workflow for]]>
    </summary>
    <title>
      <![CDATA[Kiro Workflow for Copilot, Claude & More]]>
    </title>
    <updated>2025-09-07T17:16:04.000Z</updated>
  </entry>
  <entry>
    <author>
      <name>CT Wu</name>
    </author>
    <category term="AI" scheme="https://wirelessr.github.io/categories/AI/"/>
    <content>
      <![CDATA[<h3 id="AI-Agents-for-Complex-Codebase-Analysis"><a href="#AI-Agents-for-Complex-Codebase-Analysis" class="headerlink" title="AI Agents for Complex Codebase Analysis"></a>AI Agents for Complex Codebase Analysis</h3><h4 id="Discover-a-novel-dual-agent-method-for-accurate-and-deep-codebase-understanding"><a href="#Discover-a-novel-dual-agent-method-for-accurate-and-deep-codebase-understanding" class="headerlink" title="Discover a novel dual-agent method for accurate and deep codebase understanding"></a>Discover a novel dual-agent method for accurate and deep codebase understanding</h4><p><img src="https://cdn-images-1.medium.com/max/800/1*KH9mjV0vImltD_hrAEWqAw.png"></p><p>Vibe coding has become a major trend lately, with many KOLs claiming they can create and monetize products despite lacking programming skills. Well, I generally respect this approach, since vibe coding excels at greenfield projects, meaning building something from scratch.</p><p>As long as the project isn’t overly complex and the requirements are clear, mainstream LLM models can generate decent-quality applications.</p><p>However, the real challenge for vibe coding emerges with brownfield projects, where you don’t start from scratch. Instead, you must first establish foundational knowledge and then iterate upon that understanding. This is where vibe coding faces significant difficulties.</p><p>This challenge comes from many areas, but the core issue lies in how to comprehend the existing massive codebase.</p><p>Therefore, I conducted my own experiments to observe the thought processes of AI agents and attempted to understand their limitations. On one hand, gaining deeper insight into their operations enables more effective utilization. On the other hand, this exploratory journey itself can yield fresh insights.</p><p>I’ll try to describe the evolution of this project in a relatively straightforward way, which might also show you how those vibe coding tools work behind the scenes.</p><h3 id="The-first-step-and-the-most-crucial-one-is-recognition"><a href="#The-first-step-and-the-most-crucial-one-is-recognition" class="headerlink" title="The first step, and the most crucial one, is recognition."></a>The first step, and the most crucial one, is recognition.</h3><p>In order to let the agent understand the codebase, we first need to know a few things.</p><ol><li>Each LLM call is static, so the agent must be able to decide what to do next based on the results of the previous call.</li><li>As an LLM is a large language model, we must empower it to use tools — whether through the LLM’s built-in function tooling capabilities or by having the LLM generate plans executed by code.</li><li>Since understanding the codebase inevitably requires multiple LLM calls, we must establish strategies, such as where to start and what actions to take. The LLM must also recognize the need to prepare for subsequent rounds.</li><li>Multi-round interactions inherently require termination conditions. These conditions must strike a balance between sufficient generalization and maintaining domain expertise. Generalization prevents exhaustive scenario coverage, while expertise ensures reliable outcomes regardless of context.</li><li>Most importantly, the context window size is finite. We cannot overload it with excessive information at once.</li></ol><h3 id="Step-2-Establish-an-analyzer"><a href="#Step-2-Establish-an-analyzer" class="headerlink" title="Step 2: Establish an analyzer"></a>Step 2: Establish an analyzer</h3><p>With the above understanding, we can proceed to design this agent.</p><p>First, we need an analyzer capable of utilizing tools and sustaining multi-round conversations. Additionally, it must incorporate a self-assessment mechanism.</p><p><img src="https://cdn-images-1.medium.com/max/800/1*uT2s6tvr2Ti6eYvyPdesSw.png"></p><p>Thus, an agent capable of invoking tools and conducting multi-round conversations is complete.</p><p>But this raises a problem: when an agent reviews its own generated reports, might it fall into a state of self-satisfaction? Perhaps it finds the report perfectly satisfactory, yet others actually consider it worthless.</p><p>Yes, absolutely.</p><p>There are several key reasons.</p><ol><li>Simply teaching an agent to use tools is already difficult.</li><li>Beyond tool usage, teaching an agent to analyze strategies is even more challenging.</li><li>It also requires informing the agent of a reasonable stopping condition.</li></ol><p>From the above description, we can see that an agent is tasked with too many responsibilities, leaving it unable to ensure report quality. After all, the quality of a report depends on numerous factors, not merely reviewing the codebase once, but also systematically gathering and organizing the necessary information related to user queries.</p><p>Simply put, understanding user intent itself requires a dedicated professional to handle.</p><h3 id="Step-3-Establish-a-gatekeeper"><a href="#Step-3-Establish-a-gatekeeper" class="headerlink" title="Step 3: Establish a gatekeeper"></a>Step 3: Establish a gatekeeper</h3><p>Therefore, we need an external authority to oversee the quality of the entire output.</p><p>This authority doesn’t need to use tools or even look at the code. Their role is simply to act as a demanding and nitpicky senior engineer aka a specialist. They possess the expertise of a professional engineer, so they know what’s essential and what’s meaningless.</p><p>Through this specialist, we can validate the analyzer’s output, and the specialist will also guide the analyzer on how to proceed more effectively. In other words, the specialist must understand user intent and enrich user queries.</p><p>This dual-agent design offers significant scalability because both agents have a single, focused responsibility, resulting in a single, unified interface.</p><ul><li>Analyzer’s interface involves receiving a query and attempting to locate corresponding information across the entire codebase to fulfill that query.</li><li>Specialist’s interface involves receiving a query and a report, then defining the report’s value.</li></ul><p>Now, by simply combining these two agents, we can accomplish the challenging task of understanding the codebase.</p><h3 id="Project-Architecture"><a href="#Project-Architecture" class="headerlink" title="Project Architecture"></a>Project Architecture</h3><p>The entire project architecture consists of only three core components.</p><ul><li>Code Analyzer: This is the primary agent responsible for executing analysis tasks. It adeptly invokes various shell commands to accomplish its duties. Most importantly, it possesses the ability to continuously explore. It begins by establishing broad strategies and gradually drills down to the core of the problem, relying on its own iterative process.</li><li>Task Specialist: Where there’s somebody working, there must be somebody verifying. Specialist is responsible for validating the analyzer’s results. If the analysis quality is insufficient, it will be rejected and sent back for rework.</li><li>Agent Manager: This role coordinates the entire analyzer and specialist system. It guides the analyzer through its tasks and passes results to the specialist. However, it also enforces termination conditions to prevent the specialist from operating indefinitely.</li></ul><p>The entire architecture’s workflow is illustrated in the following flowchart.</p><p><img src="https://cdn-images-1.medium.com/max/800/1*gAKNso0945dR-paF14D-3w.png"></p><p>From this diagram, we can observe two distinct cycles.</p><p>The first is the analyzer’s self-iteration process. It initiates multiple rounds of conversations, with each subsequent round building upon the previous one to explore unknown areas. This continues until the analyzer’s self-checking mechanism determines the results meet the criteria. Since these criteria are not overly stringent, the analyzer operates autonomously.</p><p>The second review, however, is significantly more rigorous, as a specialist engineer examines the report’s quality in detail. If the report is poor, it gets sent back for rewriting, but the specialist will specify what additional content is needed.</p><p>This process ensures the final report is perfect. Right?</p><h3 id="Prompt-Engineering"><a href="#Prompt-Engineering" class="headerlink" title="Prompt Engineering"></a>Prompt Engineering</h3><p>All the concepts above are correct, and the workflow is fine. But even for such a single-purpose agent, I spent a lot of time tweaking their prompts to make them look like ordinary people.</p><p>Yes, ordinary people — far from professionals.</p><p>Let me break down the system prompts for this project to understand their respective requirements.</p><h3 id="Code-Analyzer-Prompts"><a href="#Code-Analyzer-Prompts" class="headerlink" title="Code Analyzer Prompts"></a>Code Analyzer Prompts</h3><p>The Analyzer prompt has several key points.</p><ol><li>Key findings: This is the core mechanism for multi-round self-iteration. Each round collaboratively maintains this knowledge base, ensuring the process stays on track throughout iteration.</li><li>Teach the analyzer the multi-round iteration process and how to pass information between rounds.</li><li>The iteration strategy should start with broad classification of project type and language, then identify corresponding classes, methods, and imports for each language.</li><li>Tool usage requires clear guidance: specify what tools are available, what tools are unavailable, and how to use them.</li><li>One crucial point I observed over time: explicitly instruct it on handling varying file sizes. For large files, implement chunk-based reading.</li><li>Finally, clearly define the expected output format and the desired results.</li></ol><p>Points 3 and 5 above are, in my opinion, the most easily overlooked details.</p><p>The third point involves enhancing the analyzer’s generic capabilities. It needs to be able to adapt while handling various languages, so we can only achieve this by providing fundamental principles as guidance. Here, we deliberately used more general terms instead of Python’s <code>def</code> or Node.js’s <code>function</code>.</p><p>The fifth point emerged during its iterative development, where I observed it frequently treating only the first few lines of a file as fully read. This is due to the LLM’s self-imposed limitations. Constrained by window size, the LLM subconsciously takes shortcuts.</p><p>When using Kiro, you might have noticed that even with <code>design.md</code>, it still occasionally makes mistakes. That’s because it doesn’t read the entire file. Other tools like Cursor or Copilot exhibit the same behavior.</p><p>Therefore, when prompting these vibe coding tools, I deliberately emphasize that they must read the entire file and summarize its key points afterward. This is the most effective way to prevent them from cutting corners.</p><h3 id="Task-Specialist-Prompts"><a href="#Task-Specialist-Prompts" class="headerlink" title="Task Specialist Prompts"></a>Task Specialist Prompts</h3><p>Compared to the analyzer, the specialist’s system prompt is much simpler, requiring only telling it the key points to review.</p><ol><li>Establish a strict persona for them, focused on details and resistant to persuasion.</li><li>At the same time, inform them of the content required in the report, including various details.</li><li>Provide examples to guide their judgment.</li></ol><p>Although the core concept is simple, teaching an LLM to refuse requests is truly challenging.</p><p>You may have noticed that most models tend to agree rather than disagree due to their training processes. Consequently, every LLM try to be agreeable, leading to many obviously poor-quality reports being allowed to pass.</p><p>Even though it only needs to focus on refusal, refusal is exactly the psychological barrier that is the hardest to overcome.</p><h3 id="Conclusion"><a href="#Conclusion" class="headerlink" title="Conclusion"></a>Conclusion</h3><p>The operational flow of this project has been thoroughly explained above. Through analyzing the entire architecture, I believe everyone can gain a deeper understanding of the underlying principles behind vibe coding. I believe most tools incorporate such a deep iterative process, though each offers distinct customizable prompts and tool sets.</p><p>After implementing this project, I finally understood why even a spec-driven development framework like Kiro still fails to solve the problem of agents ignoring designs. The underlying truth is surprisingly simple, and it boils down to the files not being read in their entirety.</p><p>I’ll include a sequence diagram for this project at the end of the article, offering another perspective on how agents comprehend the codebase.</p><p>Through this hands-on process, I refined a set of prompts capable of transforming any vibe coding tool into a spec-driven development like Kiro. Today’s story ran a bit long, so let’s continue next time with the series of prompts I distilled. I’ll show you how to enable Copilot to define requirements, design architectures, establish plans, and execute them step by step.</p><p>Let’s call it a day.</p><p><img src="https://cdn-images-1.medium.com/max/800/1*CGlS70UQ1Aep9tmUOcAVIA.png"></p><h3 id="A-message-from-our-Founder"><a href="#A-message-from-our-Founder" class="headerlink" title="A message from our Founder"></a>A message from our Founder</h3><p><strong>Hey,</strong> <a href="https://linkedin.com/in/sunilsandhu"><strong>Sunil</strong></a> <strong>here.</strong> I wanted to take a moment to thank you for reading until the end and for being a part of this community.</p><p>Did you know that our team run these publications as a volunteer effort to over 3.5m monthly readers? <strong>We don’t receive any funding, we do this to support the community. ❤️</strong></p><p>If you want to show some love, please take a moment to <strong>follow me on</strong> <a href="https://linkedin.com/in/sunilsandhu"><strong>LinkedIn</strong></a><strong>,</strong> <a href="https://tiktok.com/@messyfounder"><strong>TikTok</strong></a>, <a href="https://instagram.com/sunilsandhu"><strong>Instagram</strong></a>. You can also subscribe to our <a href="https://newsletter.plainenglish.io/"><strong>weekly newsletter</strong></a>.</p><p>And before you go, don’t forget to <strong>clap</strong> and <strong>follow</strong> the writer️!</p><blockquote><p>Originally published on <a href="https://medium.com/@lazypro/ai-agents-for-complex-codebase-analysis-eef748fe6dfd">Medium</a></p></blockquote>]]>
    </content>
    <id>https://wirelessr.github.io/AI/AI-Agents-for-Complex-Codebase-Analysis/20250831/</id>
    <link href="https://wirelessr.github.io/AI/AI-Agents-for-Complex-Codebase-Analysis/20250831/"/>
    <published>2025-08-31T17:11:07.000Z</published>
    <summary>
      <![CDATA[<h3 id="AI-Agents-for-Complex-Codebase-Analysis"><a href="#AI-Agents-for-Complex-Codebase-Analysis" class="headerlink" title="AI Agents for]]>
    </summary>
    <title>AI Agents for Complex Codebase Analysis</title>
    <updated>2025-08-31T17:11:07.000Z</updated>
  </entry>
</feed>